|
Creating Posters |
This topic describes the process of creating original posters without borders using templates provided with PosterArtist by changing photos and text.
In PosterArtist, you can create posters simply by completing tasks 1 to 4 one after another as follows.
Optional editing operations (1-14) are also available, as needed.
When deciding on a poster design, you can either select a template and edit it or design a poster from scratch.
Either method allows you to freely edit, substituting materials such as picture and clipart, or changing text and colors, to create posters with an original design.
Select a template from which to create your own posters.
A template can be selected from around 200 choices in categories such as office, food service, and schools.
1. Select the Select Template task.
2. In Category, select a template category.
Thumbnails of templates in the selected category appear.
3. Select a template from the thumbnails and double-click it.
(Otherwise, drag and drop the template to the poster.)
|
|
![]() For instructions on selecting templates, see "Selecting Templates."
For instructions on selecting templates, see "Selecting Templates."
PosterArtist's "Auto Design function" allows you to design posters automatically by simply entering titles and text, then selecting your favorite images. Original posters can be easily created even from scratch.
For details, see "Creating unique designs using the auto design function."
Specify a page size, paper type, etc. for printing.
This section describes the method of paper settings for borderless printing on roll paper.
1. Select the Paper Options task.
2. In Page Size, select a poster size.
3. In Poster Orientation, select ![]() (Portrait).
(Portrait).
4. In Printer, select a printer to use.
5. In Media Source, select Roll Paper.
6. In Media Type, select the paper type for printing.
In this example, paper that supports borderless printing is selected.
7. In Roll Paper Width, select the width for selected paper.
8. Place a checkmark for Borderless Printing.
9. Select Fit Long Side to Roll Width or Fit Short Side to Roll Width.
For posters in portrait orientation, select Fit Short Side to Roll Width. The poster is printed on the roll paper in this orientation.
|
|
|
|
![]() For details on paper settings, see "Specifying Size and Paper."
For details on paper settings, see "Specifying Size and Paper."
This section describes how to create your own posters with editing photos or text.
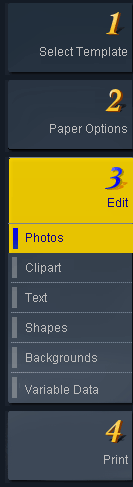
1. In the Edit task, select Photos.
The Photos settings panel is displayed.
2. On the poster, click the photo you want to replace.
3. Click the Photos tab.
4. In Category, select a photo category.
Thumbnails of photos in the selected category appear.
5. Select a photo from the thumbnails and double-click it.
The original photo is replaced with the new one.
|
1. In the Edit task, select Photos.
The Photos settings panel is displayed.
2. Click a photo you want to replace.
3. Click Add / Replace.
The file selection screen is displayed.
4. Select the photo you want to use and click Open.
The original photo is replaced with the new one.
|
![]() For details on inserting images, see "Inserting Images and Materials."
For details on inserting images, see "Inserting Images and Materials."
5. Repeat the steps to change or add photos to replace all photos.
1. In the Edit task, select Clipart.
The Clipart settings panel is displayed.
2. In Category, select a clipart category.
Thumbnails of clipart in the selected category appear.
3. Select a clipart item from the thumbnails and double-click it.
(Otherwise, drag and drop the clipart item to the poster.)
4. Resize and move the clipart as desired.
![]() To resize poster elements
To resize poster elements
Click a photo, clipart item, etc. on the poster to display it outlined in an orange. Eight resize handles (![]() ) are displayed on the outline.
) are displayed on the outline.
Drag the resize handle (![]() ) to resize the photo, clipart, etc.
) to resize the photo, clipart, etc.
![]() To move poster elements
To move poster elements
Point to a photo, clipart item, etc. to display the cursor as ![]() (Move pointer).
(Move pointer).
Drag ![]() (Move pointer) to move the photo, clipart item, etc.
(Move pointer) to move the photo, clipart item, etc.
![]() For details on editing clipart, see "Editing Clipart."
For details on editing clipart, see "Editing Clipart."
![]() Trim photos
Trim photos
1. In the Edit task, select Photos.
The Photos settings panel is displayed.
2. Click the photo you want to trim.
3. Click ![]() (Trim).
(Trim).
The Edit Image dialog box and preview panel are displayed.
4. Specify the area to trim away by adjusting the size and position of the brighter area.
5. Click Close.
The Edit Image dialog box and preview panel are closed.
Settings made in the preview panel are instantly applied to photos on the poster.
For more information, see "Trimming photos."
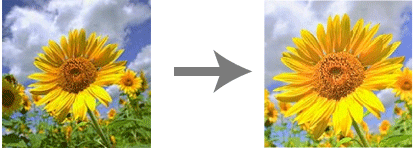
![]() Retouch images
Retouch images
1. In the Edit task, select Photos.
The Photos settings panel is displayed.
2. Click the photo you want to retouch.
3. Click ![]() (Retouch Image).
(Retouch Image).
The Retouch Image dialog box is displayed.
4. In the Retouch Image dialog box, select a retouching button to retouch the image as desired.
5. Click OK.
The Retouch Image dialog box is closed.
For more information, see "Retouching Images."
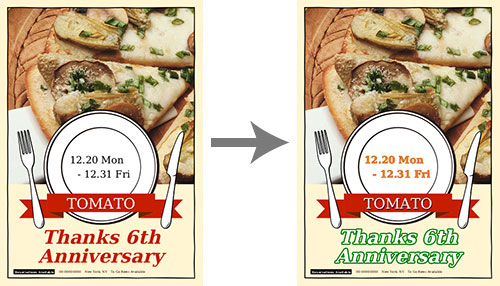
You can make photos appear as follows by retouching them or trimming away unneeded areas.
You can enhance photos with a matching effect, such as by adding steam or water droplets.
1. Make sure no photos on the poster are selected.
2. In the Edit task, click Photos.
The Photos settings panel is displayed.
3. Click the Photos tab.
4. In Category, select Image Effects: Steam.
Thumbnails of images in Image Effects: Steam appear.
5. Select an image of steam from the thumbnails and double-click it.
(Otherwise, drag and drop the image of steam to the poster.)
The selected image is inserted in the poster.
6. Drag the image over the photo and change it to a suitable size.
The steam effect is applied to the image.
![]() For details on editing photos, see "Editing Photos."
For details on editing photos, see "Editing Photos."
You can apply frames to photos. Frames are made up of lines or decorative graphics.
1. In the Edit task, select Photos.
The Photos settings panel is displayed.
2. Click the photo to which you want to apply a frame.
3. Click the Frames tab.
4. In Category, select a frame category.
Thumbnails of frames in the selected category appear.
5. Select a frame from the thumbnails and double-click it.
As shown in this example, you can apply a frame that makes the photo seem like a round cut out image with blurred edges.
![]() For details on editing photos, see "Editing Photos."
For details on editing photos, see "Editing Photos."
1. In the Edit task, select Text.
The Text settings panel is displayed.
2. Double-click the text that you want to edit.
A text editing box (framed in blue) is displayed.
3. Enter the new text in this editing box.
|
|
4. In Font, select the font.
5. In Font Size, resize the text.
6. In Text Color, change the text color.
1. In the Text settings panel, click 2. Drag on the poster from the upper-left corner to the lower-right corner of the area to insert text. A blue editing box is displayed there. 3. Enter the new text in this editing box. |
![]() For details on editing text, see "Editing Text."
For details on editing text, see "Editing Text."
1. In the Edit task, select Text.
The Text settings panel is displayed.
2. Click the text you want to outline.
3. In Text Effects, click ![]() (Fill and Stroke).
(Fill and Stroke).
The Fill and Stroke dialog box is displayed.
4. Complete the settings for the line color and style to use in outlining, as well as the text color.
For more information, see "Outlining text."
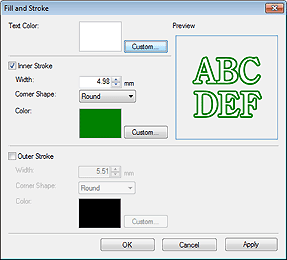
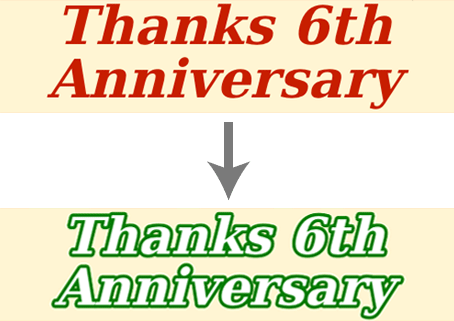
5. Click OK.
The Fill and Stroke dialog box is closed.
6. Click the text to which you want to apply a drop shadow.
7. In Text Effects, click ![]() (Set Shaded Text).
(Set Shaded Text).
The Set Shaded Text dialog box is displayed.
8. Specify the drop shadow color and opacity.
For more information, see "Specifying drop shadows for text."
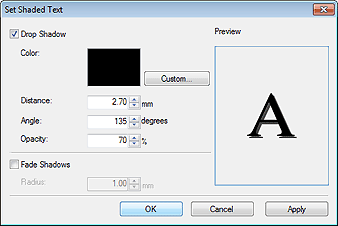
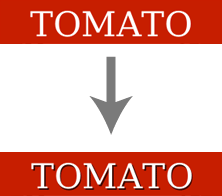
9. Click OK.
The Set Shaded Text dialog box is closed.
|
|
![]() For details on editing text, see "Editing Text."
For details on editing text, see "Editing Text."
Apply a variety of decorations to text by using text graphics.
1. In the Edit task, select Text.
The Text settings panel is displayed.
2. On the poster, click the text to which you want to apply a text graphic.
3. Click the Text Graphics tab.
4. In Category, select a text graphic category.
Thumbnails of text graphics in the selected category appear.
5. Select a text graphic from the thumbnails and double-click it.
The text graphic is applied, matching the width of the text box.
![]() For details on editing text, see "Editing Text."
For details on editing text, see "Editing Text."
Justify text to position the text uniformly across the width of the orange text box. All rows in justified text are as long as the longest row.
1. In the Edit task, select Text.
The Text settings panel is displayed.
2. Click the text you want to justify.
The text box is displayed.
3. Under Text Alignment, click ![]() (Justify).
(Justify).
All rows are adjusted to the same width, justifying the text.
![]() For details on editing text, see "Editing Text."
For details on editing text, see "Editing Text."
In PosterArtist, lines, circles, rectangles and other shapes can be added.
In this example, an arrow is added.
1. In the Edit task, select Shapes.
The Shapes settings panel is displayed.
2. Click ![]() (Line).
(Line).
![]() (Crosshair pointer) appears.
(Crosshair pointer) appears.
3. In the poster preview, drag ![]() (Crosshair pointer) to specify the size of arrow to add.
(Crosshair pointer) to specify the size of arrow to add.
A line appears in the specified size.
4. Change the line into an arrow in Start Point Shape or End Point Shape.
5. Added arrows can be resized or moved as desired. In addition, they can be aligned with other objects or rearranged. For details, see "Working with Objects."
![]() For details on arrows and other objects, see "Editing Shapes."
For details on arrows and other objects, see "Editing Shapes."
1. In the Edit task, select Backgrounds.
The Backgrounds settings panel is displayed.
2. In Category, select a background category.
Thumbnails of backgrounds in the selected category appear.
3. Select a background from the thumbnails and double-click it.
(Otherwise, drag and drop the background to the poster.)
The background design is updated.
4. In Background Color, select the color.
The background color is updated.
![]() For details on editing backgrounds, see "Editing Backgrounds."
For details on editing backgrounds, see "Editing Backgrounds."
After placing text, photos and other objects, adjust the size and position to arrange the layout.
1. Click multiple text boxes while holding down the Ctrl key or Shift key.
(Otherwise, drag across the text as if drawing a box around them.)
2. On the toolbar, click ![]() (Align and Distribute Objects Dialog).
(Align and Distribute Objects Dialog).
The Align and Distribute Objects dialog box is displayed.
3. Click ![]() (Center Horizontally on Page).
(Center Horizontally on Page).
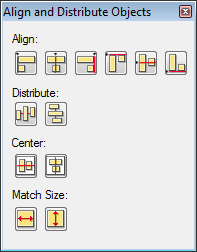
The selected text boxes are centered on the poster.
4. Click ![]() (Close).
(Close).
The Align and Distribute Objects dialog box is closed.
![]() For details on object alignment and resizing, see "Working with Objects."
For details on object alignment and resizing, see "Working with Objects."
Save the poster as follows.
1. In the File menu, select Save (or Save As).
The Save As dialog box is displayed.
2. Specify the destination.
3. In File name, enter the file name.
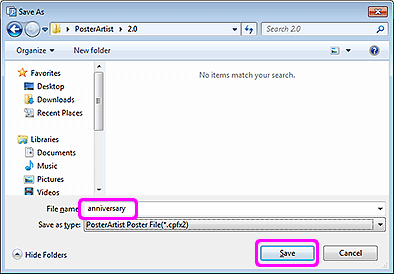
4. Click Save.
The Save As dialog box is closed.
The poster you created is saved as a file exclusively for use with PosterArtist, with a ".cpfx2" file extension.
|
|
![]() For details on saving posters, see "Saving."
For details on saving posters, see "Saving."
Print the created poster.
1. Select the Print task.
The Print settings panel is displayed.
|
|
2. Check print settings.
To change print settings, return to the Paper Options task and change settings as needed.
For details, see "Specifying Size and Paper."
3. In Print Quality, select the print quality.
4. In Matching Method, select a matching method.
|
|
5. In Copies, specify the printing quantity.
Enter the value directly or click  or
or  at right to increase or decrease the value.
6. Click Print.
Printing now begins.
![]() For details on printing, see "Printing Posters."
For details on printing, see "Printing Posters."
Use the design assist function to create an improved layout from an already created design.
1. On the toolbar, click ![]() (Design Assist Area Set Mode).
(Design Assist Area Set Mode).
Design Assist Area Set Mode is activated.
2. Drag the mouse to select the area in which you want to change the layout.
A selection box (framed in orange) is displayed around each object, and the objects are selected.
3. Click Generate Design displayed on the lower right of the selected area.
Designs are created automatically and their thumbnails are displayed. The number of designs created varies depending on the size of the selected area and the number of objects.
4. Select your favorite design and click OK.
The design is inserted in the poster.
Perform a design check.
1. On the toolbar, click ![]() (Design Check).
(Design Check).
The design is checked, and a warning symbol is displayed if there is a problem or if there is a high chance that the printing result will be unsatisfactory.
2. If a warning symbol is displayed, click it.
The reason for the warning and a preventive method for the problem are displayed.
3. On the toolbar, click ![]() (Design Check) again.
(Design Check) again.
The design check ends.
PosterArtist makes it easy to create posters with multilingual translations just by selecting the text you want to use from the provided samples and specifying language(s) to be used.
1. On the toolbar, click ![]() (Add Translation Template).
(Add Translation Template).
(Otherwise right-click a text box on the poster and select Add Translation Template.)
The Add Translation Template dialog box is displayed.
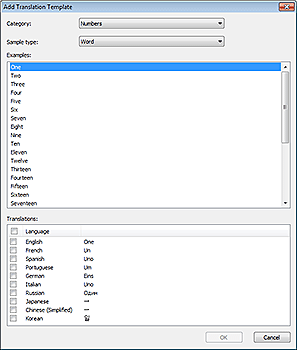
2. In Category, select a template category.
3. In Sample type, select a text type. Samples are displayed.
4. In the list, select a sample.
5. In Translations, place a checkmark for the language(s) to be used.
6. Click OK.
|
|
With variable print, particular text strings or images on your posters can be automatically updated from strings or images given or identified in a tabular data file before printing. Tabular data in Excel format and CSV format are supported. This feature makes it easy to produce a set of posters with different office names, telephone numbers, or maps, for example.
![]() For details on this function, see "Variable Printing."
For details on this function, see "Variable Printing."