| Freely Designing |
|
Creating unique designs using the auto design function Rearranging objects using the design assist function |
PosterArtist's "Auto Design function" allows you to design posters automatically by simply entering titles and text, then selecting favorite images. From designs created by the auto design function, select one that you like.
1. Select the Select Template task.
The Select Template settings panel is displayed.
2. Click Auto Design.
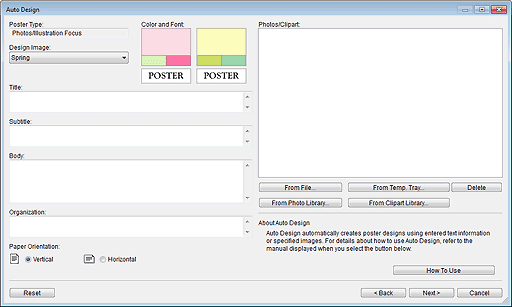
The Auto Design dialog box is displayed.
3. Select the type of design for the poster you want to create from Poster Type, and click Next.
The Auto Design dialog box is displayed.
|

4. In Design Image, select the design image for the poster you want to create.
|
5. In Title, enter a poster title (up to 60 characters).
6. In Subtitle, enter a subtitle (up to 60 characters).
7. In Body, enter text (up to 200 characters).
|
|
8. In Organization, enter the organization name (up to 60 characters).
9. In Paper Orientation, select the paper orientation.
10. Select images to insert in the poster.
Images can be added from those you have prepared or from photos/clipart in the library and temporary tray.
|
- Photos: Images in the photo library, photos in the temporary tray and image files with a .jpg, .tif, .bmp or .png extension. - Clipart: Images in the clipart library, clipart in temporary tray and image files with a .svg , .wmf or .emf extension.
|
![]() To select from images you have prepared
To select from images you have prepared
1) Click From File.
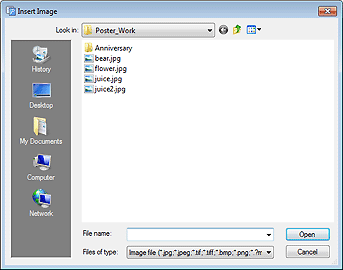
The Insert Image dialog box is displayed.

|
|
2) Specify the location of the image file you want to insert in the poster.
3) Select the image file you want to insert in the poster.
To select multiple files, hold down the Ctrl or Shift key as you click the thumbnails.
The selected images are displayed in the image list.
|
|
![]() To select photos or clipart from the temporary tray
To select photos or clipart from the temporary tray
1) Click From Temp. Tray.
The Show Images in the Temporary Tray dialog box is displayed.
2) Select the photo or clipart you want to insert in the poster.
To select multiple files, hold down the Ctrl or Shift key as you click the thumbnails.
The selected image is displayed in the image list.
![]() To select photos from the library
To select photos from the library
1) Click From Photo Library.
The View All Photos dialog box is displayed.
2) Select the photo you want to insert in the poster.
To select multiple files, hold down the Ctrl or Shift key as you click the thumbnails.
The selected photos are displayed in the image list.
![]() To select clipart from the library
To select clipart from the library
1) Click From Clipart Library.
The View All Clipart dialog box is displayed.
2) Select the clipart you want to insert in the poster.
To select multiple files, hold down the Ctrl or Shift key as you click the thumbnails.
The selected clipart is displayed in the image list.
|
|
11. Click Next.
Designs are created automatically then their thumbnails are displayed. The number of designs to be created varies depending on the number of selected images, paper orientation, and design image.
|
|
12. In Color Patterns, select your favorite color.
|
|
13. In Text Color, select your favorite text color.
14. Select your favorite design and click OK.
The design is inserted into the poster.
|
|
|
|
The design assist and quick exchange functions allow to produce even higher quality designs from a created design.
The "design assist function" automatically adjusts poster layouts, rearranging images and text in the selected area.
Use the design assist function to simply place images and text in any position and then select the area to create several layout patterns from which you can select your favorite.
1. On the toolbar, click ![]() (Design Assist Area Set Mode).
(Design Assist Area Set Mode).
Design Assist Area Set Mode is activated.
2. Drag the mouse to select the area in which you want to change the layout.
A selection box (framed in orange) is displayed around each object, and the objects are selected.
|
|
3. Click Generate Design displayed on the lower right of the selected area.
Designs are created automatically then their thumbnails are displayed. The number of designs created varies depending on the size of the selected area and the number of objects.
4. Select your favorite design and click OK.
The design is inserted into the poster.
|
|
|
|
The quick exchange function allows to easily change the position of objects. This function is useful when you want to create an improved poster design from a created design.
1. On the toolbar, click ![]() (Quick Exchange).
(Quick Exchange).
Quick Exchange mode is activated.
2. Select one or more objects.
A selection box (framed in orange) is displayed.
3. Move the pointer inside the selected box, and use the ![]() (hand) to drag the object over the position of the object you want to switch.
(hand) to drag the object over the position of the object you want to switch.
The objects are switched.
|
|
|
|
4. When you are finished switching objects, click ![]() (Quick Exchange) again on the tool bar.
(Quick Exchange) again on the tool bar.
Quick Exchange mode is canceled.
The design check function automatically checks the font, superimposed objects, etc. for the poster.
![]() For details, see Performing a design check.
For details, see Performing a design check.