| Inserting Images and Materials |
A full library of artwork is provided with PosterArtist, including photos, clipart, templates and other graphics. Your own artwork can be added to the library or posters. In PosterArtist, photos and clipart are referred to as "images."
PosterArtist supports image files in the following formats.
![]() JPEG
JPEG
![]() TIFF (without LZW compression)
TIFF (without LZW compression)
![]() BMP
BMP
![]() PNG
PNG
![]() SVG
SVG
![]() WMF/EMF
WMF/EMF
|
In PosterArtist, modifying an image does not alter the original image file. Only the image on the poster is changed.
However, if you retouch images, a copy is created internally, and that copy is adjusted.
In PosterArtist, various photos, clipart and templates are available. These materials are referred to as "library." Combine materials provided in the library as desired to create posters.
In addition to the materials provided in the library, insert images in posters directly from folders on your computer or from CD-ROMs as well as digital cameras or scanners connected to your computer.
![]() From the library
From the library
You can insert images and select templates from the library.
![]() From folders on your computer or from CD-ROMs
From folders on your computer or from CD-ROMs
Insert images from folders on your computer or CD-ROMs directly in your poster as desired.
![]() From scanners and other TWAIN devices
From scanners and other TWAIN devices
Using the control screen for scanners, digital cameras, and other TWAIN devices, you can acquire images and insert them directly in posters.
![]() From scanners using PosterArtist QuickCopy
From scanners using PosterArtist QuickCopy
You can insert scanned originals as images in posters using PosterArtist QuickCopy, an application for enlarged copies provided with the printer.
![]() From Digital Photo Front-Access
From Digital Photo Front-Access
Images scanned from Digital Photo Front-Access can be placed in temporary tray.
![]() From printing images produced by other applications
From printing images produced by other applications
You can insert printing image files in posters from originals created in Microsoft Word and other applications.
![]() By copying and pasting images from other applications
By copying and pasting images from other applications
Data (tables, graphs, etc.) created in Microsoft Word, Microsoft PowerPoint or Microsoft Excel can be inserted in posters.
Additionally, instead of selecting templates or inserting image files from folders on your computer for use in individual posters, you can import them to the library in PosterArtist to make it easier to reuse them.
For instructions on inserting images and selecting templates from the library for use in your posters, see "Selecting Templates," "Adding, changing, and removing photos" and "Adding, changing, and removing clipart."
1. In the Edit task, select Photos.
The Photos settings panel is displayed.
2. Click Add / Replace.
The Insert Image dialog box is displayed.
|
|
3. Navigate to where the file is saved.
4. Select the file to insert.
To select multiple files, hold down the Ctrl or Shift key as you click the thumbnails.
5. Click Open.
The Insert Image dialog box is closed and the image is arranged on the poster.
|
|
You can acquire images from scanners, digital cameras, and other TWAIN devices for insertion in posters.
|
|
1. Select Insert > Add / Replace Image > Read from (Device Name).
The control screen for the TWAIN device is displayed. Various control screens are displayed depending on the TWAIN device.
2. Follow the instructions on the control screen for the TWAIN device to acquire the image.
The acquired image is inserted on the poster.
|
|
Using the PosterArtist QuickCopy application, you can acquire documents or photos from a connected scanner to create posters from enlarged copies. PosterArtist QuickCopy is installed at the same time as PosterArtist.
Documents or photos acquired from scanners can be sent to PosterArtist by using PosterArtist QuickCopy.
Sent data is inserted in posters as a single image, and can be edited in the same way as other images.
For details on PosterArtist QuickCopy, see "Producing Enlarged Copies."
For instructions on sending scanned images to PosterArtist by using PosterArtist QuickCopy, see "Editing scanned images with PosterArtist."
Digital Photo Front-Access is an application that allows you to easily exchange images imported to your computers from Canon digital cameras, etc. with other applications.
Images scanned by Digital Photo Front-Access can be sent to PosterArtist.
1. In Digital Photo Front-Access, select an image.
2. In Digital Photo Front-Access, select the menu to start PosterArtist or drag and drop the image to the PosterArtist icon.
The selected image is placed in temporary tray.
Start PosterArtist if not running and then open temporary tray.
Send data from Word documents, PowerPoint presentations, or graphs in Excel spreadsheets to PosterArtist to insert them in posters as desired.
|
|
1. In the menu of an application such as Microsoft Word, select Print.
2. In the resulting dialog box, select a printer and then click Properties.
The printer driver Properties dialog box is displayed.
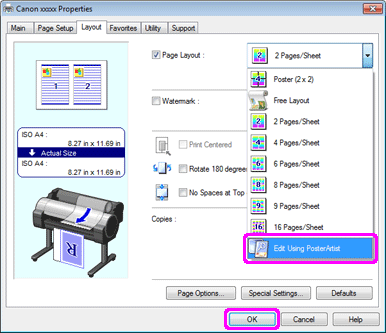
3. Click the Layout tab.
The Layout sheet is displayed.
4. On the Layout sheet, place a checkmark for Page Layout and in the list, click Edit Using PosterArtist.

5. In the Properties dialog box, click OK and then in the Print dialog box, click OK.
After a while, the Page Capture screen is displayed, showing thumbnails of the printing image.
|
6. Select the pages to send to PosterArtist.
To select multiple pages, hold down the Ctrl or Shift key as you click the thumbnails.
To select all pages, click Select All.
7. Click Load.
The printing image is sent to PosterArtist and inserted in the poster.
Copy data (tables, graphs, etc.) created in Microsoft Word, Microsoft PowerPoint or Microsoft Excel to the clipboard to paste into posters.
1. In applications such as Microsoft Word, right-click an object and select Copy.
(Otherwise, select an object, hold down the Ctrl key, and press the C key.)
The selected object is copied to the clipboard.
2. Right-click anywhere on the poster and select Paste.
(Otherwise, click anywhere on the poster, hold down the Ctrl key, and press the V key.)
The object is pasted from the clipboard onto the center of the displayed poster area.
Move the object as needed.
In PosterArtist, you can add QR codes. Adding QR codes allows you to convey information that cannot be conveyed by a poster alone and to convey a larger amount of information.
1. From the Insert menu, select Add / Replace Image - QR Code.
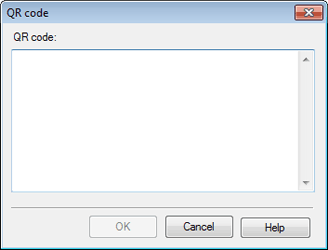
The QR code dialog box is displayed.

2. Enter text such as an email address or URL into QR code.
3. Click OK.
The QR code is added to the poster.
|
|