| Selecting Templates |
PosterArtist provides a spectrum of poster templates to support many business fields and operations, and new templates will be distributed in the future. The templates are categorized by different subjects, including office environments, food service and school. It's easy to find templates of the design that suits your particular needs.
Templates can be searched by poster orientation or the number of photos included. To find desired templates quickly, specify the search criteria.
Templates come complete with sample photos, text, backgrounds clipart, etc. Using templates as the basis for original posters, you can substitute your own photos and clipart, change text and colors, etc. to create posters of your own design easily.
You can work with templates in these ways.
![]() Add, change, delete and resize photos
Add, change, delete and resize photos
![]() Add, change and delete text and text graphics or resize them and change the colors
Add, change and delete text and text graphics or resize them and change the colors
![]() Add, change and delete shapes or resize them and change the colors
Add, change and delete shapes or resize them and change the colors
![]() Add, change and delete photo frames or change the colors
Add, change and delete photo frames or change the colors
![]() Add, change and delete clipart or resize them and change the colors
Add, change and delete clipart or resize them and change the colors
![]() Change backgrounds and margins
Change backgrounds and margins
You can also create completely original posters without using a template.
To create posters without using a template, use the auto design function. For details on the auto design function, see "Creating unique ,designs using the auto design function."
By registering these graphics in the PosterArtist library, you can develop new posters as desired using templates of your own design. For instructions on registering templates, see "Registering posters as templates in the library."
1. Select the Select Template task.
The Select Template settings panel is displayed.
2. In Category, select a template category.
Thumbnails of templates in the selected category appear.
|
|
3. Select a template from the thumbnails and double-click it.
(Otherwise, drag and drop the template to the poster.)
The template is arranged on the poster.
|
|
1. Select the Select Template task.
The Select Template settings panel is displayed.
2. Click View All Templates.
The View All Template dialog box is displayed.
3. In Category, select a template category.
Templates in the selected category appear.
|
|
4. Select the template you want to use and click OK.
The View All Template dialog box is closed, and the template is arranged on the poster.
|
|
Templates can be searched by poster orientation or the number of photos included.
1. Select the Select Template task.
The Select Template settings panel is displayed.
2. Click Find Template.
The Find Template dialog box is displayed.
3. To search by poster orientation, select Vertical or Horizontal in Orientation. To include all target templates, select Vertical and Horizontal.
4. To search by the number of photos included, select a number in No. of Photos. To include all target templates, select All.
|
|
5. Select the template you want to use and click OK.
The Find Template dialog box is closed, and the template is arranged on the poster.
|
|
To use a poster you have already created, follow these steps to open the poster file.
1. Select the Select Template task.
The Select Template settings panel is displayed.
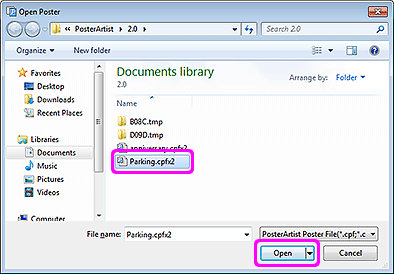
2. Click Open Poster.
The Open Poster dialog box is displayed.
|
|
3. Navigate to where the file is saved.

4. Select a file, and then click Open.
The Open Poster dialog box is closed, and the template is arranged on the poster display area.
Download templates from the Canon's web page.
1. Click Download Contents in the lower left.
The Canon's web page opens.
2. From the page, access the PosterArtist page and download a template file (.cpt file or .cptx file).
3. Import the downloaded file. For instructions on importing, see "Importing artwork".
The design check function automatically checks the font, superimposed objects, etc. for the created poster. A warning is displayed if there is a problem or if there is a high chance that the printing result will be unsatisfactory. Follow the message in the warning to correct and improve the poster.
|
|
1. On the toolbar, click ![]() (Design Check).
(Design Check).
The design is checked, and a warning symbol is displayed if there is a problem or if there is a high chance that the printing result will be unsatisfactory.
2. If a warning symbol is displayed, click it.
The reason of warning and a preventive method for the problem are displayed.
3. On the toolbar, click ![]() (Design Check) again.
(Design Check) again.
The design check ends.