| Managing Graphics |
|
|
Photos, clipart, templates, and other materials are collectively referred to as "artwork" in PosterArtist.
PosterArtist provides a wide range of artwork. This artwork is categorized and registered in PosterArtist's library of images when you install PosterArtist.
You can register posters you have created and images on your computer in the library as well. Registering artwork you commonly use makes it easier to use the artwork later when you are designing posters.
For instructions on registering artwork, see "Registering artwork in the library."
You can organize the library to enhance ease-of-use by labeling categories with names that are instantly recognizable and sorting artwork to list commonly used items first. You can also delete unneeded categories or reregister them as needed in consideration of your computer memory capacity.
For instructions on organizing artwork, see "Organizing artwork in the library."
Follow these steps to register the current poster as a template in the library.
1. In the File menu, select Add to Templates.
(Otherwise, click Add to Templates in the Select Template task.)
The Saving Artwork dialog box is displayed.
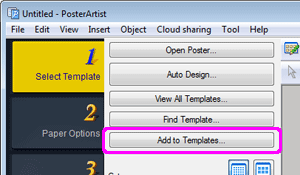
2. In Artwork type, select Templates.
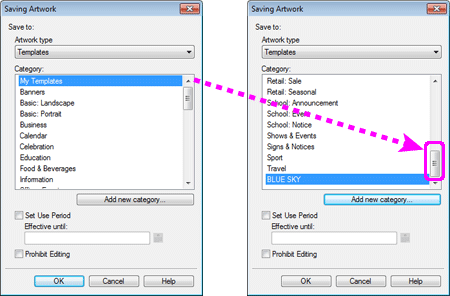
3. In Category, select a category to register the poster in.
To add a new category, click Add new category and enter the category name in the dialog box displayed. The category is added to the bottom of the list.
By default, My Templates is provided as the category exclusively for users.
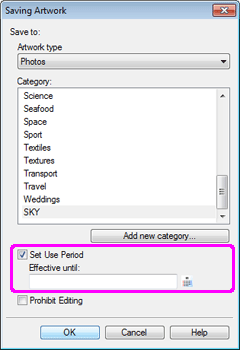
4. To set a time limit for the use of the poster as a template, place a checkmark for Set Use Period to set Effective until.
Click ![]() (Calendar) to display the Calendar dialog box. Select a date to set as a time limit and then click OK.
(Calendar) to display the Calendar dialog box. Select a date to set as a time limit and then click OK.
|
|
5. To protect the poster from editing, place a checkmark for Prohibit Editing.
|
|
6. Click OK.
The current poster is registered in the library.
The poster and the images used in it are saved in the folder specified in the Preferences dialog box.
|
Register photos, clipart, and other graphics in the library.
1. Right-click an image on the poster and select Add to Photos / Clipart.
The Saving Artwork dialog box is displayed.
|
|
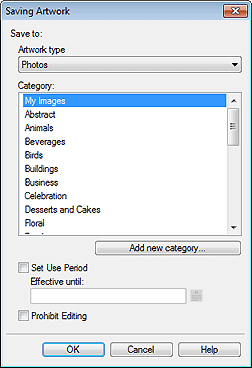
2. In Artwork type, select Photos or Clipart according to the image.
![]() For photos, select Photos or Clipart.
For photos, select Photos or Clipart.
![]() For clipart, shapes, text or QR code, select Clipart.
For clipart, shapes, text or QR code, select Clipart.
3. In Category, select a category to register the image in.
To add a new category, click Add new category and enter the category name in the dialog box displayed. The category is added to the bottom of the list.
By default, My Images and My Clipart are provided as the categories exclusively for users.

4. To set a time limit for the use of the image, place a checkmark for Set Use Period to set Effective until.
Click ![]() (Calendar) to display the Calendar dialog box. Select a date to set as a time limit and then click OK.
(Calendar) to display the Calendar dialog box. Select a date to set as a time limit and then click OK.
|
|
5. To protect the image from editing, place a checkmark for Prohibit Editing.
|
|
6. Click OK.
The image is now registered in the library.
|
Files created by exporting files with PosterArtist on other computers can be imported to PosterArtist on your computer. Imported files are registered in the category specified at the time of export and can be used in the same way as other artwork.
1. In the File menu, select Import.
The Import dialog box is displayed.
|
|
2. Navigate to where the file is saved.
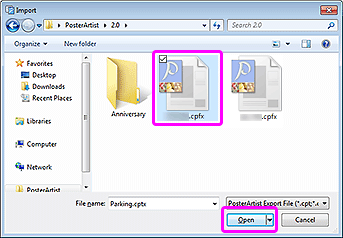
3. Select the file to import. In this example, select a cptx file.
To select multiple files, hold down the Ctrl or Shift key as you click the thumbnails.
4. Click Open.
The Import dialog box is closed, and the file exported from other computer is imported to the category specified at the time of export.
Import image files such as JPEG images to the library to use as photos or clipart.
1. In the File menu, select Import.
The Import dialog box is displayed.
|
2. Navigate to where the file is saved.
3. Select the file to import.
To select multiple files, hold down the Ctrl or Shift key as you click the thumbnails.
4. Click Open.
The Import dialog box is closed, and the Saving Artwork dialog box is displayed.
5. In Artwork type, select Photos or Clipart.
6. In Category, select a category to import the image to.
To add new categories, click Add new category and then enter a category name in the dialog box displayed. The new category is added to the bottom of the category list.
By default, My Images and My Clipart are provided as the categories exclusively for users.
7. To set a time limit for the use of the image, place a checkmark for Set Use Period to set Effective until.
Click ![]() (Calendar) to display the Calendar dialog box. Select a date to set as a time limit and then click OK.
(Calendar) to display the Calendar dialog box. Select a date to set as a time limit and then click OK.
|
|
8. To protect the image from editing, place a checkmark for Prohibit Editing.
|
|
9. Click OK.
The image is imported to the library.
Original artwork registered in the library can be saved (exported) as a single file (with a .cptx extension). An export file can include templates in the library, images used in templates as well as photos, clipart and backgrounds in the library. By importing exported artwork to the library on other computers, the created artwork can be shared and used effectively with other users.
|
|
1. Register created artwork in the library. For details on how to register artwork, see "Registering artwork in the library."
2. In the File menu, select Export.
The Export dialog box is displayed.
3. From tabs at the top of the screen, select the library containing artwork to export.
4. Select the artwork to export and click Add.
Multiple items can be selected.
To clear a selection, click the selected artwork.
The selected artwork is added in Item to be exported.
|
|
5. Click Next.
The Export to dialog box is displayed.
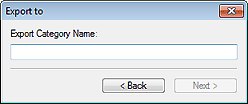
6. Enter a category name as the destination.
|
|
7. Click Next.
The Save As dialog box is displayed.
8. Specify the save location.
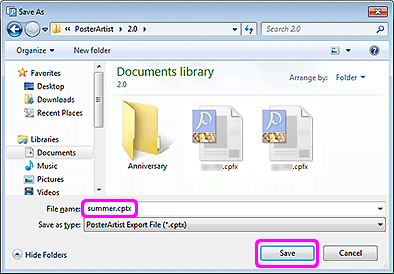
9. In File name, enter the file name.
10. Click Save.
The Save As dialog box is closed.
The artwork is saved as a PosterArtist export file, with a ".cptx" file extension.
For instructions on importing export files, see "Importing artwork."
|
|
|
|
You can make the categories easier to use by renaming them with labels as desired, or by selecting to display frequently used items first in the settings panel. You can also add or remove categories as needed.
1. On the toolbar, click ![]() (Artwork Manager Dialog).
(Artwork Manager Dialog).
The Artwork Manager dialog box is displayed.
The status of categories and artwork in the library is displayed.
2. From tabs at the top of the screen, select the library to organize.
Categories in the library are listed at left.
3. Organize the categories in the category list.
Categories labeled with ![]() are installed by default.
are installed by default.
Those without this icon are categories you have added.
|
|
![]() To add new categories
To add new categories
1) Click New category.
A new category is added to the list.
2) Enter a name for the category.
|
![]() To rename categories
To rename categories
1) Select a listed category and click Rename.
(Otherwise, right-click a category and select Rename.)
2) Enter a new name of your choice for the category.
![]() To change the order displayed in the Select Template or Photos settings panel
To change the order displayed in the Select Template or Photos settings panel
Drag a category in the list and drop to a new position to change the list order.
![]() To delete categories
To delete categories
1) Select a listed category and click Delete.
(Otherwise, right-click a category and select Delete.)
2) Click OK when a confirmation message is displayed.
|
4. Click OK.
The Artwork Manager dialog box is closed.
You can organize artwork so it's easier to use by sorting the display on the settings panel to list commonly used artwork first, changing where artwork is registered, and removing unneeded artwork.
1. On the toolbar, click ![]() (Artwork Manager Dialog).
(Artwork Manager Dialog).
The Artwork Manager dialog box is displayed.
The status of categories and artwork in the library is displayed.
2. From tabs at the top of the screen, select the library to organize.
Categories in the library are listed at left.
3. Click the category to organize artwork.
Artwork in the library is listed at right.
4. In the artwork list, organize the artwork.
Artwork labeled with ![]() is installed by default.
is installed by default.
Artwork without this icon was added by you.
To select all artwork in the list, click Select All.
Otherwise, you can clear the selection by clicking Clear All.
![]() To move artwork to another category
To move artwork to another category
1) Select the artwork.
To select, click the artwork. Multiple items can be selected.
To clear a selection, click the selected artwork.
2) Click Move.
The Move Artwork dialog box is displayed.
3) In Category, select the destination category and click OK.
The artwork is moved to the selected category.
![]() To change the order displayed in the Select Template or Photos settings panel
To change the order displayed in the Select Template or Photos settings panel
1) Select the artwork.
2) In the artwork list, drag an item and drop to the target location.
The order is changed.
![]() When copying artwork from one category to another
When copying artwork from one category to another
1) Select the artwork.
2) Click Copy at the bottom of the screen.
(Otherwise, right-click the artwork and select Copy. To move the artwork instead of copying it, select Cut instead of Copy.)
3) Select the category where you want to paste the copied artwork.
4) Click Paste in the lower-right corner of the screen.
(Otherwise, right-click and select Paste.)
|
![]() To remove artwork from a category
To remove artwork from a category
1) Select the artwork.
2) Click Delete at the bottom of the screen.
(Otherwise, right-click an item of artwork and select Delete.)
3) Click OK when the confirmation message is displayed.
|
|
5. Click OK.
The Artwork Manager dialog box is closed.
Even if you delete artwork from the library, you can reregister them.
1. On the toolbar, click ![]() (Artwork Manager Dialog).
(Artwork Manager Dialog).
The Artwork Manager dialog box is displayed.
2. In Category, click Deleted content.
Deleted artwork is listed on the right.
3. Select the artwork you want to restore, and click Restore.
The restored artwork is registered in the library.
You can bulk download unregistered artwork.
1. On the toolbar, click ![]() (Artwork Manager Dialog).
(Artwork Manager Dialog).
The Artwork Manager dialog box is displayed.
2. Click Download.
The downloaded artwork is registered in each content library.
Artwork can be freely added, removed, and sorted.
After setting up your desired artwork environment through these easy operations, you can create an artwork "installer file" that enables artwork to be used in the same state on other computers.
Simply execute the installer file on other computers and the artwork will be displayed in the same state as on the source computer.
1. In the Tool menu, select Artwork Snapshot.
The Artwork Snapshot dialog box is displayed.
2. Specify the save location.
To change the folder, click Browse and specify the save location.
3. Click Start Snapshot.
A file named "PASnapshot.exe" is saved in the specified location.
|
1. Make sure that the same version of PosterArtist is installed on both the source computer where the installer file was created and the one to which you want to apply the source computer's artwork environment.
2. On the target computer, double-click "PASnapshot.exe" created on the source computer.
The source computer's artwork environment is applied.
|

