 |
Producing Enlarged Copies |
PosterArtist QuickCopy is an application to print enlarged copies of photos and documents acquired from a scanner. It is a different application from PosterArtist and is installed when PosterArtist is installed.
Simply click the Copy button in PosterArtist QuickCopy to create posters from enlarged copies of originals in your scanner. It is as straightforward as printing copies on a copy machine. You can also edit the acquired image data in PosterArtist to use it as materials in posters.
This topic describes how to use PosterArtist QuickCopy to print enlarged copies of scanned photos or documents.
|
|
|
1. Turn on the scanner.
For scanner instructions, refer to the documentation provided with the scanner.
![]() To start PosterArtist QuickCopy, double-click the PosterArtist QuickCopy icon on the desktop or select start > Programs > Canon PosterArtist > PosterArtist QuickCopy.
To start PosterArtist QuickCopy, double-click the PosterArtist QuickCopy icon on the desktop or select start > Programs > Canon PosterArtist > PosterArtist QuickCopy.
PosterArtist shortcut icon |
|
PosterArtist QuickCopy shortcut icon |
|
![]() To exit PosterArtist QuickCopy, click
To exit PosterArtist QuickCopy, click ![]() (Close) in the upper-right corner of the screen.
(Close) in the upper-right corner of the screen.

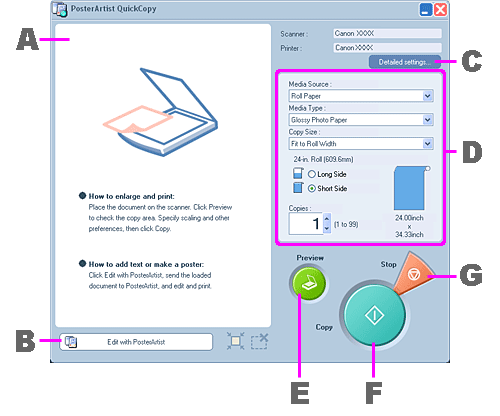
The following functions are available on the PosterArtist QuickCopy screen.
A. Preview area
The scanning area and scanned images are displayed in this outlined area. You can adjust the scanning area by dragging with the mouse.
B. Edit with PosterArtist
Send scanned images to PosterArtist, as desired.
C. Detailed settings
If necessary, you can switch to a different printer or scanner or specify image correction during scanning.
D. Print Settings
Specify the paper source, paper type and paper size for printing. Also, specify the number of copies to print.
E. Preview
Click this button to pre-scan the original to check the printing area in advance.
F. Copy
Scans and prints an enlarged copy of the original.
G. Stop
Cancels printing.
If you will use a different printer or scanner, or if you will specify whether or not to correct the scanned image, complete these settings before scanning. For more information, see "PosterArtist QuickCopy advanced settings."
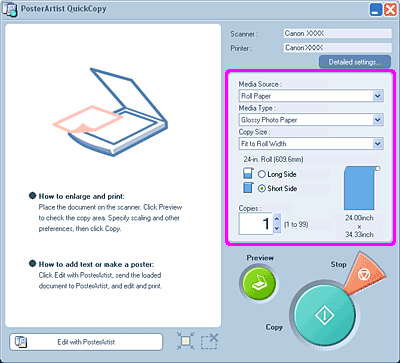
Specify the paper source, paper type and paper size for printing. Also, specify the number of copies to print.
1. In the Media Source list, select the paper source.
2. In the Media Type list, select the paper type for printing.
For borderless printing, select the paper that supports borderless printing.
3. In the Copy Size list, select the size for the enlarged copy.
Your scanned original will be enlarged automatically before printing to match the size you specify here. If you specify the same size as the paper for printing, the original will be enlarged to fill the paper before printing.
4. In Copies, specify the number of copies to print. Enter the value directly or click ![]() or
or ![]() at right to increase or decrease the value.
at right to increase or decrease the value.

|
In PosterArtist QuickCopy, simply click Copy to scan the original and print an enlarged version. If you prefer, you can pre-scan the original, check the area that will be printed, and adjust the settings as needed before actually printing the original.
Note that if you do not need to check the scanning area beforehand, pre-scanning is optional.
1. Load the original.
2. Click Preview.
The image is displayed in the preview area. The scanning area is automatically set based on the original. This scanning area is indicated by dashed lines.
3. To adjust the scanning area, follow these steps to change the setting.
![]() Resizing the scanning area
Resizing the scanning area
When pointing to the outline of the scanning area, either of transform cursors (![]() ,
, ![]() ,
, ![]() and
and ![]() ) are displayed. Drag the transform cursor to adjust the scanning area.
) are displayed. Drag the transform cursor to adjust the scanning area.
![]() Moving the scanning area
Moving the scanning area
Point inside the outlined scanning area. The move pointer (![]() ) is displayed. Use
) is displayed. Use ![]() to drag the outlined area. This will reposition the scanning area.
to drag the outlined area. This will reposition the scanning area.
In PosterArtist QuickCopy, simply click Copy to print an enlarged version of the original.
If you prefer not to pre-scan the original, click Copy to set the printing area automatically.
1. Click Copy.
Scanning will begin. After the original has been scanned, the poster is printed automatically.
For instructions on canceling printing, see "Canceling Printing."
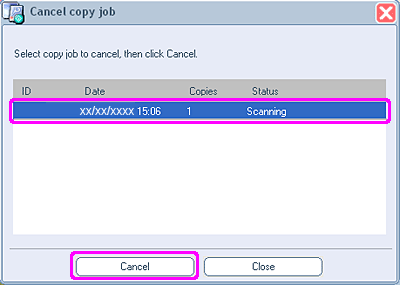
Cancels printing.
1) Click Stop.
2) Select the job and click Cancel.

|
If necessary, you can switch to a different printer or scanner or specify image correction during scanning.
1. Click Detailed settings.
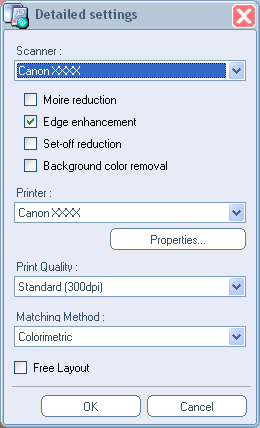
The Detailed settings dialog box is displayed.
2. Change the following settings as desired.

![]() Scanner
Scanner
The list shows scanners that support PosterArtist QuickCopy.
Select the scanner to use.
![]() Moire reduction
Moire reduction
Moire is image distortion (uneven, lighter areas or striped patterns) that may occur when scanning photos or pictures. Place a checkmark for Moire reduction to lessen this distortion.
![]() Edge enhancement
Edge enhancement
Place a checkmark for Edge enhancement to enhance the outline and increase sharpness.
|
|
![]() Set-off reduction
Set-off reduction
When the original is double-sided, images or text on the reverse side may be scanned. Place a checkmark for Set-off reduction to reduce this effect.
![]() Background color removal
Background color removal
When paper of the original is lightly colored with yellow, etc., place a checkmark for Background color removal to correct the base color and make it white.
|
|
![]() Printer
Printer
This list shows printers that support PosterArtist.
Select the printer to use.
![]() Properties
Properties
You can display the printer's Properties dialog box. Specify the printing conditions as desired. There is usually no need to change the printer Properties.
![]() Print Quality
Print Quality
Select the level of print quality.
The options displayed vary depending on the type of paper selected.
![]() Matching Method
Matching Method
Select the color-matching method.
- Auto
Print ensuring natural colors overall.
- Perceptual/Perceptual (Photo)
Color-matching for natural colors and gradations. Suitable for photos.
- Colorimetric
Emphasizes a close match between the original document and the document as printed.
- Saturation/Saturation (Poster)
Color-matching emphasizing vividness.
![]() Free Layout
Free Layout
Place a checkmark for Free Layout to activate the free layout function of the printer driver.
For details on the Properties dialog box, print quality, and the free layout function, see the manual of your printer.
3. Click OK.
The Detailed settings dialog box is closed.
Scanned images are transferred to PosterArtist. You can edit these images with PosterArtist by arranging them, adding text, and so on to create a poster.
|
1. Click Preview and determine the scanning area.
2. Click Edit with PosterArtist.
Scanning will begin.
After the document has been scanned, PosterArtist is started automatically and the image is transferred. The image is arranged on the poster.
3. Add images and text as desired to create your poster.
For instructions on creating posters, see "Creating Posters."