| Editing Photos |
|
Adding, changing, and removing photos Edit Image dialog box and preview panel Applying a gradation to photos |
This section describes how to add photos from the library to your poster.
For instructions on adding photos to the poster from folders on your computer or from a scanner, see "Inserting Images and Materials."
1. In the Edit task, select Photos.
The Photos settings panel is displayed.
2. Click the Photos tab.
3. In Category, select a photo category.
Thumbnails of photos in the selected category appear.
4. Select a photo from the thumbnails and double-click it.
(Otherwise, drag and drop the selected photo to the poster or right-click and select Insert to Poster.)
The selected photo is added to the poster.
5. Resize or rotate the photos you added or change the positions as desired. You can also align them with other objects or reorder them within a group of objects. For more information, see "Working with Objects."
Place photos you are not sure whether to use or frequently used photos in temporary tray to use them immediately when needed.
This section describes how to add photos to temporary tray and how to add photos in the tray to posters.
![]() Adding photos to temporary tray from thumbnails
Adding photos to temporary tray from thumbnails
1. In the Edit task, select Photos.
The Photos settings panel is displayed.
2. Click the Photos tab.
3. In Category, select a photo category.
Thumbnails of photos in the selected category appear.
4. Select a photo from the thumbnails and then drag and drop it to the temporary tray.
The selected photo is added to the tray.
![]() Adding photos to temporary tray from the View All Photos dialog box
Adding photos to temporary tray from the View All Photos dialog box
1. In the Edit task, select Photos.
The Photos settings panel is displayed.
2. Click the Photos tab.
3. Click ![]() (View All Photos).
(View All Photos).
The View All Photos dialog box is displayed.
4. In Category, select a photo category.
Thumbnails of photos in the selected category appear.
5. Select a photo from the thumbnails and click Add to Temporary Tray.
The selected photo is added to the tray.
|
1. Select a photo in temporary tray and then drag and drop it to the poster.
The selected photo is added to the poster.
|
This section describes how to replace a photo on your poster with another photo from the library.
For instructions on replacing photos with other photos from folders on your computer or from a scanner, see "Inserting Images and Materials."
1. In the Edit task, select Photos.
The Photos settings panel is displayed.
2. On the poster, click the photo you want to replace.
3. Click the Photos tab.
4. In Category, select a photo category.
5. Select a photo from the thumbnails and double-click it.
The original photo is replaced with the new one.
|
1. Right-click a photo on the poster and select Delete.
(Otherwise, click the photo and press the Delete key.)
The photo is removed from the poster.
|
|
In PosterArtist, you can edit photos in the following ways.
![]() Trimming
Trimming
Trim away unneeded portions.
|
|
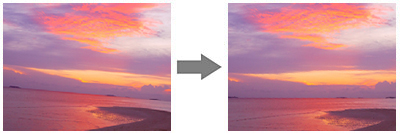
![]() Specifying a gradation
Specifying a gradation
Apply a gradation to photos as desired.
![]() Specifying transparency
Specifying transparency
Make the entire photo translucent.
![]() Correcting slant
Correcting slant
Correct slant of photos.
![]() Retouching images
Retouching images
Correct colors to make photos more realistic.
For details on retouching images, see "Retouching Images."
Use the Edit Image dialog box and preview panel to trim photos, apply gradations, correct slant or adjust transparency. For more information, see "Edit Image dialog box and preview panel."
In PosterArtist, image effects are available for your photos, such as converting them to monochrome or sepia photos, trimming away unneeded areas in the background, and other effects. For details on image effects, see "Monochrome," "Sepia" and "Cut out" respectively.
1. In the Edit task, select Photos.
The Photos settings panel is displayed.
2. Select a photo on the poster and click either of the following buttons.
|
|
(Trim) |
Trim photos or correct the slant. |
|
|
(Gradation) |
Apply a gradation or transparency to photos. |
The Edit Image dialog box and preview panel are displayed.
![]() Preview panel
Preview panel
Specify the extent of trimming or gradation on this screen.
![]() Edit Image dialog box
Edit Image dialog box
Select the area to trim, specify opacity or slant correction or apply gradation settings on this screen.
Settings you change in the Edit Image dialog box and preview panel are instantly applied to photos on the poster.
Check the poster appearance in the Edit Image dialog box and preview panel as you edit photos.
1. In the Edit task, select Photos.
The Photos settings panel is displayed.
2. On the poster, click the photo you want to trim.
3. Click ![]() (Trim).
(Trim).
The Edit Image dialog box and preview panel are displayed, and then ![]() (Crosshair pointer) is displayed.
(Crosshair pointer) is displayed.
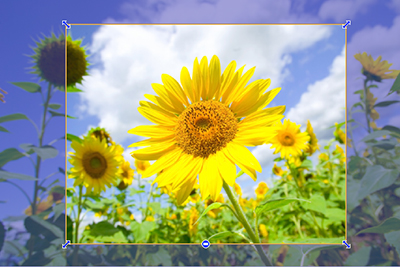
4. After you drag ![]() (Crosshair pointer)across the area to trim, it is outlined in orange. The portion inside this frame will be retained, and the portion outside will be hidden.
(Crosshair pointer)across the area to trim, it is outlined in orange. The portion inside this frame will be retained, and the portion outside will be hidden.
5. To resize the orange frame for the trimming area, drag the resize handles (![]() ) in the corners.
) in the corners.
6. If you point inside the outlined portion, ![]() (Move pointer) is displayed. You can move the orange frame for the trimming area as desired by dragging
(Move pointer) is displayed. You can move the orange frame for the trimming area as desired by dragging ![]() .
.
|
|
|
|
1. In the Edit Image dialog box, click Reset Trim.
Trimming is canceled.
1. In the Edit task, select Photos.
The Photos settings panel is displayed.
2. On the poster, click the photo to which you want to apply a gradation.
3. Click ![]() (Gradation).
(Gradation).
The Edit Image dialog box and preview panel are displayed.
4. Select Gradation.
5. To select the direction of the gradation, click any of these buttons under Gradation.
|
|
Colors fade from left to right. |
|
|
|
Colors fade from the upper left to the lower right. |
|
|
|
Colors fade from the upper right to the lower left. |
|
|
|
Colors fade from top to bottom. |
|
Midpoints are available for gradation.
Gradations can be more variable by using midpoints.
This section describes how to apply a gradation with or without midpoints.
![]() Applying a gradation with midpoints
Applying a gradation with midpoints
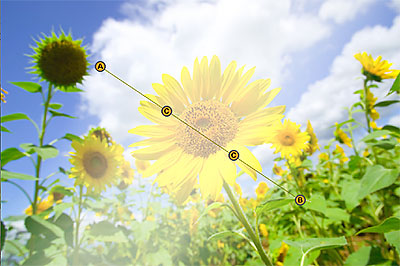
6. In Number of Points in Gradation, select Three Points.
In the preview, midpoints (C1 and C2) are displayed on the line connecting the starting point (A) and ending point (B). Point C Opacity is ready for setting.
7. Specify the gradation level for Point A Opacity, Point B Opacity and Point C Opacity.
Enter the value directly or click  or
or  at right to increase or decrease the value.
![]() Increase the value to make images more opaque.
Increase the value to make images more opaque.
![]() Decrease the value to make images more transparent.
Decrease the value to make images more transparent.
8. Drag the starting point (A), ending point (B) and midpoints (C1 and C2) in the preview to specify the direction of the gradation.
|
|
![]() Applying a gradation without midpoints
Applying a gradation without midpoints
6. In Number of Points in Gradation, select Two Points.
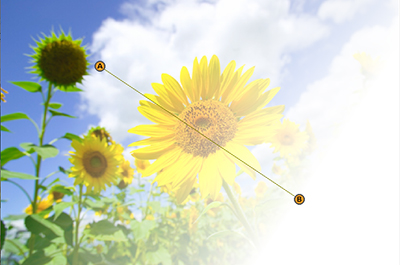
In the preview, the starting point (A) and ending point (B) are displayed.
7. Specify the gradation level between Point A Opacity and Point B Opacity.
Enter the numeric value directly or click or at right to increase or decrease the value.
![]() Increase the value to make images more opaque.
Increase the value to make images more opaque.
![]() Decrease the value to make images more transparent.
Decrease the value to make images more transparent.
8. Drag the starting point (A) and ending point (B) in the preview to specify the direction of the gradation.

1. Click the selected Gradation Orientation again.
The gradation is removed.
1. In the Edit task, select Photos.
The Photos settings panel is displayed.
2. On the poster, click the photo to which you want to apply transparency.
3. Click ![]() (Gradation).
(Gradation).
The Edit Image dialog box and preview panel are displayed.
4. Click ![]() (Set Opacity to Background).
(Set Opacity to Background).
5. In Opacity, specify the extent of transparency for the photo. Enter the value directly or click or at right to increase or decrease the value.
![]() Increase the value to make images more opaque.
Increase the value to make images more opaque.

![]() Decrease the value to make images more transparent.
Decrease the value to make images more transparent.

1. In the Edit task, select Photos.
The Photos settings panel is displayed.
2. On the poster, click the photo for which you want to correct slant.
3. Click ![]() (Trim).
(Trim).
The Edit Image dialog box and preview panel are displayed.
4. Click ![]() .
.
![]() (Slant Correction pointer) is displayed.
(Slant Correction pointer) is displayed.
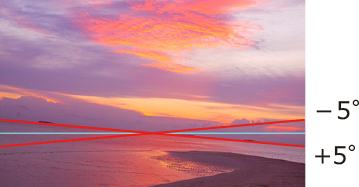
Three slant correction methods, Auto, Manual and Specify Angle are available.
The following describes how to correct slant by using each method.
![]() To correct slant automatically
To correct slant automatically
5. In Slant Correction Method, select Auto.
6. Using ![]() (Slant Correction pointer), click the line (horizon, pillar, etc.) you want to make horizontal or vertical. When the line is detected correctly, a green line is displayed.
(Slant Correction pointer), click the line (horizon, pillar, etc.) you want to make horizontal or vertical. When the line is detected correctly, a green line is displayed.
Slant is corrected so that the selected line is horizontal or vertical.
|
![]() To correct slant manually
To correct slant manually
5. In Slant Correction Method, select Manual.
6. Drag the image in the preview panel to adjust slant.
![]() To correct slant by specifying an angle
To correct slant by specifying an angle
5. In Slant Correction Method, select Specify Angle.
6. In Offset Angle, enter the value between -45.0 and 45.0 or click or at right to increase or decrease the value.
|
1. Click Reset Slant Correction.
Slant correction is canceled.
1. In the Edit task, select Photos.
The Photos settings panel is displayed.
2. On the poster, click the photo to which you want to apply frames.
3. Click the Frames tab.
4. In Category, select a frame category.
Thumbnails of frames in the selected category appear.
5. Select a frame from the thumbnails and double-click it.
The frame is resized to match the photo size and applied.
|
1. In the Edit task, select Photos.
The Photos settings panel is displayed.
2. On the poster, click the photo with a frame.
3. Click the Frames tab.
4. In Category, select No Frame.
5. Select a frame from the thumbnails and double-click it.
The photo frame is removed.
1. In the Edit task, select Photos.
The Photos settings panel is displayed.
2. On the poster, click the photo with a frame.
3. Click the Frames tab.
4. In Frame Color, the current frame color and basic colors are displayed. To use one of the basic colors, click the corresponding button. To use other colors, click Custom and select a color from the Color dialog box.
|