| Retouching Images |
In PosterArtist, you can retouch photos. Apply effects to create a particular mood in photos, adjust the colors, and use other retouching features to enhance your posters.
![]() Auto color correction
Auto color correction
Automatically retouch image color levels.
![]() Color adjustment
Color adjustment
Manually retouch image color levels.
![]() Color point correction
Color point correction
Adjust the brightness based on the brightest point in the image (white point), the point of intermediate brightness (gray point), or the darkest point (black point).
![]() Backlight correction
Backlight correction
Correct backlight scenes in which the subject is too dark or the background is too light.
![]() Sharpness
Sharpness
Sharpen image edges.
![]() Soft focus
Soft focus
Blur images to create a softer effect.
![]() Monochrome
Monochrome
Convert images to monochrome.
![]() Sepia
Sepia
Convert images to sepia.
![]() Logo color adjustment
Logo color adjustment
Adjust a portion of the logo image colors.
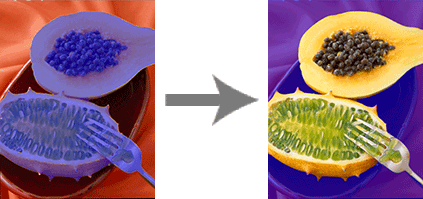
![]() Cut out
Cut out
Isolate a portion of images by cutting the rest away. You can cut out images in any shape, unlike trimming.
The following images can be retouched in PosterArtist.
-Images in the photo library
(However, images with transparent backgrounds cannot be retouched.)
-Images you have added to the poster
(Uncompressed TIFF, JPEG or BMP images with the long side measuring 7200 pixels or less and the aspect ratio equal to or less than 64:1.)
|
|
1. In the Edit task, select Photos.
The Photos settings panel is displayed.
2. On the poster, click the photo you want to retouch.
3. Click ![]() (Retouch Image).
(Retouch Image).
The Retouch Image dialog box is displayed.
In the Retouch Image dialog box, the current image is displayed.
4. Click the button of the type of image retouching desired.
Some image retouching is done automatically, and some must be done manually.
![]() Images are retouched instantly if you click the following buttons.
Images are retouched instantly if you click the following buttons.
- Sepia
![]() A dialog box is displayed if you click the following buttons.
A dialog box is displayed if you click the following buttons.
- Cut out
The image is retouched after you specify how to adjust it. The finished image (after retouching) is displayed in the Retouch Image dialog box.
5. Click OK.
The Retouch Image dialog box is closed and your changes are confirmed.
|
|
Select this option for automatic retouching of image color levels.
1. In the Edit task, select Photos.
The Photos settings panel is displayed.
2. On the poster, click the photo you want to retouch.
3. Click ![]() (Retouch Image).
(Retouch Image).
The Retouch Image dialog box is displayed.
4. Click Auto Color Correction.
The colors are automatically retouched.
|
|
Select this option to adjust image color levels manually.
1. In the Edit task, select Photos.
The Photos settings panel is displayed.
2. On the poster, click the photo you want to retouch.
3. Click ![]() (Retouch Image).
(Retouch Image).
The Retouch Image dialog box is displayed.
4. Click Color Adjustment.
The Color Adjustment dialog box is displayed.
Under Original Image, the original image is displayed and under Touched Up Image, the retouched image is displayed.
5. Adjust the Quality and Color Settings as you check the image.
![]() Quality
Quality
Specify the desired image brightness, contrast, and saturation by adjusting the sliders under Brightness, Contrast, and Saturation. Move the sliders left and right in a range of -100 to 100. You can also enter a value directly.
![]() Color Settings
Color Settings
Adjust the image color intensity in Increase Red/Increase Cyan, Increase Green/Increase Magenta, and Increase Blue/Increase Yellow. Move the sliders left and right in a range of -100 to 100. You can also enter a value directly.
|
|
6. Click OK.
The Color Adjustment dialog box is closed and your changes are confirmed.
Adjust the brightness based on the brightest point in the image (white point), the point of intermediate brightness (gray point), or the darkest point (black point).
1. In the Edit task, select Photos.
The Photos settings panel is displayed.
2. On the poster, click the photo you want to retouch.
3. Click ![]() (Retouch Image).
(Retouch Image).
The Retouch Image dialog box is displayed.
4. Click Color Point Correction.
The Color Point Correction dialog box is displayed.
Under Original Image, the original image is displayed and under Touched Up Image, the retouched image is displayed.
5. Adjust the brightness using White Point, Gray Point and Black Point as you check the image.
![]() White Point, Gray Point, and Black Point
White Point, Gray Point, and Black Point
Click a button, and on the image under Original Image, click a point of the color of the clicked button. For example, after clicking White Point, click a point on the image that you want to be treated as white. The image brightness is adjusted based on where you click.
![]() Auto
Auto
This option produces the same results as Auto Color Correction.
|
|
6. Click OK.
The Color Point Correction dialog box is closed and your changes are confirmed.
Correct backlight scenes in which the subject is too dark or the background is too light.
1. In the Edit task, select Photos.
The Photos settings panel is displayed.
2. On the poster, click the photo you want to retouch.
3. Click ![]() (Retouch Image).
(Retouch Image).
The Retouch Image dialog box is displayed.
4. Click Backlight Correction.
The Backlight Correction dialog box is displayed.
Under Original Image, the original image is displayed and under Touched Up Image, the retouched image is displayed.
5. Move the Level slider to the left or right to adjust the level between -100 and 100 as you check the image. You can also enter a value directly.
![]() Backlight
Backlight
Move the slider toward Backlight to brighten areas that are dark.
![]() Over
Over
Move the slider toward Over to darken areas that appear overexposed.
![]() Auto Adjust For Faces
Auto Adjust For Faces
If the photo includes people, you can also click Auto Adjust For Faces for automatic adjustment.
|
|
6. Click OK.
The Backlight Correction dialog box is closed and your changes are confirmed.
This effect sharpens image edges.
1. In the Edit task, select Photos.
The Photos settings panel is displayed.
2. On the poster, click the photo you want to retouch.
3. Click ![]() (Retouch Image).
(Retouch Image).
The Retouch Image dialog box is displayed.
4. Click Sharpness.
The Sharpness dialog box is displayed.
Under Original Image, the original image is displayed and under Touched Up Image, the retouched image is displayed.
5. Move the Level slider to the left or right to adjust the level of sharpness between 0 and 100 as you check the image. You can also enter a value directly.
|
|
6. Click OK.
The Sharpness dialog box is closed and your changes are confirmed.
This effect blurs images to create a softer effect.
1. In the Edit task, select Photos.
The Photos settings panel is displayed.
2. On the poster, click the photo you want to retouch.
3. Click ![]() (Retouch Image).
(Retouch Image).
The Retouch Image dialog box is displayed.
4. Click Soft Focus.
The Soft Focus dialog box is displayed.
Under Original Image, the original image is displayed, and under Touched Up Image, the retouched image is displayed.
5. Move the Level slider to the left or right to adjust the level of blurring between 0 and 100 as you check the image. You can also enter a value directly.
|
|
6. Click OK.
The Soft Focus dialog box is closed and your changes are confirmed.
This effect converts images to monochrome.
1. In the Edit task, select Photos.
The Photos settings panel is displayed.
2. On the poster, click the photo you want to retouch.
3. Click ![]() (Retouch Image).
(Retouch Image).
The Retouch Image dialog box is displayed.
4. Click Monochrome.
The image is converted to monochrome.
This effect converts images to sepia.
1. In the Edit task, select Photos.
The Photos settings panel is displayed.
2. On the poster, click the photo you want to retouch.
3. Click ![]() (Retouch Image).
(Retouch Image).
The Retouch Image dialog box is displayed.
4. Click Sepia.
The image is converted to sepia.
This effect adjusts a portion of the logo image colors.
1. In the Edit task, select Photos.
The Photos settings panel is displayed.
2. On the poster, click the photo you want to retouch.
3. Click ![]() (Retouch Image).
(Retouch Image).
The Retouch Image dialog box is displayed.
4. Click Logo Color Adjustment.
The Logo Color Adjustment dialog box is displayed.
Under Color Table, colors used in the logo are displayed. Under Original Image, the original image is displayed and under Touched Up Image, the retouched image is displayed.
5. Under Color Table or Original Image, click the color you want to adjust.
6. Adjust the levels in Color Settings, Hue, Saturation, and Luminance as you check the image in Touched Up Image.
![]() Color Settings
Color Settings
Adjust the color intensity of the image. Move the sliders left and right in the range of -100 to 100. You can also enter a value directly.
![]() Hue, Saturation, and Luminance
Hue, Saturation, and Luminance
Specify the desired hue (contrast), saturation, and brightness by adjusting the Hue, Saturation, and Luminance sliders. Move the sliders left and right in the range of -100 to 100. You can also enter a value directly.
|
|
7. Click OK.
The Logo Color Adjustment dialog box is closed and the image is adjusted.
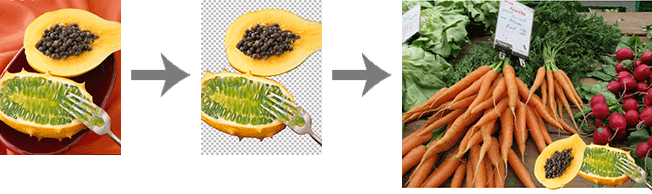
By trimming photos, you can isolate the desired portion of photos and trim away unneeded areas in the background.
Use the Cut Out dialog box to cut out images.
In the Cut Out dialog box, two tabs are available.
![]() Auto tab
Auto tab
PosterArtist automatically cuts out images after detecting colors of the background and colors of the image to retain.
![]() Manual tab
Manual tab
If you are not satisfied with the results of cutting out images automatically using the Auto tab, try using tools on the Manual tab. Attractive cut out images can be created by using tools on the Manual tab to specify exactly which area to retain and what area to erase.
The following functions are available in the settings panel at right. The following functions are the same on the Auto tab and Manual tab.
![]()
![]() (Zoom In) and
(Zoom In) and ![]() (Zoom Out)
(Zoom Out)
Enlarges and reduces the display magnification. Also, the magnification can be specified in ![]() .
.
![]() Reset
Reset
Cancels the cut out effect.
![]() Undo / Redo
Undo / Redo
For undoing or redoing the previous action.
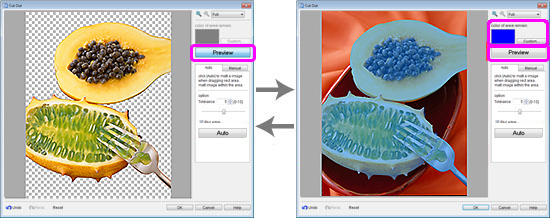
![]() Preview button
Preview button
Switch the button off and on to view a preview of the image. To view the original image before trimming, clear the Preview button to hide the preview.
![]() color of area remain
color of area remain
When the original image is displayed (that is, when the preview is off), the shaded area represents the image that will be cut out. To change the color of shading for the original image, click Custom and in the Color dialog box, select another color.
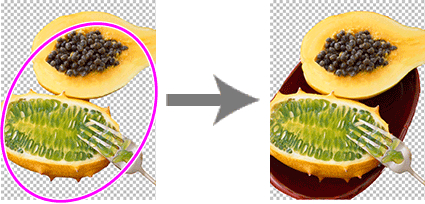
This topic describes how to cut out images using both the Auto and Manual tabs of the Cut Out dialog box. Depending on what you cut out, sometimes results from the Auto tab are sufficiently attractive.
1. In the Edit task, select Photos.
The Photos settings panel is displayed.
2. On the poster, click the photo you want to retouch.
3. Click ![]() (Cut out).
(Cut out).
The Cut Out dialog box is displayed.
4. Click the Auto tab.
5. Click Auto.
Otherwise, move the mouse pointer over the image to display a crosshair cursor, and drag the cursor around the area to retain.
The background is automatically erased.
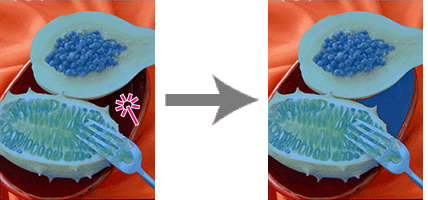
Place a checkmark for Blur edge to blur the edges of cut out portions.
6. To adjust the extent of the area to retain, change the value in Tolerance and click Auto again.
Drag the slider left or right to change the tolerance level, or enter a value directly.
![]() Select a smaller value to erase a larger area (because fewer colors are judged similar).
Select a smaller value to erase a larger area (because fewer colors are judged similar).
![]() Select a larger value to retain a larger area (because more colors are judged similar).
Select a larger value to retain a larger area (because more colors are judged similar).
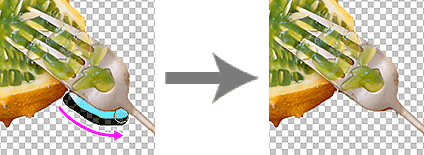
7. To view the original image before trimming, clear the Preview button to hide the preview. The area shaded in the color of color of area remain (indicated in blue in the following figure) will be cut out. You can adjust the settings as you compare the original image to a preview of the cut out image by switching the Preview on and off.
8. Repeat steps 6 and 7 to specify the area to retain, and then click OK.
The Cut Out dialog box is closed and the image is cut out.
If automatic trimming is unsatisfactory - if unneeded portions remain in the cut out image, or if too much is erased - try using the tools on the Manual tab.
9. Click the Manual tab.
10. Use the cut out tools to specify the area to retain and the area to erase in great detail.
For instructions on the cut out tools, see "Using the cut out tools."
|
11. Click OK.
The Cut Out dialog box is closed and the image is cut out.
|
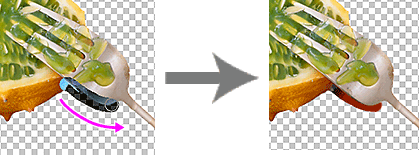
On the Manual tab, specify the area to cut out in great detail by using the following cut out tools.
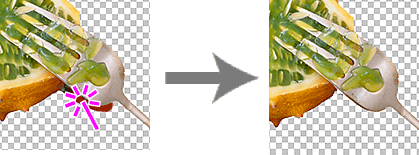
![]() (Specify by color and cut)
(Specify by color and cut)
The area in the color you specify is retained.
Click one point on the image. The area made up of colors similar to the color of the clicked point is retained.
|
![]() (Specify by area and cut)
(Specify by area and cut)
The area you outline freehand or by drawing a polygon is retained.
In the Mode list, you can select how you will select the area.
- Freehand
Draw a line around the area to retain freehand.
- Shape
Draw a polygon around the area to retain.
Drag on the image to outline the area to retain. When outlining the area by drawing a polygon, click to specify the vertices of the polygon, and double-click when you have finished drawing.
![]() (Specify by line and cut)
(Specify by line and cut)
The area you trace freehand or by drawing a polyline is retained.
In the Mode list, you can select how to draw the line.
- Brush
Trace freehand.
- Line
Trace using a polyline.
Drag on the image to trace the area to retain. When tracing by drawing a polyline, click to specify the vertices of the polyline, and double-click when you have finished drawing.
|
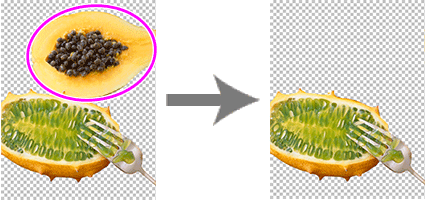
![]() Erasing shaded areas specified by color
Erasing shaded areas specified by color
![]() (Specify by color and clear)
(Specify by color and clear)
The area in the color you specify is erased.
Click one point on the image. The area made up of colors similar to the color of the clicked point is erased.
|
![]() (Specify by area and clear)
(Specify by area and clear)
The area you outline freehand or by drawing a polygon is erased.
In the Mode list, you can select how you will select the area.
- Freehand
Draw a line around the area to erase freehand.
- Shape
Draw a polygon around the area to erase.
Drag on the image to outline the area to erase. When outlining the area by drawing a polygon, click to specify the vertices of the polygon, and double-click when you have finished drawing.
![]() (Specify by line and clear)
(Specify by line and clear)
The area you trace freehand or by drawing a polyline is erased.
In the Mode list, you can select how to draw the line.
- Brush
Trace freehand to erase.
- Line
Erase by tracing a polyline.
Drag on the image to trace the area to erase. When tracing by drawing a polyline, click to specify the vertices of the polyline, and double-click when you have finished drawing.
|