| Working with Objects |
1. Click an object.
A selection box (framed in orange) is displayed around the object, and the object is selected.
|
|
1. Click multiple objects while holding down the Ctrl key or Shift key.
(Otherwise, drag across the objects as if drawing a box around them.)
A selection box (framed in orange) is displayed around each object, and the objects are selected.
1. Select one or more objects, right-click, and select Cut.
(Otherwise, select an object, hold down the Ctrl key, and press the X key.)
The selected object is copied to the clipboard and deleted from the poster.
1. Select one or more objects, right-click, and select Copy.
(Otherwise, select an object, hold down the Ctrl key, and press the C key.)
The selected object is copied to the clipboard.
|
|
1. Right-click anywhere on the poster and select Paste.
(Otherwise, hold down the Ctrl key and press the V key.)
The object is pasted from the clipboard onto the center of the poster.
2. Move the object as needed.
1. Select one or more objects.
A selection box (framed in orange) is displayed.
2. Point inside the selection box. The cursor is displayed as ![]() (Move pointer). Drag with this pointer to move the object.
(Move pointer). Drag with this pointer to move the object.
|
|
Selection boxes (framed in orange) can be used in the following two modes:
|
Resize mode |
In this mode, images can be resized. |
|
|
Rotate mode |
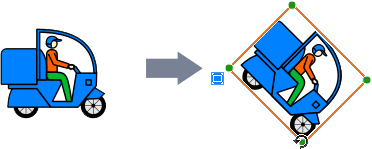
In this mode, images can be rotated. |
|
1. Select one or more objects.
A selection box (framed in orange) is displayed.
2. Point at a ![]() (Resize handle) on the selection box. The pointer is displayed as
(Resize handle) on the selection box. The pointer is displayed as ![]() ,
, ![]() ,
, ![]() , or
, or ![]() . (If the object is a line or arrow, a crosshair pointer is displayed.) Drag the pointer to resize the object.
. (If the object is a line or arrow, a crosshair pointer is displayed.) Drag the pointer to resize the object.
|
|
The pointer is displayed this way if you point to the corners of the outlined area.
|
|
|
The pointer is displayed this way if you point to the sides of the outlined area.
|
|
|
To resize an object without changing its center point, hold down the Ctrl key as you drag the pointer.
|
|
|
To resize an object without changing its aspect ratio, hold down the Shift key as you drag the pointer.
|
|
|
To resize an object without changing its aspect ratio and center point, hold down the Ctrl and Shift key as you drag the pointer.
|
|
Crosshair pointer |
A crosshair pointer is displayed if you point to either end of a line or arrow.
|
|
Crosshair pointer |
To extend or retract both ends of the line or arrow at once, hold down the Ctrl key as you drag the
|
|
Crosshair pointer |
To extend or retract the line or arrow while maintaining its orientation, hold down the Shift key as you drag the
|
|
Crosshair pointer |
To extend or retract a line or arrow without changing its center point and orientation, hold down the Ctrl and Shift key as you drag the
|
|
|
You can rotate objects in three ways, as follows.
![]() Rotate objects freely by using the mouse
Rotate objects freely by using the mouse
![]() Rotate objects 90 degrees in either direction
Rotate objects 90 degrees in either direction
![]() Inverting objects
Inverting objects
To specify the rotation angle numerically, see "Specifying the size, position, or orientation of objects numerically."
1. Select one or more objects.
A selection box (framed in orange) is displayed.
2. Click ![]() to switch the selection box to rotate mode.
to switch the selection box to rotate mode.
3. Drag when the handle is displayed as a ![]() (Rotate handle) to rotate the object.
(Rotate handle) to rotate the object.

1. Select one or more objects.
A selection box (framed in orange) is displayed.
2. On the toolbar, click either of the following buttons to select the rotation direction.
(Otherwise, right-click and in Rotate or Flip, select either of the following menus.)
|
|
(Rotate Left 90 degrees) |
Rotates objects 90 degrees to the left (counter-clockwise).
|
|
|
(Rotate Right 90 degrees) |
Rotates objects 90 degrees to the right (clockwise).
|
You can invert objects vertically or horizontally.
1. Select one or more objects.
A selection box (framed in orange) is displayed.
2. On the toolbar, click either of the following buttons to select the direction of inversion.
(Otherwise, right-click and in Rotate or Flip, select either of the following menus.)
|
|
(Flip Vertical) |
Inverts images so that the top portion is on the bottom and vice versa.
|
|
|
(Flip Horizontal) |
Inverts images so that the left side is on the right and vice versa.
|
Specify the size, position, or angle of orientation of objects by entering a value.
This example explains how to resize, reposition, or reorient objects other than lines or arrows by entering values. For instructions for lines and arrows, see "Specifying the size, position, or orientation of lines numerically."
1. Select one or more objects.
A selection box (framed in orange) is displayed.
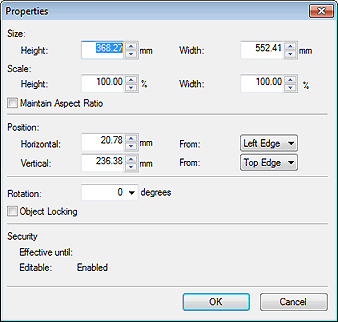
2. Right-click the selected object and select Size and Position or Properties.
The Properties dialog box is displayed.
3. Enter a value to specify the size, position, or orientation of the object.

![]() To maintain the aspect ratio during enlargement or reduction
To maintain the aspect ratio during enlargement or reduction
1) Place a checkmark for Maintain Aspect Ratio.
2) In Height (or Width) under Size, specify the object height (or width).
Otherwise, in Height (or Width) under Scale, specify the scale for the current height (or width).
Enter the value directly or click ![]() or
or ![]() at right to increase or decrease the value.
at right to increase or decrease the value.
![]() When changing the aspect ratio
When changing the aspect ratio
1) Remove the checkmark from Maintain Aspect Ratio.
2) In Height and Width under Size, specify the object height and width.
Otherwise, in Height and Width under Scale, specify the scale for the current height and width.
Enter the value directly or click ![]() or
or ![]() at right to increase or decrease the value.
at right to increase or decrease the value.
|
|
![]() Moving objects horizontally
Moving objects horizontally
Specify the new object position relative to the left or right edge of the page.
1) In From, select the criterion (Left Edge or Right Edge) to specify the object position.
2) In Horizontal, specify the distance from the reference position. Enter the value directly or click ![]() or
or ![]() at right to increase or decrease the value.
at right to increase or decrease the value.
![]() Moving objects vertically
Moving objects vertically
Specify the new object position relative to the top or bottom edge of the page.
1) In From, select the criterion (Top Edge or Bottom Edge) to specify the object position.
2) In Vertical, specify the distance from the reference position. Enter the value directly or click ![]() or
or ![]() at right to increase or decrease the value.
at right to increase or decrease the value.
|
|
![]() Specifying an angle for object rotation
Specifying an angle for object rotation
1) In Rotation, enter a value directly or select the rotation angle to the right (clockwise). You can enter a value in one-degree increments.
|
|
4. Click OK.
The Properties dialog box is closed.
This example explains how to resize, reposition, or reorient lines or arrows by entering values. For instructions for objects other than lines and arrows, see "Specifying the size, position, or orientation of objects numerically."
1. Select one or more lines (or arrows).
A selection box (framed in orange) is displayed.
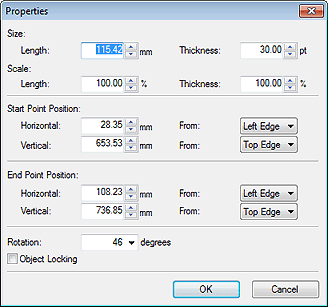
2. Right-click the selected line (or arrow) and select Size and Position or Properties.
The Properties dialog box is displayed.
3. Specify the size, position or angle of the line (or arrow) numerically.

![]() Changing the line/arrow length
Changing the line/arrow length
1) In Length under Size, specify the line (or arrow) length.
Otherwise, in Length under Scale, specify the scale for the current length.
Enter the value directly or click ![]() or
or ![]() at right to increase or decrease the value.
at right to increase or decrease the value.
![]() Changing the line/arrow thickness
Changing the line/arrow thickness
1) In Thickness under Size, specify the line (or arrow) thickness.
Otherwise, in Thickness under Scale, specify the scale for the current thickness.
Enter the value directly or click ![]() or
or ![]() at right to increase or decrease the value.
at right to increase or decrease the value.
![]() Specifying the starting and ending points
Specifying the starting and ending points
1) Specify the new horizontal end point position relative to the left or right edge of the page.
In From, select Left Edge or Right Edge as the reference position.
In Horizontal, specify the distance from the reference position. Enter the value directly or click ![]() or
or ![]() at right to increase or decrease the value.
at right to increase or decrease the value.
2) Specify the new vertical end point position relative to the top or bottom edge of the page.
In From, select Top Edge or Bottom Edge as the reference position.
In Vertical, specify the distance from the reference position. Enter the value directly or click ![]() or
or ![]() at right to increase or decrease the value.
at right to increase or decrease the value.
|
|
![]() Specifying an angle for object rotation
Specifying an angle for object rotation
1) In Rotation, enter a value directly or select the rotation angle to the right (clockwise). You can enter a value in one-degree increments.
|
|
4. Click OK.
The Properties dialog box is closed.
Sometimes when attempting to move an object on the poster, you may accidentally move another object instead. To prevent moving objects by mistake, you can lock them. This may help your poster designing go more smoothly.
1. Select one or more objects.
A selection box (framed in orange) is displayed.
2. Right-click the selected object and select Properties.
The Properties dialog box is displayed.
3. Place a checkmark for Object Locking.
To cancel the lock, remove the checkmark from Object Locking.
4. Click OK.
The object is locked.
|
|
|
Align multiple objects (including photos and clipart) on the poster.
1. Click multiple objects while holding down the Ctrl key or Shift key.
The objects are selected (framed in orange).
2. On the toolbar, click ![]() (Align and Distribute Objects Dialog).
(Align and Distribute Objects Dialog).
(Otherwise, right-click and select Align and Distribute Objects > Align and Distribute Objects Dialog.)
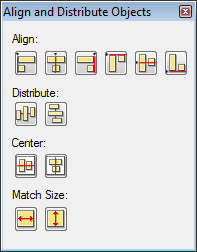
The Align and Distribute Objects dialog box is displayed.
3. Click any of the following buttons to select a method of alignment or distribution.

![]() Align Objects
Align Objects
Aligns objects.
|
|
(Left Align) |
Objects are aligned at the left edge of the leftmost object. |
|
|
|
(Center Horizontally) |
Objects are centered relative to the middle of the previously leftmost and rightmost objects. |
|
|
|
(Right Align) |
Objects are aligned at the right edge of the rightmost object. |
|
|
|
(Top Align) |
Objects are aligned at the top of the top object. |
|
|
|
(Center Vertically) |
Objects are centered relative to the middle of the objects on the top and bottom. |
|
|
|
(Bottom Align) |
Objects are aligned at the bottom of the bottom object. |
|
![]() Distribute Spacing Evenly
Distribute Spacing Evenly
Spaces objects evenly apart.
|
|
(Even Horizontal Spacing) |
Distributes objects horizontally, evenly spaced from each other. |
|
|
|
(Even Vertical Spacing) |
Distributes objects vertically, evenly spaced from each other. |
|
![]() Center Objects to Page
Center Objects to Page
Center objects in the middle of the page.
|
|
(Center Vertically on Page) |
Centers objects on a virtual horizontal line in the middle of the page. |
|
|
|
(Center Horizontally on Page) |
Centers objects on a virtual vertical line in the middle of the page. |
|
4. Click ![]() (Close).
(Close).
The Align and Distribute Objects dialog box is closed.
|
Display the guide or grid on the poster and align objects with it to adjust the positions.
|
|
![]() Guide
Guide
1. On the toolbar, click ![]() (Guide).
(Guide).
(Otherwise, right-click outside the poster and select Grid and Guide > Guide.)
The guide is displayed on the poster.
2. Drag the guide to the position where you want to adjust an object.
3. On the toolbar, click ![]() to the right of
to the right of ![]() and place a checkmark for Snap to Guide.
and place a checkmark for Snap to Guide.
(Otherwise, right-click outside the poster and select Grid and Guide > Snap to Guide.)
4. Drag the object to the position where you want to adjust it.
The object is snapped to the guide when brought closer to it, and the position is adjusted.
|
|
![]() Grid
Grid
1. On the toolbar, click ![]() (Grid).
(Grid).
(Otherwise, right-click outside the poster and select Grid and Guide > Grid.)
The grid is displayed on the poster.
2. On the toolbar, click ![]() to the right of
to the right of ![]() and place a checkmark for Snap to Grid.
and place a checkmark for Snap to Grid.
(Otherwise, right-click outside the poster and select Grid and Guide > Snap to Grid.)
3. Drag the object to the position where you want to adjust it.
The object is snapped to the grid when brought closer to it, and the position is adjusted.
|
|
Make multiple objects on the poster the same height or width.
1. Click the object of the target size.
2. Click multiple objects while holding down the Ctrl key or Shift key.
The objects are selected (framed in orange).
3. On the toolbar, click ![]() (Align and Distribute Objects Dialog).
(Align and Distribute Objects Dialog).
(Otherwise, right-click and select Align and Distribute Objects > Align and Distribute Objects Dialog.)
The Align and Distribute Objects dialog box is displayed.
4. Under Match Size, click either of the following buttons to match the height or width of the target object.
|
|
(Fit Width) |
Each object is resized to match the width of the target object that was selected first. The objects' aspect ratios are not maintained.
|
|
|
(Fit Height) |
Each object is resized to match the height of the target object that was selected first. The objects' aspect ratios are not maintained.
|
5. Click ![]() (Close).
(Close).
The Align and Distribute Objects dialog box is closed.
By grouping multiple objects on the poster, you can work with the group as if it were a single object. This can help make selecting and moving objects more smoothly.
1. Click multiple objects while holding down the Ctrl key or Shift key.
The objects are selected (framed in orange).
2. Right-click any of the selected objects and select Group > Group.
The objects are grouped.
To ungroup the objects, right-click the group and select Group > Ungroup.
|
When you add new objects, they are arranged in front of existing objects. You can change the order of overlapping objects as needed.
1. Click an object.
The object is selected (framed in orange).
2. Right-click the selected object and in Order, select any of the following submenu items to reorder the object.
|
Bring to Front |
Moves the selected object to the front. |
|
Send to Back |
Moves the selected object to the back. |
|
Bring Forward |
Moves the selected object one position forward. |
|
Send Backward |
Moves the selected object one position back. |
|
|