| Editing Text |
|
Differences between text boxes and editing boxes Adding, changing, and removing text Aligning text on the left, centered, or on the right Changing kerning and line spacing |
To enter or edit text in PosterArtist, use text boxes or editing boxes to enter or edit text.
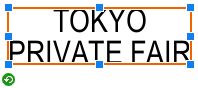
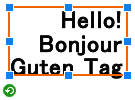
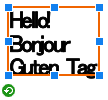
![]() Text box (framed in orange)
Text box (framed in orange)
When you click text on a poster, the text is displayed in an orange box. This box is called a text box.
Text boxes enable you to change the text format, as when changing the font or text style. However, you cannot enter text in a text box.
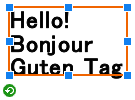
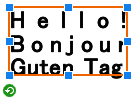
![]() Editing box (framed in blue)
Editing box (framed in blue)
When you double-click text on a poster, the text is displayed in a blue box. This box is called an editing box.
You can enter text in an editing box.
|
|
|
|
Text box |
Editing box |
1. In the Edit task, select Text.
The Text settings panel is displayed.
2. Click the Edit tab.
3. Click the following button to insert text.
|
|
(Text) |
4. When you click on the poster, a text box pointer (![]() ) is displayed. Drag from the upper-left corner to the lower-right corner of the area to insert text. An editing box (framed in blue) is displayed there.
) is displayed. Drag from the upper-left corner to the lower-right corner of the area to insert text. An editing box (framed in blue) is displayed there.
5. Enter text in the editing box.

To insert a line break, position the cursor where you want the line break and press the Enter key.
|
|
6. Click outside the editing box.
The text is displayed at actual size. You can check how the text appears on the poster and its position in the layout.
7. To change the font, size, or color, adjust the Text settings.
|
|
1. In the Edit task, select Text.
The Text settings panel is displayed.
2. Right-click text on the poster and select Edit.
An editing box (framed in blue) is displayed.
(Otherwise, double-click the text to display the editing box.)
3. Enter text in the editing box.
4. Click outside the editing box.
The entered text is reflected in the poster.
1. Right-click text on the poster and select Delete.
(Otherwise, click the text and press the Delete key.)
In PosterArtist, the following aspects of text format can be specified. The text format can be specified both in text boxes (framed in orange) and editing boxes (framed in blue).
![]() Change the font
Change the font
Change the font (typeface) as desired.
![]() Resize text
Resize text
You can change the size of text.
![]() Specify the text style
Specify the text style
Make text bold, italic, etc.
![]() Align lines
Align lines
Align text left, right, center or justified.
![]() Changing kerning and line spacing
Changing kerning and line spacing
Widen or narrow the space between characters or between lines.
![]() Change the text color
Change the text color
You can change the text color.
![]() Outline text
Outline text
You can outline the text.
![]() Specify drop shadows for text
Specify drop shadows for text
You can apply a drop shadow to text.
1. In the Edit task, select Text.
The Text settings panel is displayed.
2. Click text on the poster.
A text box (framed in orange) is displayed.
3. In the Font list, select a font.
|
|
1. In the Edit task, select Text.
The Text settings panel is displayed.
2. Click text on the poster.
A text box (framed in orange) is displayed.
3. In the Font Size list, select a font size.
|
|
1. In the Edit task, select Text.
The Text settings panel is displayed.
2. Click text on the poster.
A text box (framed in orange) is displayed.
3. Under Text Alignment, click any of the following buttons to align lines.
|
|
(Left Align) |
Aligns lines of text on the left. |
|
|
|
(Center Align) |
Centers lines of text. |
|
|
|
(Right Align) |
Aligns lines of text on the right. |
|
By justifying text, you can make all lines in the text box the same width. All lines in justified text are as long as the longest line.
|
|
|
|
|
|
Aligned Left |
Justified |
1. In the Edit task, select Text.
The Text settings panel is displayed.
2. Click text on the poster.
A text box (framed in orange) is displayed.
3. Under Text Alignment, click ![]() (Justify).
(Justify).
The character spacing is automatically adjusted and text is distributed evenly according to the text box width.
1. In the Edit task, select Text.
The Text settings panel is displayed.
2. Click text on the poster.
A text box (framed in orange) is displayed.
3. Enter a value in Line Spacing directly or in the Line Spacing list, select a line spacing. The default value is 1.0.
|
Increase the value to space the lines further apart. |
|
|
Decrease the value to space the lines closer together. |
|
4. Enter the value in Character Spacing directly or click ![]() or
or ![]() at right to increase or decrease the value. The default value is 0.00 mm.
at right to increase or decrease the value. The default value is 0.00 mm.
|
Increase the value to space characters further apart. |
|
|
Decrease the value to space characters closer together. |
|
1. In the Edit task, select Text.
The Text settings panel is displayed.
2. Click text on the poster.
A text box (framed in orange) is displayed.
3. In Text Color, the current text color and basic colors are displayed. To use one of the basic colors, click the corresponding button. To use other colors, click Custom and select a different color from the Color dialog box.
|
|
1. In the Edit task, select Text.
The Text settings panel is displayed.
2. Click text on the poster.
A text box (framed in orange) is displayed.
3. Click any of the following buttons to select the text style. Multiple styles can be specified to the text.
|
|
(Bold) |
Makes text bold. |
|
|
|
(Italic) |
Makes text italic. |
|
|
|
(Underline) |
Underlines text. |
|
|
|
You can outline text in several different ways. For examples, see "Examples of outlined text."
1. In the Edit task, select Text.
The Text settings panel is displayed.
2. Click text on the poster.
A text box (framed in orange) is displayed.
3. In Text Effects, click ![]() (Fill and Stroke).
(Fill and Stroke).
The Fill and Stroke dialog box is displayed.
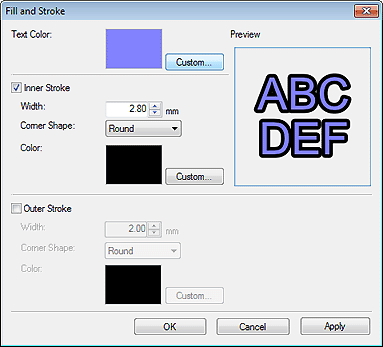
In Text Color, the color specified in the Text settings panel is reflected.
To change the text color, click Custom and in the Color dialog box, select a color.
4. Place a checkmark for Inner Stroke.
5. In Width, specify the width of the outline. Enter the value directly or click ![]() or
or ![]() at right to increase or decrease the value.
at right to increase or decrease the value.
6. In Corner Shape, select any of the following shapes.
|
Round |
Make the angles of outlined characters rounded. |
|
|
Square |
Make the angles of outlined characters acute angles. |
|
|
Bevel |
Make the angles of outlined characters for a 3D effect. |
|
7. In Color, specify the outline color. Click Custom and in the Color dialog box, select a color.
8. To apply a double outline, place a checkmark for Outer Stroke and repeat steps 5-7.
9. The effect can be checked in Preview. To see how the outlined text appears under the current settings, click Apply. Continue adjusting the settings and clicking Apply until the outlined text appears as desired.
|
|
10. Click OK.
The Fill and Stroke dialog box is closed, and the outline is set.
|
|
You can add drop shadows of several types. For examples, see "Examples of drop shadows."
1. In the Edit task, select Text.
The Text settings panel is displayed.
2. Click text on the poster.
A text box (framed in orange) is displayed.
3. In Text Effects, click ![]() (Shaded Text).
(Shaded Text).
The Set Shaded Text dialog box is displayed.
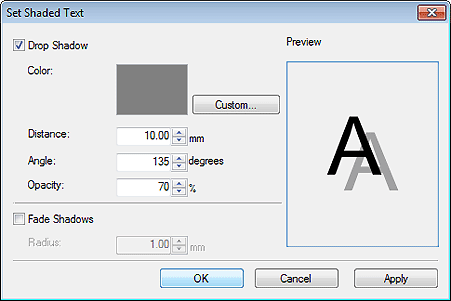
4. Place a checkmark for Drop Shadow.
5. To change the shadow color, click Custom and in the Color dialog box, select a different color.
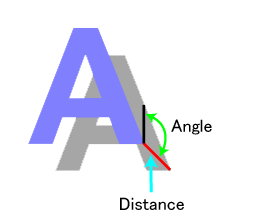
6. In Distance, specify the distance between the text and shadow. Enter the value directly or click ![]() or
or ![]() at right to increase or decrease the value.
at right to increase or decrease the value.
7. In Angle, specify the shadow angle. Enter the value directly or click ![]() or
or ![]() at right to increase or decrease the value.
at right to increase or decrease the value.
8. In Opacity, specify the shadow opacity (%). Enter the value directly or click ![]() or
or ![]() at right to increase or decrease the value.
at right to increase or decrease the value.
![]() Increase the value to make shadows darker.
Increase the value to make shadows darker.
![]() Decrease the value to make shadows lighter.
Decrease the value to make shadows lighter.
9. To soften the shadow, place a checkmark for Fade Shadows and in Radius, set the degree of softening. Enter the value directly or click ![]() or
or ![]() at right to increase or decrease the value.
at right to increase or decrease the value.
![]() Increase the value to soften shadows more.
Increase the value to soften shadows more.
![]() Decrease the value to emphasize shadows.
Decrease the value to emphasize shadows.
10. The effect can be checked in Preview. To see how the drop shadow appears under the current settings, click Apply. Continue adjusting the settings and clicking Apply until the drop shadow appears as desired.
|
11. Click OK.
The Set Shaded Text dialog box is closed, and a drop shadow is applied to the text.
|
|
Using outlining, you can create the following kinds of effects.
|
|
Inner Stroke: |
|
|
Color: |
White | |
|
Width: |
6 mm (0.25 in.) |
|
|
Corner Shape: |
Round |
|
|
Outer Stroke |
||
|
Color: |
Black |
|
|
Width: |
6 mm (0.25 in.) |
|
|
Corner Shape: |
Round |
|
|
Text: |
||
|
Color: |
Black |
|
Using drop shadows, you can create the following kinds of effects.
|
Drop Shadow: |
|
Color: |
Black |
|
Distance: |
21 mm (0.8 in.) |
|
Opacity: |
10% |
|
Angle: |
90 degrees |
By combining outlining and a drop shadow, you can create the following kinds of effects.
|
|
Inner Stroke: |
|
|
Color: |
Black |
|
|
Width: |
2 mm (0.07 in.) |
|
|
Corner Shape: |
Round |
|
|
Text: |
||
|
Color: |
White |
|
|
Drop Shadow: |
||
|
Color: |
Gray |
|
|
Distance: |
3 mm (0.10 in.) |
|
|
Opacity: |
50% |
|
|
Angle: |
135 degrees |
1. In the Edit task, select Text.
The Text settings panel is displayed.
2. On the poster, click the text to which you want to apply a text graphic.
3. Click the Text Graphics tab.
4. In Text Graphics, select a text graphic category.
Thumbnails of text graphics in the selected category appear.
5. Select a text graphic from the thumbnails and double-click it.
The text graphic is applied, matching the width of the text box.
1. In the Edit task, select Text.
The Text settings panel is displayed.
2. On the poster, click the text to which you want to apply a text graphic.
3. Click the Text Graphics tab.
4. In Text Graphic Color, the current text graphic color and basic colors are displayed. To use one of the basic colors, click the corresponding button. To use other colors, click Custom and select a color from the Color dialog box.
|
|
1. In the Edit task, select Text.
The Text settings panel is displayed.
2. On the poster, click the text to which you want to apply a text graphic.
3. Click the Text Graphics tab.
4. In Category, select No Text Graphic.
5. Select a blank thumbnail and double-click it.
The text graphic is removed.