| Printing Posters |
|
Printers supported with PosterArtist Printing by selecting a chart number Printing by specifying light source and color temperature Printing by adjusting monitor and print colors |
The posters created by PosterArtist can be printed with only Canon printers or Océ printers.
You can print posters from the printer listed in the Printer list on the Paper Options settings panel of the printers connected to your computer.
|
- Printers other than Canon imagePROGRAF series - PRO-1000 and PRO-500 See "For users using printers other than Canon imagePROGRAF series" for details. |
This topic gives the basic printing instructions.
|
1. Select the Print task.
The Print settings panel is displayed.
|
|
2. Check the print settings.
|
3. In Print Quality, select the print quality.
Items displayed in Print Quality vary depending on Media Type specified in the Paper Options task.
|
|
4. In Matching Method, select a matching method.
|
|
5. In Copies, specify the number of copies to print. Enter the value directly or click ![]() or
or ![]() at right to increase or decrease the value.
at right to increase or decrease the value.
|
|
6. Click Print.
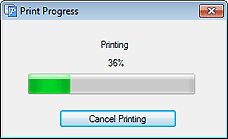
Printing starts and the Print Progress dialog box is displayed.
In the Print Progress dialog box or in PosterArtist's status bar, the print progress can be checked.
|
|
|
|
Before printing at actual size, test printing can be performed on A4 or Letter size paper to check the printing image.
For information on the printer and paper size to use for test printing, see "PosterArtist settings."
1. Select the Print task.
The Print settings panel is displayed.
2. Click Test Print.
Printing starts and the Print Progress dialog box is displayed.
In the Print Progress dialog box, the print progress can be checked.
|
|
|
1. In the Print Progress dialog box, click Cancel Printing.
Printing is canceled.
Ambient light color and brightness vary by environment factor such as location (indoors or outdoors) or lighting (fluorescent or incandescent). Therefore the same poster may look different depending on where it is displayed.
The ambient light setting functions allow you to adjust colors automatically according to the environment so that the created poster's color tone looks good.
|
In ambient light settings, posters can be printed by selecting one of the four prepared ambient light settings. Print samples of the four ambient light settings (chart printing) then select the number of the sample whose color tone matches the environment where the poster is displayed.
This section describes how to select one of the four prepared ambient light settings to print posters.
1. Print samples of ambient light settings (chart printing). For instructions on chart printing, see "Printing the ambient light correction chart."
2. Select the Print task.
The Print settings panel is displayed.
3. In the Print Quality list, select High or Highest.
4. In Copies, specify the number of copies to print. Enter the value directly or click ![]() or
or ![]() at right to increase or decrease the value.
at right to increase or decrease the value.
5. Place a checkmark for Use Ambient Light Setting.
The ambient light setting is enabled.
6. Check the charts printed using chart printing, and select the number of the chart on which colors of four pictures look favorable overall.
|
7. In the ambient light setting list, select the chart number you selected.
8. Click Print.
Printing is performed according to the selected ambient light setting, and the Print Progress dialog box is displayed.
In the Print Progress dialog box or in PosterArtist's status bar, the printing progress can be checked.
Posters can also be printed by specifying the light source and color temperature.
|
1. Measure the light source type and color temperature by using the "i1" light meter and the Light Source Measure Tool.
|
|
2. Select the Print task.
The Print settings panel is displayed.
3. In the Print Quality list, select High or Highest.
4. In Copies, specify the number of copies to print. Enter the value directly or click ![]() or
or ![]() at right to increase or decrease the value.
at right to increase or decrease the value.
5. Place a checkmark for Use Ambient Light Setting.
6. In the ambient light setting list, select Custom Settings.
The Ambient Light Setting dialog box is displayed.
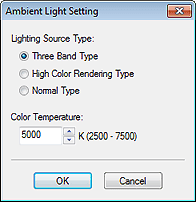
7. In Lighting Source Type, select the light source type measured with the Light Source Measure Tool.
8. In Color Temperature, specify the value of the color temperature measured with the Light Source Measure Tool.
Enter the value directly or click ![]() or
or ![]() at right to increase or decrease the value.
at right to increase or decrease the value.
9. Click OK.
The Ambient Light Setting dialog box is closed and the selected ambient light setting is enabled.
10. Click Print.
Printing is performed according to the selected ambient light setting, and the Print Progress dialog box is displayed.
In the Print Progress dialog box or in PosterArtist's status bar, the printing progress can be checked.
Adjusting the monitor and print colors to more closely match is called monitor matching. This section describes how to adjust using the ambient light settings to print the poster with colors that match the monitor.
|
![]() Printing by selecting a chart number
Printing by selecting a chart number
This section describes how to select one of the four prepared ambient light settings and specify the color temperature and illuminance to print posters.
1. Print samples of ambient light settings (chart printing). For instructions on chart printing, see "Printing the ambient light correction chart."
2. Select the Print task.
The Print settings panel is displayed.
3. In the Print Quality list, select High or Highest.
4. In Matching Method, select Monitor Matching.
|
5. Select the color temperature set on the monitor under Monitor White Point.
6. In Copies, specify the number of copies to print.
Enter the value directly or click ![]() or
or ![]() at right to increase or decrease the value.
at right to increase or decrease the value.
7. Select the Use Ambient Light Setting check box.
8. In the ambient light setting list, select By selecting a chart number.
The Ambient Light Setting dialog box is displayed.
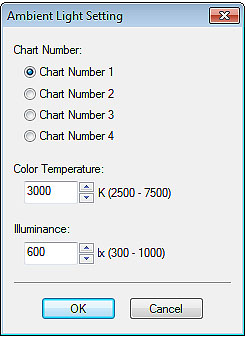
9. Check the charts printed using chart printing, and select the number of the chart on which colors of four pictures look favorable overall.
|
|
10. Specify the value of the color temperature measured at monitor calibration in Color Temperature.
Enter the value directly or click ![]() or
or ![]() at right to increase or decrease the value.
at right to increase or decrease the value.
11. Specify the value of the illuminance measured at monitor calibration in Illuminance.
Enter the value directly or click ![]() or
or ![]() at right to increase or decrease the value.
at right to increase or decrease the value.
12. Click OK.
The Ambient Light Setting dialog box is closed and the selected ambient light setting is applied.
13. Click Print.
Printing is performed according to the selected ambient light setting, and the Print Progress dialog box is displayed.
In the Print Progress dialog box or in PosterArtist's status bar, the printing progress can be
checked.
![]() Printing by specifying the light source, color temperature, and illuminance
Printing by specifying the light source, color temperature, and illuminance
Posters can also be printed by specifying the light source, color temperature, and illuminance.
|
1. Measure the light source type and color temperature by using the "i1" light meter and the Light Source Measure Tool.
|
|
2. Select the Print task.
The Print settings panel is displayed.
3. In the Print Quality list, select High or Highest.
4. In Matching Method, select Monitor Matching.
|
5. Select the color temperature set on the monitor under Monitor White Point.
6. In Copies, specify the number of copies to print.
Enter the value directly or click ![]() or
or ![]() at right to increase or decrease the value.
at right to increase or decrease the value.
7. Select the Use Ambient Light Setting check box.
8. In the ambient light setting list, select By entering values directly.
The Ambient Light Setting dialog box is displayed.
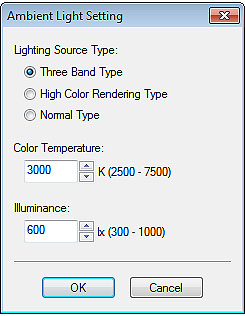
9. In Lighting Source Type, select the light source type measured with the Light Source Measure Tool.
10. In Color Temperature, specify the value of the color temperature measured with the Light Source Measure Tool.
Enter the value directly or click ![]() or
or ![]() at right to increase or decrease the value.
at right to increase or decrease the value.
11. In Illuminance, specify the value of the illuminance measured with the Light Source Measure Tool.
Enter the value directly or click ![]() or
or ![]() at right to increase or decrease the value.
at right to increase or decrease the value.
12. Click OK.
The Ambient Light Setting dialog box is closed and the selected ambient light setting is enabled.
13. Click Print.
Printing is performed according to the selected ambient light setting, and the Print Progress dialog box is displayed.
In the Print Progress dialog box or in PosterArtist's status bar, the printing progress can be
checked.
Register ambient light settings with a name of your own. Registered ambient light settings can be deleted or listed. Register frequently used ambient light settings to quickly print posters according to the environment where they are displayed.
![]() Registering ambient light settings
Registering ambient light settings
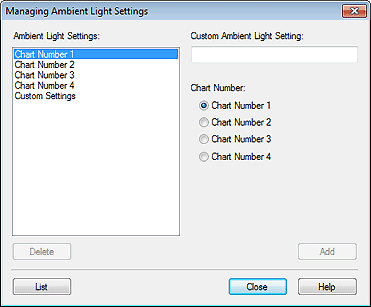
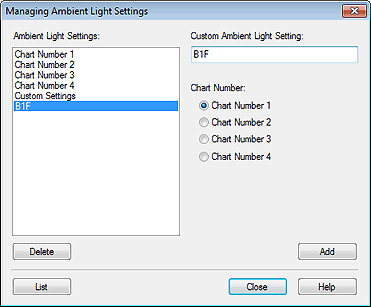
1. In the Tool menu, select Managing Ambient Light Settings.
The Managing Ambient Light Settings dialog box is displayed.
2. To register prepared ambient light settings with a different name, in Chart Number, select from Chart Number 1 to Chart Number 4.
To register ambient light settings by specifying the light source and color temperature, in the Ambient Light Settings list, select Custom Settings and specify the light source and color temperature.
|
|
3. In Custom Ambient Light Setting, enter a name of your choice.
4. Click Add.
The ambient light setting is registered with the specified settings.
|
|
![]() Deleting registered ambient light settings
Deleting registered ambient light settings
1. In the Tool menu, select Managing Ambient Light Settings.
The Managing Ambient Light Settings dialog box is displayed.
2. In the Ambient Light Settings list, select the ambient light setting you want to delete.
3. Click Delete.
4. When a confirmation is displayed, click OK.
The selected ambient light setting is deleted.
|
![]() Displaying ambient light setting list
Displaying ambient light setting list
1. In the Tool menu, select Managing Ambient Light Settings.
The Managing Ambient Light Settings dialog box is displayed.
2. Click List.
The Ambient Light Setting List dialog box is displayed.
Chart printing is the function to print samples of four prepared ambient light settings.
|
1. In the Tool menu, select Print Ambient Light Correction Chart.
The Print Chart dialog box is displayed.
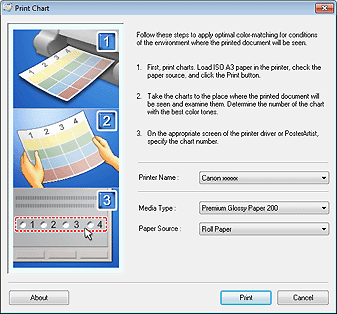
2. In the Printer Name list, select the printer for printing.
3. In the Media Type list, select the paper type for printing.
Supported paper types vary depending on the selected printer.
4. In the Paper Source list, select the paper source.
5. Click Print.
The ambient light correction chart is printed.
6. Check the charts printed using chart printing, and select the number of the chart on which colors of four pictures look favorable overall.
|
|

