| Specifying Size and Paper |
|
Printing filling the entire roll paper width without borders Printing filling the entire roll paper width with borders Printing in a larger size than the roll paper Printing within the printable area |
PosterArtist allows you to print posters on paper of various types and sizes. Posters can be printed to scale, or without borders.
Most settings for printing posters are stored in the Paper Options task.
This section describes how to customize the settings in the Paper Options task for the following printing tasks.
![]() Printing on roll paper
Printing on roll paper
- Basic settings
- Printing filling the entire roll paper width without borders
- Printing filling the entire roll paper width with borders
- Large-format printing
- Printing in a larger size than the roll paper
![]() Printing on cut sheets
Printing on cut sheets
![]() Printing to scale
Printing to scale
![]() Printing within the printable area
Printing within the printable area
![]() Printing with crop marks
Printing with crop marks
|
- Printers other than Canon imagePROGRAF series - PRO-1000 and PRO-500 See "For users using printers other than Canon imagePROGRAF series" for details. |
When printing on roll paper, you can print at non-standard sizes such as for horizontal or vertical banners. Borderless printing is also available.
Roll paper can only be used with printers that support this kind of printing.
To print posters on roll paper, follow these steps to complete paper settings.
Note that if you change the page size and orientation, you may need to adjust the layout. For more information, see "If you change the poster page size or orientation."
1. Select the Paper Options task.
The Paper Options settings panel is displayed.
2. In the Page Size list, select the page size of the poster.
For non-standard size posters, select Set Custom Size and specify the custom size. For instructions on specifying non-standard paper sizes, see "Specifying non-standard page sizes."
|
3. In Poster Orientation, select either of the following to specify the poster orientation.
|
(Portrait) |
The poster is set to portrait orientation. |
|
(Landscape) |
The poster is set to landscape orientation. |
4. In the Printer list, select the printer to use.
|
5. In the Media Source list, select Roll Paper.
6. In the Media Type list, select the paper type for printing.
Supported paper types vary depending on the selected printer.
|
7. In the Roll Paper Width list, select the width of the roll paper loaded in the printer.
Selectable roll paper width varies depending on the selected printer.
· When Borderless Printing is on ·When Enlarged/Reduced Printing is off and either the vertical or horizontal page size matches the selected roll width ·When Enlarged/Reduced Printing is on and Fit Long Side to Roll Width or Fit Short Side to Roll Width is selected When the media size is larger than the selected roll paper width, a warning message appears during printing. |
|
To print posters filling the roll paper width without borders, follow these steps to complete paper settings.
1. Complete settings according to "Basic settings."
2. Place a checkmark for Borderless Printing.
|
3. If the roll paper width is different from the length of the original's long side and short side, select Fit Long Side to Roll Width or Fit Short Side to Roll Width.
|
Fit Long Side to Roll Width |
The poster's long side will be the same length as the width of the loaded roll paper for printing. |
|
|
Fit Short Side to Roll Width |
The poster's short side will be the same length as the width of the loaded roll paper for printing. |
|
|
|
To print posters filling the roll paper width with borders, follow these steps to complete paper settings.
1. Complete settings according to "Basic settings."
2. Place a checkmark for Enlarged/Reduced Printing.
3. Select Fit Long Side to Roll Width or Fit Short Side to Roll Width.
|
Fit Long Side to Roll Width |
The poster's long side will be the same length as the width of the loaded roll paper for printing. |
|
|
Fit Short Side to Roll Width |
The poster's short side will be the same length as the width of the loaded roll paper for printing. |
|
To print non-standard size posters such as horizontal or vertical banners filling the entire roll paper width, follow these steps.
1. Select the Paper Options task.
The Paper Options settings panel is displayed.
2. In the Page Size list, select the page size of the poster.
For non-standard size posters, click Set Custom Size and specify the page size of the poster.
For details, see "Specifying non-standard page sizes."
|
3. In Poster Orientation, select either of the following to specify the poster orientation.
|
(Portrait) |
The poster is set to portrait orientation. |
|
(Landscape) |
The poster is set to landscape orientation. |
4. In the Printer list, select the printer to use.
|
5. In the Media Source list, select Roll Paper.
6. In the Media Type list, select the paper type for printing.
Supported paper types for borderless printing vary depending on the selected printer.
|
7. Place a checkmark for Borderless Printing.
8. In the Roll Paper Width list, select the width of the roll paper loaded in the printer.
If the roll paper width is different from the length of the original's long side or short side, the poster is automatically enlarged or reduced according to the roll paper width for printing.
|
9. Select Fit Long Side to Roll Width or Fit Short Side to Roll Width.
The poster width is enlarged or reduced according to the roll paper width.
![]() Fit Long Side to Roll Width
Fit Long Side to Roll Width
When Fit Long Side to Roll Width is selected, the poster width (indicated by W in the figure) is enlarged or reduced according to the roll paper width.

![]() Fit Short Side to Roll Width
Fit Short Side to Roll Width
When Fit Short Side to Roll Width is selected, the poster width (indicated by W in the figure) is enlarged or reduced according to the roll paper width.

Follow these steps to print in a larger size than the roll paper.
1. According to the instructions in "Basic settings," specify the Paper Size and Poster Orientation.
2. Place a checkmark for Edit layout with Free Layout plus.
|
|
To print posters on cut sheets, follow these steps to complete paper settings.
Note that if you change the page size and orientation, you may need to adjust the layout. For more information, see "If you change the poster page size or orientation."
1. Select the Paper Options task.
The Paper Options settings panel is displayed.
2. In the Page Size list, select the page size of the poster.
For non-standard size posters, click Set Custom Size and specify the page size of the poster.
For details, see "Specifying non-standard page sizes."
|
3. In Poster Orientation, select either of the following to specify the poster orientation.
|
(Portrait) |
The poster is set to portrait orientation. |
|
(Landscape) |
The poster is set to landscape orientation. |
4. In the Printer list, select the printer to use.
|
5. In the Media Source list, select Cut Sheet, Cassette or Manual.
Supported cut sheet sources vary depending on the selected printer.
6. In the Media Type list, select the paper type for printing.
Supported paper types vary depending on the selected printer.
|
7. To print on cut sheets that are different in size from the original, in Media Size list, select the size of paper to load in the printer.
Supported paper sizes vary depending on the selected printer.
For non-standard size posters, click Set Custom Size and specify the size of paper to print the poster on.
For details, see "Specifying non-standard page sizes."
|
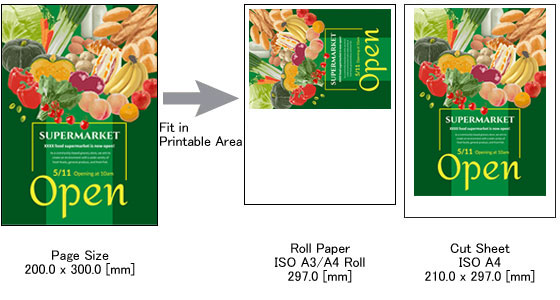
8. If the original size is different from the media size or when Media Source is changed from Roll Paper to Cut Sheet, printing may not be possible because images around the poster will be cut off. To avoid this problem, place a checkmark for Enlarged/Reduced Printing then select Fit in Printable Area.
For details, see "Printing within the printable area."
This section describes how to print posters in an enlarged or reduced scale.
1. Select the Paper Options task.
The Paper Options settings panel is displayed.
2. In the Page Size list, select the page size of the poster.
For non-standard size posters, click Set Custom Size and specify the page size of the poster.
For details, see "Specifying non-standard page sizes."
|
3. In Poster Orientation, select either of the following to specify the poster orientation.
|
|
(Portrait) |
The poster is set to portrait orientation. |
|
|
(Landscape) |
The poster is set to landscape orientation. |
4. In the Printer list, select the printer to use.
|
|
5. In the Media Source list, select the paper source.
6. In the Media Type list, select the paper type for printing.
Supported paper types vary depending on the selected printer.
|
|
7. If Roll Paper is selected in the Media Source list, in the Roll Paper Width list, select the width of the roll paper for printing.
Supported roll paper types vary depending on the selected printer.
|
8. If Roll Paper is selected in the Media Source list, remove the checkmark for Borderless Printing.
9. Place a checkmark for Enlarged/Reduced Printing.
10. Select Scaling.
11. Specify the scale. Enter the value directly or click ![]() or
or ![]() at right to increase or decrease the value.
at right to increase or decrease the value.
12. If Cut Sheet is selected in the Media Source list, in the Media Size list, select the paper size for printing.
Supported paper sizes vary depending on the selected printer.
For non-standard size posters, click Set Custom Size and specify the page size of the poster.
For details, see "Specifying non-standard page sizes."
|
Depending on the poster size, a portion of an image may be cut off (when printing on cut sheets, etc.). To avoid this problem, specify the paper size for printing and fit the entire poster on the paper.
1. Select the Paper Options task.
The Paper Options settings panel is displayed.
2. In the Page Size list, select the page size of the poster.
For non-standard size posters, click Set Custom Size and specify the page size of the poster.
For details, see "Specifying non-standard page sizes."
|
3. In Poster Orientation, select either of the following to specify the poster orientation.
|
|
(Portrait) |
The poster is set to portrait orientation. |
|
|
(Landscape) |
The poster is set to landscape orientation. |
4. In the Printer list, select the printer to use.
|
|
5. In the Media Source list, select the paper source.
6. In the Media Type list, select the paper type for printing.
Supported paper types vary depending on the selected printer.
|
|
7. Place a checkmark for Enlarged/Reduced Printing.
8. Select Fit in Printable Area.
|
9. In the Media Size list, select the paper size for printing.
Supported paper sizes vary depending on the selected printer.
For non-standard size posters, click Set Custom Size and specify the page size of the poster.
For details, see "Specifying non-standard page sizes."
|
Crop marks can be printed in the margins of posters to indicate the cutting positions.
This section describes how to print posters filling the entire printable area of cut sheets that are larger than the original.
1. Select the Paper Options task.
The Paper Options settings panel is displayed.
2. Specify the size or orientation of the poster, printer, paper source, type of paper, etc. as needed.
3. Place a checkmark for Crop Marks.

|
|
You can create horizontal or vertical banners or other documents in non-standard sizes by specifying an original size of your choice.
1. Select the Paper Options task.
The Paper Options settings panel is displayed.
2. Click Set Custom Size.
The Set Custom Size dialog box is displayed.
3. Enter a value directly in Short Side or Long Side. Otherwise, click Set to Roll Width and specify the original size.
To specify the same length for the poster's long side as the width of the loaded roll paper, click Set to Roll Width to the right of Long Side. |
|
To specify the same length for the poster's short side as the width of the loaded roll paper, click Set to Roll Width to the right of Short Side. |
|
|
|
4. Click OK.
The Set Custom Size dialog box is closed.
|
|
In templates, the poster paper size and orientation are already set. If you change the poster size or orientation, the relative positions of objects will be retained (instead of rotating all objects in the poster individually). However, objects are resized to fit the new poster size or orientation. Adjust the size and position of objects as needed.