| Editing Shapes |
|
Applying transparency to shapes Changing the line type of shapes Changing the line color of shapes Specifying drop shadows for shapes Changing rectangle corner shapes |
1. In the Edit task, select Shapes.
The Shapes settings panel is displayed.
2. Click either of the following buttons to select a shape.
![]() (Crosshair pointer) is displayed.
(Crosshair pointer) is displayed.
|
|
(Line/Arrow) |
Enables you to add lines or arrows |
|
|
(Rectangle) |
Enables you to add rectangles |
|
|
(Circle/Ellipse) |
Enables you to add circles or ellipsis |
3. Drag ![]() (Crosshair pointer) to specify the size of shape you want to add.
(Crosshair pointer) to specify the size of shape you want to add.
The shape is added in the specified size.

To add a shape with the angle or center point fixed, hold down the Shift or Ctrl key as you drag the crosshair pointer.
|
Shift key |
Line/Arrow |
Horizontal line, vertical line or line slanted at a multiple of 15 degrees |
|
|
Rectangle |
Square |
|
|
|
Circle/Ellipse |
Circle |
|
|
|
Ctrl key |
All shapes |
Shapes (center is the clicked point) |
|
|
Shift key and Ctrl key |
Line/Arrow |
Horizontal line, vertical line or line slanted at a multiple of 15 degrees with the clicked point set as the center |
|
|
Rectangle |
Square (center is the clicked point) |
|
|
|
Circle/Ellipse |
Circle (center is the clicked point) |
|
4. You can freely resize, rotate, or move shapes you added. You can also align a shape with other objects or reorder it within a group of objects. For more information, see "Working with Objects."
1. Right-click a shape on the poster and select Delete.
(Otherwise, click the shape and press the Delete key.)
In PosterArtist, you can specify the following aspects of the shape style.
![]() Resize Shapes
Resize Shapes
You can change the size of shapes.
![]() Change Line Thickness
Change Line Thickness
You can change the thickness of shape line.
![]() Change Shape Opacity
Change Shape Opacity
You can adjust the shape opacity to apply transparency to shapes.
![]() Change Line Type
Change Line Type
You can make the shape line a dashed or dotted line.
![]() Change Line Color
Change Line Color
You can change the shape line color.
![]() Change Shape Color
Change Shape Color
You can change the color of rectangles or circles.
![]() Specify Drop Shadows for Shapes
Specify Drop Shadows for Shapes
You can apply a drop shadow to shapes.
![]() Change Rectangle Corner Shapes
Change Rectangle Corner Shapes
You can change the rectangle corner shape to a round or square shape.
![]() Change Types of Line Ends
Change Types of Line Ends
You can change the line ends into arrows or shapes such as ![]() and
and ![]() .
.
![]() Resize Shapes of Line Ends
Resize Shapes of Line Ends
You can change the size of the line ends.
1. Click a shape on the poster.
 (Resize handle) is displayed on the selected shape.
2. Drag the resize handle ( ) to resize the shape.
|
|
1. In the Edit task, select Shapes.
The Shapes settings panel is displayed.
2. Click a shape on the poster.
3. In Line Thickness, change the value. Enter the value directly or click ![]() or
or ![]() at right to increase or decrease the value.
at right to increase or decrease the value.
Change the shape opacity to apply transparency.
1. In the Edit task, select Shapes.
The Shapes settings panel is displayed.
2. Click a shape on the poster.
3. In Opacity, specify the opacity (%) of the shape. Enter the value directly or click ![]() or
or ![]() at right to increase or decrease the value.
at right to increase or decrease the value.
![]() Increase the value to make lines more opaque.
Increase the value to make lines more opaque.
![]() Decrease the value to make lines more transparent.
Decrease the value to make lines more transparent.
Change the shape line to a dashed line or dotted line.
1. In the Edit task, select Shapes.
The Shapes settings panel is displayed.
2. Click a shape on the poster.
3. In the Line Type list, select the line type.
Change the shape line color.
1. In the Edit task, select Shapes.
The Shapes settings panel is displayed.
2. Click a shape on the poster.
3. When selecting a rectangle, circle or ellipse, place a checkmark for Line Color.
4. In Line Color, the current shape line color and basic colors are displayed. To use one of the basic colors, click the corresponding button. To use other colors, click Custom and select a color from the Color dialog box.
Fill shapes with color or change the color.
1. In the Edit task, select Shapes.
The Shapes settings panel is displayed.
2. Click a rectangle, circle or ellipse on the poster.
3. Place a checkmark for Fill-in Color.
4. In Fill-in Color, the current shape color and basic colors are displayed. To use one of the basic colors, click the corresponding button. To use other colors, click Custom and select a color from the Color dialog box.
You can add drop shadows of several types to shapes.

1. In the Edit task, select Shapes.
The Shapes settings panel is displayed.
2. Click a shape on the poster.
3. Click ![]() (Drop Shadow).
(Drop Shadow).
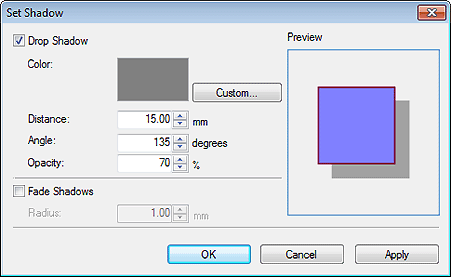
The Set Shadow dialog box is displayed.

4. Place a checkmark for Drop Shadow.
5. To change the shadow color, click Custom and in the Color dialog box, select another color.
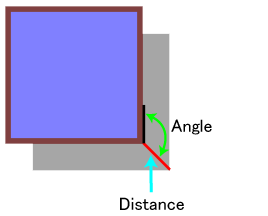
6. In Distance, specify the distance between the shape and shadow. Enter the value directly or click ![]() or
or ![]() at right to increase or decrease the value.
at right to increase or decrease the value.
7. In Angle, set the shadow angle. Enter the value directly or click ![]() or
or ![]() at right to increase or decrease the value.
at right to increase or decrease the value.

8. In Opacity, specify the opacity (%) of the shadow. Enter the value directly or click ![]() or
or ![]() at right to increase or decrease the value.
at right to increase or decrease the value.
![]() Increase the value to make shadows darker.
Increase the value to make shadows darker.
![]() Decrease the value to make shadows lighter.
Decrease the value to make shadows lighter.
9. To soften the shadow, place a checkmark for Fade Shadows and in Radius, set the value of softening. Enter the value directly or click ![]() or
or ![]() at right to increase or decrease the value.
at right to increase or decrease the value.
![]() Increase the value to soften shadows more.
Increase the value to soften shadows more.
![]() Decrease the value to emphasize shadows.
Decrease the value to emphasize shadows.
10. The effect can be checked in Preview. To see how the drop shadow appears under the current settings, click Apply. Continue adjusting the settings and clicking Apply until the drop shadow appears as desired.
11. Click OK.
The Set Shadow dialog box is closed. The drop shadow is applied to the shape.
|
|
Change the rectangle corner shape to a round or square shape.
1. In the Edit task, select Shapes.
The Shapes settings panel is displayed.
2. Click a rectangle on the poster.
3. In the Corner Shape list, select a corner shape.
When selecting the round shape in Corner Shape, set the value of roundness in Radius. Enter the value directly or click ![]() or
or ![]() at right to increase or decrease the value.
at right to increase or decrease the value.
By changing the types at the starting and ending points of lines, you can make lines into arrows and vice versa. You can also select the type of arrows.
1. In the Edit task, select Shapes.
The Shapes settings panel is displayed.
2. Click a line (or arrow) on the poster.
3. In the Start Point Shape list, select the start point shape.
4. In the End Point Shape list, select the end point shape.
You can change the size of the arrow head.
1. In the Edit task, select Shapes.
The Shapes settings panel is displayed.
2. Click an arrow on the poster.
3. In the Size list for the start point, select the size of start point shape.
4. In the Size list for the end point, select the size of end point shape.
|
|