Changeable Setting Items Using Remote UI
After logging in to the Remote UI, the portal screen (Remote UI top page) is displayed. You can check the printer's activity and printer information, and change settings at the click of a button.
 Note
Note
- The item which can be used is different in Administrator Mode or in General User Mode.
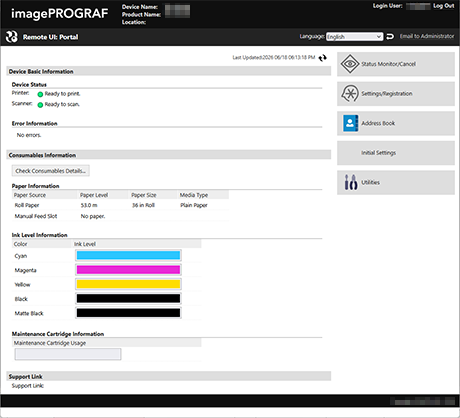
- Device Name
-
The device name is displayed as set at Settings/Registration > Device Management > Device Information Settings.
- Product Name
-
The printer's name is displayed.
- Location
-
The installed location of the printer is displayed as set at Settings/Registration > Device Management > Device Information Settings.
- Login User
-
Information for the logged in user is displayed.
- Log Out
-
Log out from the Remote UI and return to the login screen.
- Language
-
Change the Remote UI display language.
 Important
-
The language on the PC and on the Remote UI must be the same. If the display languages are different, it may prevent entered information from being displayed correctly, or prevent specified destinations such as folders, the server, from being accessible.
-
- Email to Administrator
-
Create email addressed to the administrator set at Settings/Registration > User Management > Administrator Information.
- Last Updated
-
The date and time information displayed in the portal screen was updated is displayed. Click the
 to the right of the date and time to update to the latest information.
 - Device Basic Information
-
The current status of the printer and error information is displayed. If an error has occurred, a link to an error information screen is displayed.
- Consumables Information
-
Information for paper / ink tanks / the maintenance cartridge is displayed.
Click Check Consumables Details... to check the model number of ink tanks.
- Support Link
-
A link to support information for the printer is displayed as set at Settings/Registration > License/Other > Support Link.
- Status Monitor/Cancel
-
The Status Monitor/Cancel screen appears. Check the current processing and use of functions, as well as operation, error information, etc. of the printer.
- Checking the Print Job Status and Log
- Checking the Copy Job Status and Log
- Checking the Send and Save Status and Log of Scanned Data
Note-
Statuses that you can check in the Status Monitor/Cancel screen depend on the mode that you are logged in with.
If you are logged in with Administrator Mode, all statuses are displayed.
- Settings/Registration
-
The Settings/Registration screen appears. If you are logged in with Administrator Mode, all operations for changing settings, saving/reading data, etc. are available.
Important-
Items that can be set in the Settings/Registration screen are mostly the same as in the settings menu on the operation panel. However, there are some items that can only be set at either the operation panel or the Remote UI.
-
The printer must be restarted to apply settings changes for some items. If the printer must be restarted, The following changes will be effective after the main power is turned OFF and ON. appears at the top of the screen.
-
- Address Book
-
The Address Book screen appears. If you are logged in with Administrator Mode, you can register to/edit the address book.
Important-
The destination for saving files (shared folders) can be registered from the Remote UI.
-
- Initial Settings (Administrator Mode only)
-
The Initial Settings screen appears. You can also change the initial scan settings.
-
Email Sending Settings
Make settings for sending scanned originals by email.
-
Folder Storing Settings
Make settings for saving scanned originals to a shared folder.
-
- Utilities
-
The Utilities screen appears. You can run some maintenance items, such as print head cleaning.
