Menu Structure in the Overview screen and Home screen
As soon as the printer starts up, the Home screen appears in the touch screen.
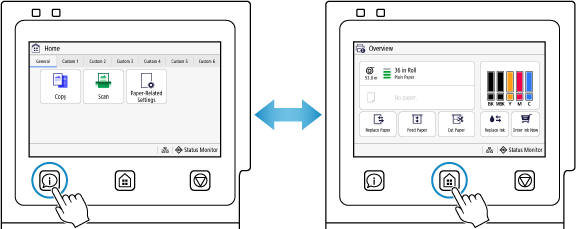
 Note
Note
-
You can change the screen that appears when the printer starts up with settings.
-
You can change operation panel display items such as the language, units, and showing/hiding messages. You can also reverse the screen colors and adjust the brightness for easier viewing.
-
After a certain time elapses with no operating activity, any changes or editing being made in a screen are cleared, and the screen when the printer starts up appears. You can change the time that elapses before the screen is cleared, and the screen that appears.
Overview screen structure
The screen that appears when the Overview button is pressed in the operation panel.
The Overview screen allows you to perform operations for using paper and replacing ink.
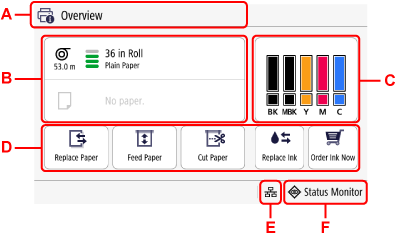
- A: Printer Information Display Area
-
Displays the printer status, messages, and other information.
- B: Paper Setting Display Area
- Displays information on loaded paper. Selecting this area displays the menu for making paper settings.
- C: Ink Display Area
- Displays the current estimated ink levels. Select this area to check a model number or view more detailed information.
- D: Basic Menu
- Frequently used items pertaining to paper and ink appear, such as Replace Paper and Replace Ink, and you can access them here.
- E: Network
-
Displays the current network status.
 Appears when connected via a Wi-Fi router.
 Appears when connected to a wired LAN.
Selecting the network icon displays the network settings screen.
- F: Status Monitor
-
Check printer information, usage status/logs, network settings, error information, etc.
Home screen structure
The screen that appears when the HOME button is pressed in the operation panel.
You can change copy/scan and printer settings in the Home screen.
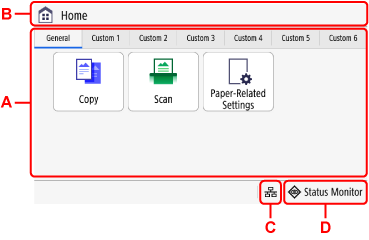
- A: Menu items
-
Function and setting buttons are displayed grouped in different tabs.
Select a tab, or flick the screen left/right, to switch displayed buttons.
Note-
You can add shortcut buttons, or change button layout and tab names.
-
- B: Printer information display area
-
Printer status, messages, etc. appear.
- C: Network
-
Your network is displayed.
Appears when connected via a Wi-Fi router. Appears when connected to a wired LAN.Selecting the network icon displays the network settings screen.
- D: Status Monitor
-
Check printer information, usage status/logs, network settings, error information, etc.
Message display
A message is displayed when an error occurs, or when remaining ink or paper has run out.
If action to take is displayed, follow the instructions to remedy the situation. If action is not displayed, you can check the cause and how to remedy it from the message or code.
Note
-
If the message is long, the display alternates at a set interval.
Basic Touch Screen Operations
You can select various functions and settings by gently touching and swiping the touch screen with your fingertip.
 Important
-
Take the following precautions when operating the touch screen. Otherwise, the touch screen may malfunction or become damaged.
- Do not forcibly press the touch screen with your finger.
- Do not press the touch screen with an object other than your finger (such as a ballpoint pen, pencil, fingernail, or other object with a sharp tip).
- Do not operate the touch screen with wet or dirty hands.
- Do not place objects on top of the touch screen.
- Do not place a protective film over the touch screen. Removing it can damage the touch screen.
