
<Adjust Image Quality>
All the settings related to image quality adjustment are listed with descriptions.
|
|
Asterisks (*)Settings marked with "*" cannot be imported or exported.
|
<Black Text Processing for Color>
Select whether the color of black or blackish text in color documents should be reproduced as true black or as a color more or less close to that of the original. For each option, you can adjust the degree of effect. You can set values for the feeder and the platen glass separately. Adjusting Values for Text Color Reproducibility
<Color Correction>
Makes adjustment to maintain or improve as well as ensure stable quality during printing.
<Auto (Pattern Scan)>
Scan sheets the machine prints out to allow the machine to automatically correct colors.
<All Paper Types>
Use plain paper to perform correction.
<Single Paper Type>
Print out and scan adjustment images to correct colors. You can select the paper type to use for adjustment.
<Restore Initial Settings>
Return (initialize) the correction value for color correction to its default.
<Manual (Visual Check)>
Visually check an output test page to determine an adjustment value for density.
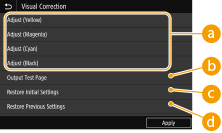
 <Adjust (Yellow)>/<Adjust (Magenta)>/<Adjust (Cyan)>/<Adjust (Black)>
Select colors to adjust, and adjust the density values.
 <Output Test Page>
Output a test page to check visually.
 <Restore Initial Settings>
Return the adjustment value of each color to its initial value.
 <Restore Previous Settings>
Return the adjustment value of each color to its previous value.
<Abrasion Prevention>
Correct paper abrasion by widening the space between the print head and the paper. Preventing Abrasion
<1-sided>
Set whether to correct abrasion during 1-sided printing.
<2-sided>
Set whether to correct abrasion during 2-sided printing.
<Print Head Alignment>
Adjust the position of the print head if printed vertical lines are distorted or colors are mismatched. Any of A4, A3, 11x17, or LTR size plain paper can be used.Aligning the Print Head
<Density/Drying Time Adjustment>
If ink from already output sheets smudges paper, setting the print density or wait time until ink dries after printing can correct the problem. Adjusting the Density and Ink Drying Time
<Adjust for All Paper Sources>
Adjust all feed slots at the same time.
<Adjust by Paper Source>
Adjust feed slots individually.
<Paper Curl Adjustment After Printing>
If curling in output paper causes paper in the output tray to be untidy, adjust paper curling. Adjusting Paper Curling after Printing
<Adjust for All Paper Sources>
Adjust all feed slots at the same time.
<Adjust by Paper Source>
Adjust feed slots individually.
<Margin Adjustment>
Adjust the amount of margin during printing for each paper source. Adjusting Margins
<Paper Curl Prevention On Output>
Correct stacking in the output tray if paper arches or rolls back and causes paper in the output tray to be untidy. Correcting Arching of Paper when Output
<Adjusting Maintenance Interval>
If white streaks appear again a while after being corrected with print head cleaning, adjust the maintenance interval. Perform print head cleaning first if it has not yet been performed.Cleaning the Print Head
Try in the order "1" then "2". Maintenance is performed more frequently with "2" than "1". You can select "0" to restore the default setting.
Try in the order "1" then "2". Maintenance is performed more frequently with "2" than "1". You can select "0" to restore the default setting.
<White Streak Correction>
If white streaks are not corrected even after performing print head cleaning, perform white streak correction. Correcting White Streaks
If white streaks appear again a while after being corrected with print head cleaning, adjust the maintenance interval. Perform print head cleaning first if it has not yet been performed.Cleaning the Print Head
If white streaks appear again a while after being corrected with print head cleaning, adjust the maintenance interval. Perform print head cleaning first if it has not yet been performed.Cleaning the Print Head