Adjusting Margins
If a document is printed off center or out of the print area, adjust the margins. You can adjust the margins for each paper source. Specify adjustment in increments of 0.01 inches (0.1 mm).

Check the version of the machine’s firmware Main Controller. Checking the Firmware Version
Adjusting Margins: Firmware Main Controller Version: Ver. 03.99 or Earlier
1
Print a pattern (nozzle check pattern) to adjust margins.
|
1
|
Either pull out the drawer of the paper source slightly that you will not adjust margins for, or load paper only in the paper source that you will adjust for.
Size: A4, A3, 11x17, or LTR
 It is recommended to adjustment with the paper that will be used.
If using a size other than A4, A3, 11x17, or LTR, print any image to adjust margins.
Align the edges of the paper on a flat surface before loading.
Align the paper guides with the left and right edges and the back edge of the paper using the paper size indicator as a guide.
Do not squeeze the paper too tightly with the paper guides. Doing so may prevent paper from feeding well.
|
|
2
|
In the Home screen, select <Menu>. Home Screen
|
|
3
|
<Adjustment/Maintenance>
 <Maintenance>. <Maintenance>. |
|
4
|
Select <Nozzle Check Pattern>.
|
|
5
|
Select the paper type.
|
|
6
|
Check that the paper displayed on the screen is loaded, and select <OK>.
|
|
7
|
Select <Start>.
The check pattern is printed.
 |
|
8
|
On the next screen, select <A>, and then <Close>.
|
2
Check the margin adjustment values to adjust margins.
Check the direction and distance to adjust.
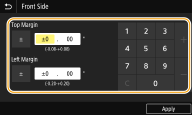
To adjust the margins, specify the direction using "+" and "-" and the distance using "mm". For <Top Margin>, specify a value with "+" to shift the print position in the up-to-down direction. For <Left Margin>, specify a value with "+" to shift the print position in the left-to-right direction. To shift in the reverse direction, specify a value with "-".
To adjust the margins, specify the direction using "+" and "-" and the distance using "mm". For <Top Margin>, specify a value with "+" to shift the print position in the up-to-down direction. For <Left Margin>, specify a value with "+" to shift the print position in the left-to-right direction. To shift in the reverse direction, specify a value with "-".
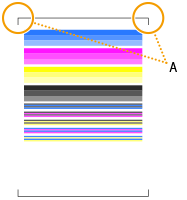
A:Leading edge of the printed pattern
|
<Top Margin>
 |
|
<Left Margin>
 |
 |
|
To specify "inch" instead of "mm", perform the following settings.
<Menu>  <Preferences> <Preferences>  <Display Settings> <Display Settings>  <Millimeter/Inch Entry Switch> <Millimeter/Inch Entry Switch>  Select <Millimeter> or <Inch> Select <Millimeter> or <Inch>   |
|
1
|
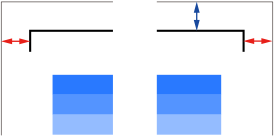
Check the adjustment values so that the black frame of the check pattern located near the leading edge of the print pattern is printed as follows.
Check the adjustment value to make the left and right margins (the length of the red arrow) the same.
Check the adjustment value so that the leading edge margin (the length of the blue arrow) is about 0.16 inches (4 mm).
 |
|
2
|
Select <Menu> in the Home screen. Home Screen
|
|
3
|
Select <Adjustment/Maintenance>
 <Adjust Image Quality>. <Adjust Image Quality>. |
|
4
|
Select <Margin Adjustment>.
|
|
5
|
Select the paper source.
 |
|
6
|
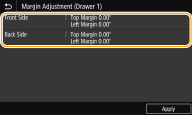
Select the printing side to adjust.
If performing 1-sided printing, select <Front Side>.
If performing 2-sided printing, select <Front Side> and <Back Side>.
When adjusting margins with a nozzle check pattern, set the same values for the front and back sides.
 |
|
7
|
Specify adjustment values, and select <Apply>.
 |
|
8
|
Select <Apply>.
|
 |
|
You can also adjust margins separately for the front and back sides. Print any image using 2-sided printing to adjust margins.
|
3
To check whether the margin adjustment was performed correctly, print a nozzle check pattern again.
Perform step 1 to check that the black border of the check pattern is printed equally on the left and right sides and that the leading edge margin is about 0.16 inches (4 mm).
|
Adjusting the Print Position for All Print Jobs
|
|
You can use <Function Settings> in the setting menu of the operation panel to adjust the print position for all print jobs, irrespective of the paper source. The print position can be adjusted in 0.01 inch (0.5 mm) increments between -2.00 inches (-50.0 mm) and +2.00 inches (+50.0 mm). <Offset Short Edge/Offset Long Edge>
|
Adjusting Margins: Firmware Main Controller Version: Ver. 04.00 or Later
1
Print a pattern (nozzle check pattern) to adjust margins.
|
1
|
Either pull out the drawer of the paper source slightly that you will not adjust margins for, or load paper only in the paper source that you will adjust for.
Size: A5, A4, A3, 11x17, LTR, or STMT
 It is recommended to adjustment with the paper that will be used.
If using a size other than A5, A4, A3, 11x17, LTR, or STMT, print any image to adjust margins.
Align the edges of the paper on a flat surface before loading.
Align the paper guides with the left and right edges and the back edge of the paper using the paper size indicator as a guide.
Do not squeeze the paper too tightly with the paper guides. Doing so may prevent paper from feeding well.
|
|
2
|
In the Home screen, select <Menu>. Home Screen
|
|
3
|
<Adjustment/Maintenance>
 <Maintenance>. <Maintenance>. |
|
4
|
Select <Nozzle Check Pattern>.
|
|
5
|
Select the paper type.
|
|
6
|
Check that the paper displayed on the screen is loaded, and select <OK>.
|
|
7
|
Select <Start>.
The check pattern is printed.
 |
|
8
|
On the next screen, select <A>, and then <Close>.
|
2
Check the margin adjustment values to adjust margins.
Check the direction and distance to adjust.
To adjust the margins, specify the direction using "+" and "-" and the distance using "mm". For <Top Margin>, specify a value with "+" to shift the print position in the up-to-down direction. For <Left Margin>, specify a value with "+" to shift the print position in the left-to-right direction. To shift in the reverse direction, specify a value with "-".
To adjust the margins, specify the direction using "+" and "-" and the distance using "mm". For <Top Margin>, specify a value with "+" to shift the print position in the up-to-down direction. For <Left Margin>, specify a value with "+" to shift the print position in the left-to-right direction. To shift in the reverse direction, specify a value with "-".

A:Leading edge of the printed pattern
|
<Top Margin>
 |
|
<Left Margin>
 |
 |
|
To specify "inch" instead of "mm", perform the following settings.
<Menu>  <Preferences> <Preferences>  <Display Settings> <Display Settings>  <Millimeter/Inch Entry Switch> <Millimeter/Inch Entry Switch>  Select <Millimeter> or <Inch> Select <Millimeter> or <Inch>   |
|
1
|
Check the adjustment values so that the black frame of the check pattern located near the leading edge of the print pattern is printed as follows.
Check the adjustment value to make the left and right margins (the length of the red arrow) the same.
Check the adjustment value so that the leading edge margin (the length of the blue arrow) is about 0.16 inches (4 mm).
 |
|
2
|
Select <Menu> in the Home screen. Home Screen
|
|
3
|
Select <Adjustment/Maintenance>
 <Adjust Image Quality>. <Adjust Image Quality>. |
|
4
|
Select <Margin Adjustment>.
|
|
5
|
Select the paper source.
 |
|
6
|
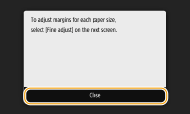
Check the message, and select <Close>.
 To adjust the left edge marginAdjusting the Left Edge Margin
To adjust the leading edge marginAdjusting the Leading Edge Margin
|
Adjusting the Left Edge Margin
|
1
|
Select <Fine Adjust>.
 |
|
2
|
Select the print size you want to adjust.
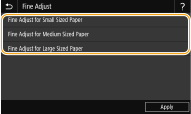 For details on large/medium/small paper sizes, press the <?> button.
Sizes when adjusting the margin with a nozzle check pattern are as follows.
Small sizes: A5, STMT
Medium sizes: A4, LTR
Large sizes: A3, 11x17
|
|
3
|
Select the printing side to adjust.
If performing 1-sided printing, select <Front Side>.
If performing 2-sided printing, select <Front Side> and <Back Side>.
When adjusting the margin using a nozzle check pattern, set the same values for the front and back sides. 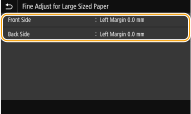 |
|
4
|
Specify adjustment values, and select <Apply>.
Any fine adjustment value is added onto the margin adjustment value.
 |
|
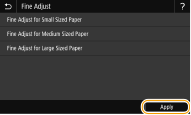
5
|
Select <Apply>.
 |
|
6
|
Select <Apply>.
|
Adjusting the Leading Edge Margin
|
1
|
Select the printing side to adjust.
If performing 1-sided printing, select <Front Side>.
If performing 2-sided printing, select <Front Side> and <Back Side>.
When adjusting the margin using a nozzle check pattern, set the same values for the front and back sides. 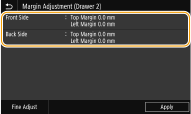 |
|
2
|
Specify adjustment values, and select <Apply>.
 |
|
3
|
Select <Apply>.
|
 |
|
You can also adjust margins separately for the front and back sides. Print any image using 2-sided printing to adjust margins.
|
3
To check whether the margin adjustment was performed correctly, print a nozzle check pattern again.
Perform step 1 to check that the black border of the check pattern is printed equally on the left and right sides and that the leading edge margin is about 0.16 inches (4 mm).
|
Adjusting the Print Position for All Print Jobs
|
|
You can use <Function Settings> in the setting menu of the operation panel to adjust the print position for all print jobs, irrespective of the paper source. The print position can be adjusted in 0.01 inch (0.5 mm) increments between -2.00 inches (-50.0 mm) and +2.00 inches (+50.0 mm). <Offset Short Edge/Offset Long Edge>
|