Correcting White Streaks
Perform this correction if white streaks are not corrected even after performing print head cleaning.
Perform print head cleaning first if it has not yet been performed. Cleaning the Print Head
Perform print head cleaning first if it has not yet been performed. Cleaning the Print Head

Prepare the following paper.
Plain paper (recycled paper can be used)
Size: any of A3, 11x17, LTR, or A4
A3 or 11x17 is recommended.
A3 or 11x17 is recommended.
Sheets: 1
Paper clean and white on both front and back
1
Load paper in a paper drawer or the multi-purpose tray.
Make paper settings also. Loading Paper
2
Select <Menu> in the Home screen. Home Screen
3
Select <Adjustment/Maintenance>  <Adjust Image Quality>.
 <Adjust Image Quality>.
4
Select <White Streak Correction>.
5
Check that the size and type of paper displayed on the screen is loaded in the machine, and select <Next>.
6
Confirm the procedure, and select <Start>.
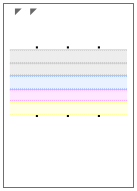
An adjustment image is printed.

7
Open the feeder after the screen displayed during printing disappears.
8
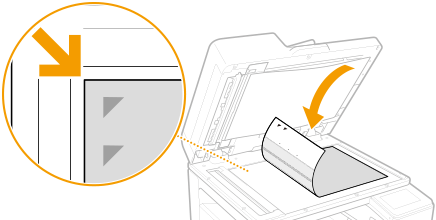
Place the adjustment image on the platen glass.
Place the adjustment image with the print side facing down and the  mark in the upper left corner of the machine.
 mark in the upper left corner of the machine.
9
Gently close the feeder.
10
Select <Start Scanning>.
The placed adjustment image is scanned, and white streaks are corrected.
11
When a message appears notifying that adjustment is complete, open the feeder, and remove the adjustment image.
12
Gently close the feeder.
 |
If <Could not perform correction.> is displayedIs the paper displayed in step 5 loaded in the paper source?
Is the adjustment image placed on the platen glass with the print side facing down and the
 mark in the upper left corner of the machine? mark in the upper left corner of the machine? |