Setting Items for Scanning Using Operation Panel
You can change settings for scanning at the printer.
- Scanning (Saving to a USB Flash Drive)
- Scanning (Sending by E-mail)
- Scanning (Saving to a Shared Folder)
 Important
-
This printer has many different image adjustment functions that can be used with copied/scanned images. However, your original may sometimes prevent these adjustment functions from being effective.
-
Displayed setting items depend on the scan function.
 Note
Note
-
Register your scan settings as Favorite Settings to recall them when needed.
-
Specify the destination using the send log to recall the scan settings used when sending/saving that scan data.
-
You can also change the initial scan settings.
Destinations (email send destinations/shared folder save locations)
Specify destinations with the Specify Destination tab.
Scan settings
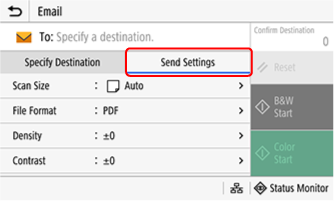
Select and set items from the scan screen or Send Settings tab.
-
Scan Size
Select the original size.
Setting this to Auto allows the printer to automatically detect the size from the width of the loaded original.
Important-
Automatic detection might fail depending on the original, such as with tracing paper or an original with torn ends.
If the printer fails to automatically detect the original size, set the scan size manually.
-
Setting non-standard sizes
Select Specify Custom Size, enter the lengths for the X edge and Y edge, and press Apply.
Note-
You can also register a size for originals you use frequently and that are a specific non-standard size. It can be recalled in the screen for entering the size, so you do not have to enter the size every time.
Register Size > Select any of S1 to S3 > Enter X and Y > Apply
-
-
-
File Format
Select the scan data format from PDF/JPEG.
-
Density
Adjust the density.
Set to + for heavier, or to - for lighter.
-
Contrast
Adjust the contrast.
Set to + for stronger, or to - for weaker.
-
Saturation
Adjust the saturation.
Set to + for brighter color, or to - for more subdued color.
Important-
In image saturation enhancement, a low-saturation image is enhanced so it becomes brighter.
Applying this to an already highly saturated image may prevent any visual effectiveness.
-
-
Original Type
Set the type of original to scan.
-
CAD (Line Drawing)
Select this to scan CAD drawing-type line drawings.
-
Poster/Photo
Select to scan posters, photos, etc.
-
Drawing/Map
Select to scan drawings and maps.
-
Blueprint (Black & White Conversion)
Select to scan blueprint drawings.
-
Inverse Blueprint (Black & White Conversion)
Select to scan inverse blueprint drawings.
-
Tracing Paper
Select to scan tracing paper, etc.
Important-
This product allows you to select Blueprint (Black & White Conversion) and Inverse Blueprint (Black & White Conversion) original types. Depending on the condition of the original, copying results may not be as intended, such as background remaining or lines being incomplete.
-
Blueprint (Black & White Conversion) and Inverse Blueprint (Black & White Conversion) are settings specialized for scanning blueprint originals. All data scanned using these settings are output in monochrome (black and white only). To scan while retaining an original's color information and gray scale information, use the CAD (Line Drawing) setting.
-
-
Resolution
Select the resolution to scan the original at.
A higher resolution results in crisper images, however, send time is longer.
-
Sharpness
Adjust the sharpness.
Emphasize contours and lines for crisper images, or lighten them for softer images.
Set to + to print blurry text and graphics more clearly. Set to - to alleviate moiré (striped pattern noise) in photos.
-
Data Size
Set the data size of scanned images.
Set any one of Small: Memory Priority, Standard, or Large: Image Quality Priority.
-
File Name
Specify a character string to add to the start of the file name of the scan data.
-
Subject/Message
Set a subject and type a message to send scan data by email.
-
Reply To
Select and set an email address to be indicated as the address for email replies (Reply-To) from the address book. If not set, the printer's email address is indicated as the reply address.
Note-
The printer's email address is always indicated as the originating email address (From) regardless of the Reply To setting.
-
To indicate the originating sender together with the email address, set the sender with Register Unit Name.
-
-
Priority
Select a priority level for sending scan data by email.
-
Enhance White
Emphasize white.
Setting this to + emphasizes white, so that bright portions of images are brighter.
-
Enhance Black
Emphasize black.
Setting this to + emphasizes black, so that dark portions of images are darker.
Important-
Black enhancement works to emphasize black components in an image, to increase visual recognition.
Over-enhancing black emphasizes image noise, and may cause black dots to appear in an image.
-
-
Favorite Settings
You can register any settings you changed as Favorite Settings.
