Scanning (Saving to a USB Flash Drive)
Scan an original and save the scan data to a USB flash drive.
Prepare Beforehand
 Important
-
Do not remove the USB flash drive from the printer under the following conditions:
-
While scanning is in progress
- Before saving the scanned data
-
-
For safety reasons, we recommend backing up the scanned data saved on a USB flash drive to another media periodically to avoid unexpected accidents.
-
We assume no responsibility for damage to or loss of data for whatever reason even within the warranty period.
Saving Scanned Data on USB Flash Drive
-
Load the original.
-
Insert USB flash drive into USB flash drive port.
If the Memory Media screen appears, press USB Scan and go to step 5.
-
In the Home screen, select Scan.
-
Select USB Memory.
-
Make scan settings as required.
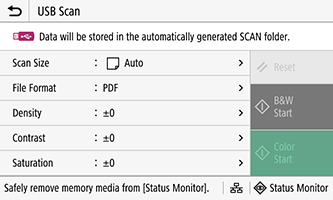
-
Select B&W Start or Color Start.
Original scan begins.
 Note
Note-
To stop scanning select Cancel or press the Stop button.
-
-
Holding the original to prevent it from falling, select OK.
The retainer releases the original, so allow the original to move. The scan data is saved.
Note-
Scan data is saved with the following folder name and file name.
-
Folder name: "SCAN_XX" (XX is a number)
-
File name: "SCAN0001.pdf"
The portion "SCAN" in the file name can be changed to any string of characters with the scan settings.
-
-
-
After the scan is completed, remove the USB flash drive.
Select Status Monitor > Rmv. Mem. Media, then remove.
