Specifying Destinations
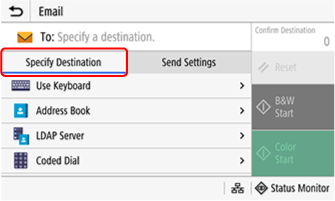
Specify destinations as follows to send/save scan data.
The method of specifying or the number of destinations that can be specified depend on the function and destination.
- Specifying a Destination - Address Book
- Specifying a Destination - Send Log
- Specifying a Destination - LDAP Server
- Specifying a Destination - Direct Entry
- Canceling Specified Destinations
 Important
-
Cc/Bcc destinations can only be specified from the address book when sending scan data by email.
 Note
Note
-
Repeat the step of specifying a destination so as to specify several destinations.
-
A screen for confirming that a correct destination was specified may appear depending on the printer settings. The method for specifying a destination may be limited, or sending may be limited to only specific destinations.
Specifying a Destination - Address Book
Specify a destination registered in the printer's address book.
-
In the Specify Destination tab in the scan screen, select Address Book.
If the To/Cc/Bcc screen appears, select the type of destination (To/Cc/Bcc) to specify.
Alternatively, select Address Book in the Home screen to specify a destination.
-
Checkmark destinations to specify, and select Apply.
Destinations are specified.
Note-
If the address book is recalled in the Home screen to specify destinations, the destinations will be already entered when the scan screen is displayed.
-
Select the index at the bottom of the address book screen to filter and display destinations.
-
Specifying with Coded Dial codes
You can also enter Coded Dial codes in the scan screen to specify destinations.
-
In the Specify Destination tab in the scan screen, select Coded Dial.
If the To/Cc/Bcc screen appears, select the type of destination (To/Cc/Bcc) to specify.
-
Enter the 3-digit Coded Dial code.
If a screen for confirming the destination appears, check that the destination is correct and press OK.
Specifying a Destination - Send Log
Recall and specify a destination specified before from the scan send log. Scan settings at the time of sending are applied together with the destination.
Important
-
Recalling the send log overwrites any already-set destinations and scan settings.
-
If sending from the log is restricted, the send log cannot be used.
-
In the Specify Destination tab in the scan screen, select Recall Settings.
-
Select the log to recall
Destinations and scan settings from the selected log are applied. You can change recalled destinations and scan settings before sending.
Note-
If several destinations are contained in a log, only the first destination is displayed, but all destinations are applied.
-
The send log is erased at the following times.
-
The power is turned off
-
A new destination is restricted from being entered
-
-
Specifying a Destination - LDAP Server
Search for and specify a destination from user information managed with an LDAP server
If logged on for authenticated sending (LDAP server authentication), you as the logged-on user can specify your user email address.
-
In the Specify Destination tab in the scan screen, select LDAP Server.
-
If logged on for authenticated sending, you as the logged-on user can specify your user email address by selecting Specify Myself as Destination. No further operation is required.
-
-
Select the LDAP server.
-
Specify the search conditions, and select Start Searching.
Users matching the search conditions are displayed.
-
If an authentication screen appears, enter the user name and password for the printer registered to the LDAP server.
-
-
Select the user to register to the address book.
The name and destination are entered in the address book register screen.
Specifying a Destination - Direct Entry
Use the operation panel keyboard to enter the destination.
-
In the Specify Destination tab in the scan screen, select Use Keyboard.
-
Enter the email address, and select Apply.
Destinations are specified.
Canceling Specified Destinations
Cancel any specified destinations that are unnecessary.
-
In the scan screen, select Confirm Destination.
-
Checkmark destinations and groups to cancel, and select Remove from Dest..
Note-
If you checkmarked a group, check registered destinations by selecting Details > Destination. Destinations registered in a group cannot be canceled individually.
-
-
Select Yes.
Destinations are canceled.
