
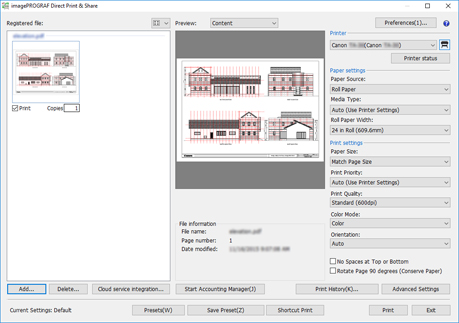
Main Screen
You can specify files and print them on the Direct Print & Share main screen. The main screen consists mainly of the Registered file list area on the left side, the preview area in the middle, and the print settings area on the right side.
![]() Note
Note
-
You can maximize the Direct Print & Share screen to fill the screen on your PC.
By clicking on the top-right, you can make it easier to check the content of the Registered file list and the preview area in the center.
- Registered file list
-
Add files you want to print to this list. For more information, see "Registered file List".
 Button
-
Click this button if you want to switch the Registered file list display method.
You can switch between thumbnail display and text display. - Add...
-
Click this button if you want to add files to the Registered file list. For information on how to add files, see "Add Files to Print".
- Delete...
-
If you want to delete files from the Registered file list, select the files you want to delete, and then click this button.
- Cloud service integration...
-
The Cloud service integration dialog box will open. It is used when downloading files from cloud storage or uploading files to cloud storage.
-
For more information, see "Cloud service integration Dialog Box".
- Preview
-
Preview of the file selected in the Registered file list is displayed.
-
Select Content from the pull-down menu to display the file image. Information such as file name and updated date and time of the file are displayed in File information.
-
Select Layout to display what the sheet layout will look like when printed. Information such as configured document size and output sheet size are displayed in Print Information.
 Note
Note-
HP-GL/2 files can only be previewed in Layout preview.
-
- Start Accounting Manager
-
Starts the Accounting Manager. Accounting Manager is a software program that constantly communicates with managed printers to collect job logs.
The collected job logs are saved to the hard disk of your computer, which you can use to calculate total printing costs and for other purposes. - Preferences
-
The Preferences dialog box will open. It is used for setting automatic launch of the status monitor, using the driver's internal spool processing function, and inserting blank pages.
For more information, see "Preferences Dialog Box (Main Screen)". - Printer
-
Select the printer you want to use to print files.
 Button
-
Click this button to add a printer to the Printer pull-down menu. For information on how to add printers, see "Add Printers".
- Printer status
-
The status monitor of the selected printer will start, and the status of the print job can be confirmed.
When using an Océ printer, Remote UI will open allowing you to check the printing progress. - Note
-
For detailed information, see the status monitor help.
-
- Paper settings
-
You can configure the following printer driver settings: Paper Source, Media Type, and Roll Paper Width.
-
This cannot be configured when HP-GL/2 files are selected.
- Print settings
-
You can configure the following printer driver settings: Paper Size, Print Priority, Print Quality, Color Mode, Orientation, No Spaces at Top or Bottom, and Rotate Page 90 degrees (Conserve Paper).
-
Only Print Quality can be configured when HP-GL/2 files are selected.
 Important
-
If Paper Size is set to something other than Match Page Size, the image will be enlarged or shrunk to match the printing area of the output sheet size, and then printed.
-
- Note
-
For information on each of the setting items of the printer driver, see the printer driver help.
-
Auto in Orientation cannot be configured in driver properties. If you select Auto, the appropriate orientation for each page will be automatically configured.
-
- Print History...
-
Click this button to browse through your print history and print. For information on how to print from print history, see "Print from Print History".
- Advanced settings
-
Driver properties will open.
- Note
-
For settings that are not in Paper settings or Print settings, open the driver properties and configure settings.
-
This button cannot be clicked when HP-GL/2 files are selected.
-
- Current Settings
-
Display the name of the setting that is currently applied.
- Presets
-
Click this button to replicate saved settings for the current settings. For information on how to replicate settings, see "Call Frequently Used Settings and Print".
- Save Preset
-
Click this button to save current settings. For information on how to save settings, see "Save Frequently Used Settings" in "Call Frequently Used Settings and Print".
- Shortcut Print
-
The Shortcut Print dialog box will open. You can create shortcut icons that can be used to print simply by dropping the data you want to print.
-
For instructions on how to create Shortcut Print icons, see "Create Shortcut Print Icons".
-
Printing will start. The Print dialog box will open while printing is in progress.
 Button
-
The Direct Print & Share online manual will be displayed.
 Icon
Icon-
Click About imagePROGRAF Direct Print & Share... to display information such as version information.
![]() Note
Note
-
When using an Océ printer, Start Accounting Manager, Preferences, Print settings (Print Priority, No Spaces at Top or Bottom, Rotate Page 90 degrees (Conserve Paper)), and Advanced Settings will not function.
