| Handy Functions |
|
Locking objects and backgrounds Specifying object size and position numerically Editing multiple objects at once |
To display a context menu, right-click an image or text on a poster.
Major commands for image or text editing are available in the context menu.
For more information, see "Context menus."
You can nudge objects by pressing the arrow key.
1. Select one or more objects to move.
2. To move the object, press the arrow key (up, down, left, and right). The object moves a little each time you press a key.
|
|
|
|
Click ![]() (Undo) to cancel your last action. This allows to undo up to 20 past actions.
(Undo) to cancel your last action. This allows to undo up to 20 past actions.
Click ![]() (Redo) to cancel Undo. This allows to redo up to 20 of the most recent "Undos".
(Redo) to cancel Undo. This allows to redo up to 20 of the most recent "Undos".
Enlarge the view (zoom in) if your poster is full of photos or text and it is difficult to select objects. Reduce the view to see the entire poster.
To scale the poster view, click ![]() (Enlarge) or
(Enlarge) or ![]() (Reduce). Alternatively, select a magnification or enlargement method from
(Reduce). Alternatively, select a magnification or enlargement method from ![]() , or enter a magnification value directly.
, or enter a magnification value directly.
In the Edit or Print task, double-clicking an object displays subtasks according to the object. For text, an editing box is also displayed.
Double-clicking the QR code opens the QR code dialog box.
PosterArtist offers the following functions.
Temporary tray is the location to keep photos, clipart, etc. you are not sure whether to use or frequently used photos. Templates and photos in temporary tray can be added to posters when needed without searching through thumbnails again.
While preparing posters, you may accidentally select or move nearby objects. You can avoid this by locking the objects to keep them in position. You can also lock any backgrounds to help ensure other design work goes more smoothly.
![]() Locking object or line positions
Locking object or line positions
You can create a neat, organized layout by aligning objects. PosterArtist offers an array of alignment options, including aligning on either side or relative to the center of the page.
The guide and grid are also available for aligning objects.
You can specify the general size, position, and orientation of objects by using the mouse. After this, you can specify these settings in greater detail by entering values in the Properties dialog box.
![]() Specifying size, position, or orientation numerically
Specifying size, position, or orientation numerically
You can execute PosterArtist tasks when multiple objects are selected.
For example, after initially selecting multiple images, you can apply the same frame to all the images at once.
In addition, grouping objects enables you to move them all simultaneously or work with them as a group in other ways.
If you want objects on the poster to overlap, you can specify the order they are superimposed.
You can print with crop marks to indicate where to cut the paper when printing a poster smaller than the roll width. This is a handy feature when cutting out posters.
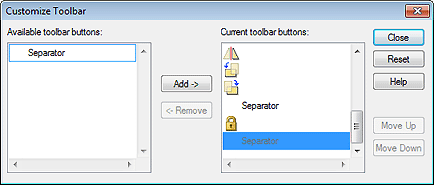
Toolbars can be customized by assigning only the frequently used buttons or by rearranging the order of buttons.
1. To customize the main toolbar, in the Tool menu, select Custom > Main Toolbar.
To customize the sub toolbar, in the Tool menu, select Custom > Sub Toolbar.
The Customize Toolbar dialog box is displayed.

2. To add buttons, in Available toolbar buttons, select the button you want to add then click Add->.
To delete buttons, in Current toolbar buttons, select the button you want to delete then click <-Remove.
To rearrange the order, in Current toolbar buttons, select the button you want to change the order then click Move Up or Move Down.
|
|
3. Click Close.
The Customize Toolbar dialog box is closed.
1. On the Windows taskbar, select start > Programs > Canon PosterArtist > Uninstall PosterArtist.
2. Follow the uninstaller instructions.
You can view all provided templates, photos, clipart, photo frames, text graphics, and backgrounds in the "Template Guide."
The "Quick Guide" briefly describes how to use PosterArtist.
Display user support information by clicking the button in the lower-left of the screen.
Access the website on the Internet to download templates.
![]() Downloading templates on the Internet
Downloading templates on the Internet
Access the website on the Internet to view the latest information of imagePROGRAF printers or other useful information. Tips for poster creation, etc. are also available.
The imagePROGRAF support information button may not be displayed depending on the version of the printer driver.
Open this manual. Information required for operations is contained.