
Main Screen
This is the screen for handling various functions of Professional Print & Layout. Operate each area to correct color tones of images, print them, and more.
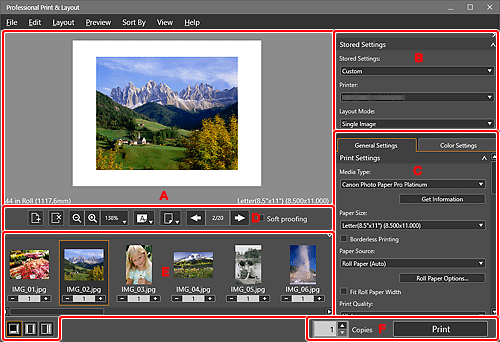
- A: Preview Area
- B: Stored Settings Area
- C: Settings Area
- D: Tools Area
- E: Thumbnails Area
- F: Print Button Area
B: Stored Settings Area
Select the printer you want to use or save the settings made in the Settings area.
C: Settings Area
Make settings for printing.
The Settings area consists of two tabs. For details, see the corresponding page.
- General Settings tab
-
- Frame Settings
- Print Settings
- Layout
- Color Management
- Text Settings
- Color Settings tab
-
- Color Settings
![]() Note
Note
- To show or hide the corresponding category in the Settings area, click
 (Triangle).
 - Frame Settings is displayed when Gallery Wrap is selected for Layout Mode in the Stored Settings area.
D: Tools Area
![]() Note
Note
- The displayed items vary depending on the selected Layout Mode.
 (Add Page)
-
Adds a new page after the selected page.
 (Delete Page)
-
Deletes the selected page.
 (Slot Auto Nesting)
-
Automatically places images apart from each other.
 Note
Note- The space between slots can be set on the Layout tab of the Other Settings dialog box.

 (Zoom Out/Zoom In)
- Reduces or enlarges the display size of preview.
 (Scale)
-
Set the preview scale.
Fit to Width (for filling the entire paper width) or Fit Screen (for displaying the entire image) can also be selected.
 (Paper Orientation)
-
 (Display Paper Horizontally)
- Displays the paper in horizontal orientation.
 (Display Paper Vertically)
- Displays the paper in vertical orientation.
Note- This setting is unavailable when Gallery Wrap is selected for Layout Mode in the Stored Settings area and Panel Preview is displayed.
 (Switch Preview)
-
 (Print Preview)
- Displays a preview of how the images look with the specified paper size.
 (Roll Paper Preview)
- Displays a preview of how the images look on the entire roll paper.
Note- (Switch Preview) is not displayed depending on your printer.
- This setting is unavailable when Gallery Wrap is selected for Layout Mode in the Stored Settings area and Panel Preview is displayed.

 (Previous Page/Next Page)
- Switches the displayed page when there are multiple pages.
- Soft proofing
-
Select this checkbox to display the image on the monitor in a color tone close to the print result.
 Important
- This function is unavailable depending on the selected media type.
Note- Available only when Use ICC Profile is selected for Color Mode.
E: Thumbnails Area
Displays the thumbnails of images.
 (File Name/Number of Copies)
-
Displays the file name of the image and the number of copies set. Set the number of copies (up to 100) for the images you want to print.
You can change the order of images by selecting and dragging them.
Note- This is displayed when Single Image, Multiple Images, or Multiple Images (Auto Nesting) is selected for Layout Mode in the Stored Settings area.
- If Gallery Wrap is selected for Layout Mode in the Stored Settings area, this is displayed when Panel Preview is open. The number of print copies cannot be set.
- Up to 100 images can be displayed in the Thumbnails area. If the number of copies is 0 in the Thumbnails area, that image does not appear in the Preview area.
- To select multiple images, click them while pressing the Ctrl key.
- If started from the Programs folder, you can delete an image in the Thumbnails area by right-clicking it and then selecting Delete.
 (Selected Image/Number of Frames)
-
Images with checkmarks will be printed. The view switches according to the number of frames selected in Panel Layout in Frame Settings on the General Settings tab.
Note- This is displayed when Gallery Wrap is selected for Layout Mode in the Stored Settings area and Print Preview is open.


 (Change Layout)
- Changes the position of the Thumbnails area.
![]() Note
Note
- To show or hide the Thumbnails area, click
 (Triangle) at the upper right of the Thumbnails area.
F: Print Button Area
- Copies
- Set the number of copies to print.
-
Displays the Print dialog box for printing images.
