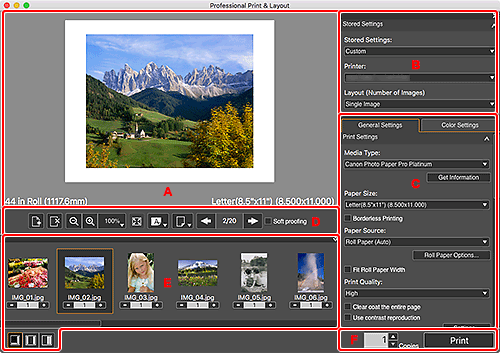
Main Screen
This is the screen for handling various functions of Professional Print & Layout. Operate each area to correct color tones of images, print them, and more.

- A: Preview Area
- B: Stored Settings Area
- C: Settings Area
- D: Tools Area
- E: Thumbnails Area
- F: Print Button Area
B: Stored Settings Area
Select the printer you want to use or save the settings made in the Settings area.
C: Settings Area
Make settings for printing.
The Settings area consists of two tabs. For details, see the corresponding page.
- General Settings tab
-
- Print Settings
- Layout
- Color Management
- Color Settings tab
-
- Color Settings
 Note
Note
- To show or hide the corresponding category in the Settings area, click
 (Triangle).
D: Tools Area
 (Add Page)
-
Adds a new page after the selected page.
 (Delete Page)
-
Deletes the selected page.

 (Zoom Out/Zoom In)
-
Reduces or enlarges the display size of preview.
Display ranges are 25%, 50%, 75%, 100%, 200%, and 400%.
 (Scale)
-
Set the display scale.
Select from 25%, 50%, 75%, 100%, 200%, and 400%, where 100% is the size at which the whole page can be displayed.
 (Whole Image View)
- Displays the preview at the size (100%) at which the whole page can be displayed.
 (Paper Orientation)
-
 (Display Paper Horizontally)
- Displays the paper in horizontal orientation.
 (Display Paper Vertically)
- Displays the paper in vertical orientation.
 (Switch Preview)
-
 (Print Preview)
- Displays a preview when printing on paper other than roll paper.
 (Roll Paper Preview)
- Displays a preview when printing on roll paper.
 Note
Note (Switch Preview) is not displayed depending on your printer.

 (Previous Page/Next Page)
-
Switches the displayed page when there are multiple pages.
 Note
Note- If the number of copies is 0 in the Thumbnails area, that image does not appear in the Preview area.
- Soft proofing
-
Select this checkbox to display the image on the monitor in a color tone close to the print result.
 Important
- This function is unavailable depending on the selected media type.
 Note
Note- Available only when Use ICC Profile is selected for Color Mode.
E: Thumbnails Area
Displays the thumbnails of images. You can change the order of images by selecting and dragging them.

 (Number of Copies)
-
Set the number of copies for the images you want to print.
 Note
Note- Set up to 99 copies.


 (Change Layout)
- Changes the position of the Thumbnails area.
 Note
Note
- To show or hide the Thumbnails area, click
 (Triangle) at the upper right of the Thumbnails area.
 - Up to 100 images can be displayed in the Thumbnails area.
- To select multiple images, click them while pressing the command key.
F: Print Button Area
- Copies
- Set the number of copies to print.
-
You can print images.
 Note
Note- Printing is performed in the order displayed in the Thumbnails area.

