When remaining ink cautions or errors occur, the Alarm lamp will flash orange to inform you of the error. Count the number of flashes and take appropriate action.
 If an Error Occurs
 Note Note
 For information on the compatible ink tank, refer to the printed manual: Getting Started. For information on the compatible ink tank, refer to the printed manual: Getting Started.
If print results become faint or white streaks appear despite sufficient ink levels, see Maintenance Procedure.
|
Replacing Procedure
When you need to replace an ink tank, follow the procedure below.
 Important Important
Handling ink
 If you remove an ink tank, replace it immediately. Do not leave the printer with the ink tank removed. If you remove an ink tank, replace it immediately. Do not leave the printer with the ink tank removed.
Use a new ink tank for replacement. Installing a used ink tank may cause the nozzles to clog. Furthermore, with such an ink tank, the printer will not be able to inform you when to replace the ink tank properly.
Once an ink tank has been installed, do not remove it from the printer and leave it out in the open. This will cause the ink tank to dry out, and the printer may not operate properly when it is reinstalled. To maintain optimal printing quality, use an ink tank within six months of first use.
|
Note
Color ink may be consumed even when printing a black-and-white document or when black-and-white printing is specified.
Every ink is also consumed in the standard cleaning and deep cleaning of the print head and in the system cleaning, which may be necessary to maintain the performance of the printer. When an ink tank is out of ink, replace it immediately with a new one.
 Useful Information about Ink Useful Information about Ink
|
-
Make sure that the power is turned on.
-
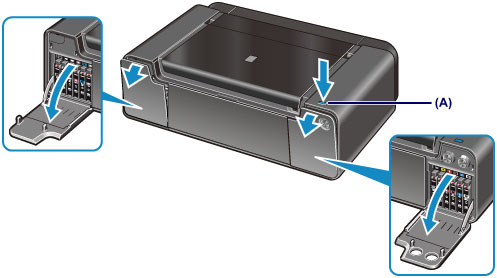
Press the tank cover open button (A).
The tank cover open button flashes blue, and the left and right tank covers start to open.
When the tank covers are fully open, the tank cover open button changes to a slower flash.
Important
Be sure to press the tank cover open button to open the tank covers. Do not force open the tank covers by hand. Doing so may damage the printer.
Do not place anything in front of the tank covers. If the tank covers do not fully open, the Alarm lamp flashes and the tank cover open button goes off.
|
Note
The tank cover open button is not lit during normal operation. It lights up blue when an error or caution that requires checking the ink tank status occurs. In either case, you can open the tank covers by pressing the tank cover open button.
Be sure to close the top cover when opening the tank covers. Otherwise, the tank covers will not open even if you press the tank cover open button.
The time it takes for the tank covers to open after pressing the tank cover open button depends on the printer status. It normally takes about 5 seconds to 1 minute.
|
-
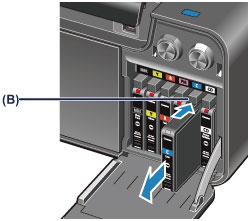
Remove the ink tank with the lamp flashing fast.
Push the Ink Tank Eject button (B) and remove the ink tank.
Important
Handle the ink tank carefully to avoid staining of clothing or the surrounding area.
Discard the empty ink tank according to the local laws and regulations regarding disposal of consumables.
|
Note
Do not remove two or more ink tanks at the same time. Be sure to replace ink tanks one by one when replacing two or more ink tanks.
For details on ink lamp flashing speed, see Checking the Ink Status with the Ink Lamps.
|
-
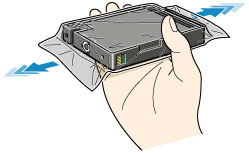
Prepare the new ink tank.
(1) Before removing the ink tank from its package, shake it five to six times horizontally.
Important
Handle the ink tanks carefully. Do not drop or apply excessive pressure to them.
|
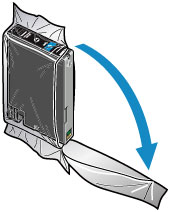
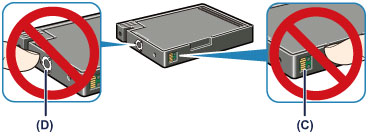
(2) Remove the ink tank from the package.
Important
Do not touch the contact (C) and joint (D) of the ink tank.
|
-
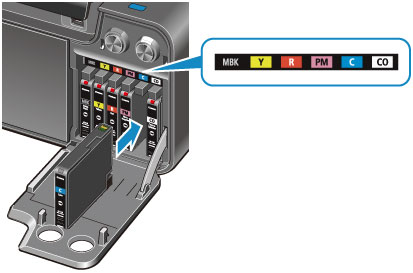
Install the new ink tank.
(1) Insert the new ink tank into its position.
Insert the ink tank into its position according to the label.
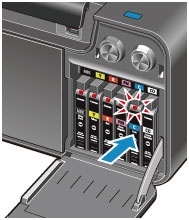
(2) Press the mark  (Push) to set the ink tank firmly into place.
When the installation is completed properly, the ink lamp lights red.
Important
An ink tank cannot be inserted into the wrong position. Be sure to install an ink tank in its correct position below its color on the label.
You cannot print unless all the ink tanks are installed. Be sure to install all the ink tanks.
Once an ink tank is installed, do not remove it until the next replacement. If you remove an ink tank with enough ink, ink may spill out of it.
|
-
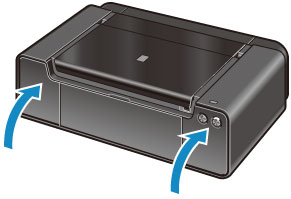
Close the tank covers.
Close the left and right tank covers until they click.
After ink tank replacement, the printer starts mixing the ink automatically and the tank cover open button flashes blue. The printer vibrates during mixing. Wait until the tank cover open button goes off and the printer has stopped making operating noise. This takes about 1 minute.
Note
If the tank cover open button still flashes, make sure that the left and right tank covers are closed properly.
If the Alarm lamp still flashes orange after the tank covers are closed, take appropriate action.
If an Error Occurs
If printed ruled lines are misaligned or the print head position is misaligned, adjust the print head position.
Aligning the Print Head
|


