Saving Received Documents into the Machine (Memory Reception)
 |
|
You can store received faxes into memory of the machine, and then print them later. This feature can prevent unauthorized persons from seeing confidential documents unintentionally.
|
Storing Documents into Memory
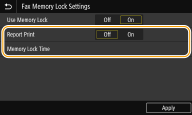
To store received documents into memory, set <Use Memory Lock> to <On>. You can also specify optional settings such as a security setting and a time setting that specifies a period of time during the day in which received documents are stored in memory.
<Menu>  <Function Settings>
  <Receive/Forward>
  <Common Settings>
  <Set Fax/I-Fax Inbox>
  <Fax Memory Lock Settings>
  Select <On> in <Use Memory Lock>
  Specify each setting
  <Apply>

 <Function Settings>
  <Receive/Forward>
  <Common Settings>
  <Set Fax/I-Fax Inbox>
  <Fax Memory Lock Settings>
  Select <On> in <Use Memory Lock>
  Specify each setting
  <Apply>


<Report Print>
Enables you to print RX Result reports every time documents are stored into memory. To print reports, select <On>. You also need to set <RX Result Report> to <On>. RX Result Report
Enables you to print RX Result reports every time documents are stored into memory. To print reports, select <On>. You also need to set <RX Result Report> to <On>. RX Result Report
<Memory Lock Time>
Specify a period of time during the day in which received documents are stored in memory. If you do not set a period of time, the machine stores every document into memory when Memory Reception is turned on.
Specify a period of time during the day in which received documents are stored in memory. If you do not set a period of time, the machine stores every document into memory when Memory Reception is turned on.
Printing Documents in Memory
To print received documents in memory, set <Use Memory Lock> to <Off>. All the documents in memory are printed.
 |
|
You cannot select a specific document for printing.
If a time for the feature to deactivate has been specified, the documents are automatically printed at the specified time.
|
<Menu>  <Function Settings>
  <Receive/Forward>
  <Common Settings>
  <Set Fax/I-Fax Inbox>
  <Fax Memory Lock Settings>
  Select <Off> in <Use Memory Lock>
  <Apply>

 <Function Settings>
  <Receive/Forward>
  <Common Settings>
  <Set Fax/I-Fax Inbox>
  <Fax Memory Lock Settings>
  Select <Off> in <Use Memory Lock>
  <Apply>

Checking/Forwarding/Deleting Documents in Memory
You can check an outline of each document stored in memory, including sender fax numbers and number of pages sent. You can also select and forward a document stored in memory, and delete an unnecessary document, if any.
1
Select <Status Monitor>.
2
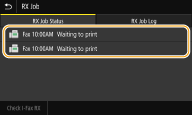
Select <RX Job>.
3
In the <RX Job Status> tab, select the document you want to check/forward/delete.

Displays detailed information about the document.
To forward the document, select <Forward>, and specify the appropriate destination.
To delete the document, select <Delete>  <Yes>.
 <Yes>.