Changing the Text Format
Change the format of text entered on your poster.
 Important
- Fluorescent spot colors cannot be used depending on your model or paper type.
- Fluorescent spot colors cannot be used when the Edit layout with Free Layout plus checkbox is selected in the Paper Options screen.
- Changing the Font
- Resizing Text
- Aligning Text to the Left, Center, or Right
- Justifying Text
- Changing Kerning and Line Spacing
- Changing the Text Color
- Specifying the Text Style
- Outlining Text
- Specifying Drop Shadows for Text
- Outlining and Drop Shadow Examples
Changing the Font
Change the font (typeface).
-
Click Edit in the task area, and then click Text.
The view switches to the Edit screen (Text).
-
Click text on poster.
-
In Font, select font.
 Note
Note- Font names in the Font list are displayed in the actual font.
- To change the font of a single character or text block, right-click text on the poster and click Edit, or double-click text to display an editing box, and then drag the character or text block you want to change to specify the font.
Resizing Text
Change the size of text.
-
Click Edit in the task area, and then click Text.
The view switches to the Edit screen (Text).
-
Click text on poster.
-
In Font Size, select font size.
 Note
Note- You can also enter a value (6 to 5000) directly in Font Size.
- Another way to enlarge or reduce text is to drag
 (Resize handle) displayed on the text box. For details, see Moving, Enlarging, Reducing, and Rotating Objects.
Aligning Text to the Left, Center, or Right
Specify how to align text.
-
Click Edit in the task area, and then click Text.
The view switches to the Edit screen (Text).
-
Click text on poster.
-
In Text Alignment, select
 (Left Align),
  (Center Align), or
  (Right Align).
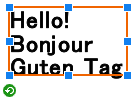
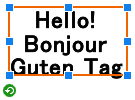
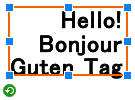
Left Align Center Align Right Align
Justifying Text
Position the text evenly across the text box so that all rows are as long as the longest row.
 |
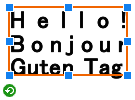 |
| Left Align | Justify |
 Note
Note
- Justification can be set only when a text box (framed in orange) is displayed.
-
Click Edit in the task area, and then click Text.
The view switches to the Edit screen (Text).
-
Click text on poster.
-
Under Text Alignment, click
 (Justify).
Changing Kerning and Line Spacing
Widen or narrow the space between characters or between lines.
-
Click Edit in the task area, and then click Text.
The view switches to the Edit screen (Text).
-
Click text on poster.
-
In Line Spacing, select line spacing.
-
In Character Spacing, set character spacing.
 Note
Note- Enter a value (-1000.00 to 1000.00) directly in Character Spacing. Alternatively, click
 (Up Arrow) or
  (Down Arrow) on the right to increase or decrease the value.
- Enter a value (-1000.00 to 1000.00) directly in Character Spacing. Alternatively, click
Changing the Text Color
Change the text color.
-
Click Edit in the task area, and then click Text.
The view switches to the Edit screen (Text).
-
Click text on poster.
-
In Text Color, click on a color.
 Note
Note- In Text Color, the current color and basic colors are displayed. To use other colors, click Custom..., and then select a color in the displayed dialog box.
- To change the color of a single character or text block, right-click text on the poster and click Edit, or double-click text to display an editing box, and then drag the character or text block you want to change to specify the color.
Specifying the Text Style
Specify the text style (bold, italic, or underline).
-
Click Edit in the task area, and then click Text.
The view switches to the Edit screen (Text).
-
Click text on poster.
-
In Text Style, select
 (Bold),
  (Italic), or
  (Underline).
Multiple styles can be specified to the text.
 Note
Note- To change the style of a single character or text block, right-click text on the poster and click Edit, or double-click text to display an editing box, and then drag the character or text block you want to change to specify the style.
Outlining Text
Outline the text. The text will be enhanced on the poster.
-
Click Edit in the task area, and then click Text.
The view switches to the Edit screen (Text).
-
Click text on poster.
-
In Text Effects, click
 (Fill and Stroke).
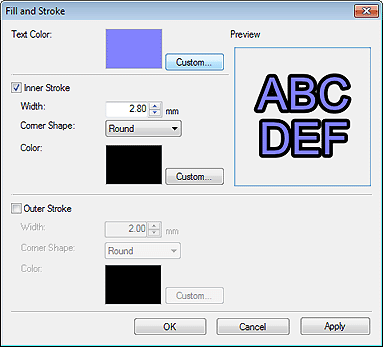
The Fill and Stroke dialog box appears.
 Note
Note- In Text Color, the color specified in the settings panel in the Edit screen (Text) is reflected. To change the text color, click Custom..., Change to Spot Color..., or Change to Regular Color..., and then select a color in the displayed dialog box.
-
Select the Inner Stroke checkbox.
-
In Width, specify the width of the outline.
 Note
Note- Enter a value (0.10 to 100.00) directly. Alternatively, click
 (Up Arrow) or
  (Down Arrow) on the right to increase or decrease the value.
- Enter a value (0.10 to 100.00) directly. Alternatively, click
-
In Corner Shape, select Round, Square, or Bevel.
-
Specify Color of the outline.
-
Click Apply.
The text on the poster is outlined. Continue adjusting the settings and clicking Apply until the outlined text appears as desired.
-
Click OK.
 Note
Note- To apply a double outline, select the Outer Stroke checkbox and repeat steps 5-7.
- The effect can be checked in Preview.
- To remove the outline, deselect the Inner Stroke or Outer Stroke checkbox.
- To outline a single character or text block, right-click text on the poster and click Edit, or double-click text to display an editing box, and then drag the character or text block you want to outline.
Specifying Drop Shadows for Text
Add drop shadows of several types to text. The text will appear as if it is floating over the poster.
-
Click Edit in the task area, and then click Text.
The view switches to the Edit screen (Text).
-
Click text on poster.
-
In Text Effects, click
 (Shaded Text).
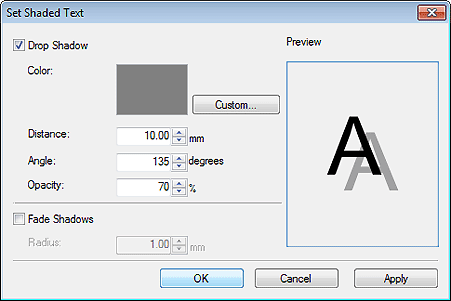
The Set Shaded Text dialog box appears.
-
Select the Drop Shadow checkbox.
To change the shadow color, click Custom..., Change to Spot Color..., or Change to Regular Color... in Color, and then select a color in the displayed dialog box.
-
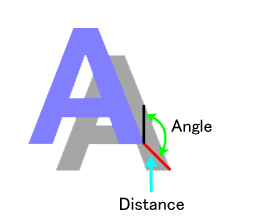
Specify Distance, Angle, and Opacity.
Enter the value directly or click
 (Up Arrow) or
  (Down Arrow) on the right to increase or decrease the value.
 Important
- Opacity cannot be set when a fluorescent spot color is specified for the drop shadow color.
-
Click Apply.
The drop shadow is applied to the text on the poster. Continue adjusting the settings and clicking Apply until the drop shadow appears as desired.
-
Click OK.
 Important
- Shadows cannot be softened when a fluorescent spot color is specified for the drop shadow color.
 Note
Note-
To soften the shadow, select the Fade Shadows checkbox, and then specify the Radius.
- To soften shadows more, increase the value.
- To emphasize shadows, decrease the value.
- The effect can be checked in Preview.
- To remove the shadow, deselect the Drop Shadow checkbox.
- To apply a drop shadow to a single character or text block, right-click text on the poster and click Edit, or double-click text to display an editing box, and then drag the character or text block to which you want to apply a drop shadow.
Outlining and Drop Shadow Examples
Use outlining and drop shadows to decorate text in various ways.
Example of outlined text

Example of settings in the Fill and Stroke dialog box
| Text Color | |
|---|---|
| Color | Black |
| Inner Stroke | |
| Width | 6 mm (0.25 in.) |
| Corner Shape | Round |
| Color | White |
| Outer Stroke | |
| Width | 6 mm (0.25 in.) |
| Corner Shape | Round |
| Color | Black |
Example of drop shadow

Example of settings in the Set Shaded Text dialog box
| Drop Shadow | |
|---|---|
| Color | Black |
| Distance | 21 mm (0.8 in.) |
| Angle | 90 degrees |
| Opacity | 10% |
Example of outlining combined with drop shadow

Example of settings in the Fill and Stroke and Set Shaded Text dialog boxes
| Text Color | |
|---|---|
| Color | White |
| Inner Stroke | |
| Width | 2 mm (0.07 in.) |
| Corner Shape | Round |
| Color | Black |
| Drop Shadow | |
| Color | Gray |
| Distance | 3 mm (0.10 in.) |
| Angle | 135 degrees |
| Opacity | 50% |
