
Changing Shape Styles
Change the style of shapes added to your poster.
- Resizing Shapes
- Changing Line Thickness
- Applying Transparency to Shapes
- Changing Line Types
- Changing Line Colors
- Specifying Drop Shadows for Shapes
- Specifying Shape Colors
- Changing Rectangle Corner Shapes
- Changing Types of Line Ends
- Resizing Arrows
Resizing Shapes
Change the size of shapes.
-
Click Edit in the task area, and then click Shapes.
The view switches to the Edit screen (Shapes).
-
Click a shape on poster.
 (Resize handle) appears on the selected shape.
 -
Drag
(Resize handle). Note
Note- You can resize lines without changing their angles and center points. You can also resize rectangles without changing their aspect ratios and center points. For details, see Moving, Enlarging, Reducing, and Rotating Objects.
Changing Line Thickness
Change the line thickness of shapes.
-
Click Edit in the task area, and then click Shapes.
The view switches to the Edit screen (Shapes).
-
Click a shape on poster.
-
In Line Thickness, specify thickness (pt).
Note- Enter a value (1.00 to 500.00) directly in Line Thickness. Alternatively, click
 (Up Arrow) or
  (Down Arrow) on the right to increase or decrease the value.
- Enter a value (1.00 to 500.00) directly in Line Thickness. Alternatively, click
Applying Transparency to Shapes
Adjust the opacity to apply transparency to shapes.
-
Click Edit in the task area, and then click Shapes.
The view switches to the Edit screen (Shapes).
-
Click a shape on poster.
-
In Opacity, specify the opacity (%) of the shape.
Note-
Enter a value (100 to 0) directly in Opacity. Alternatively, click
(Up Arrow) or (Down Arrow) on the right to increase or decrease the value.- To decrease opacity (increase transparency), decrease the value.
- To increase opacity (decrease transparency), increase the value.
-
Changing Line Types
Change the shape line to a dashed or dotted line.
-
Click Edit in the task area, and then click Shapes.
The view switches to the Edit screen (Shapes).
-
Click a shape on poster.
-
In Line Type, select line type.
Changing Line Colors
Change the line color of shapes.
-
Click Edit in the task area, and then click Shapes.
The view switches to the Edit screen (Shapes).
-
Click a shape on poster.
-
When a rectangle, circle, or ellipse is selected, select the Line Color checkbox.
-
In Line Color, click on a color.
Note- In Line Color, the current color and basic colors are displayed. To use other colors, click Custom... to display the Color dialog box, and then select a color.
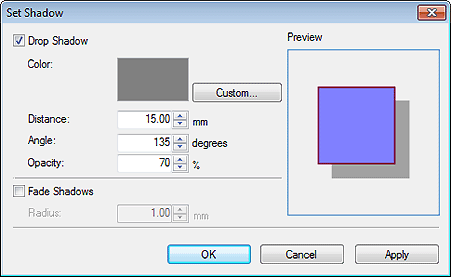
Specifying Drop Shadows for Shapes
Add drop shadows of several types to shapes.
-
Click Edit in the task area, and then click Shapes.
The view switches to the Edit screen (Shapes).
-
Click a shape on poster.
-
Click
 (Drop Shadow).
The Set Shadow dialog box appears.
-
Select the Drop Shadow checkbox.
-
To change the shadow color, click Custom... in Color to display the Color dialog box, and then select a color.
-
Specify Distance, Angle, and Opacity.
Enter the value directly or click
(Up Arrow) or (Down Arrow) on the right to increase or decrease the value.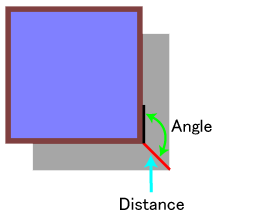
-
Click Apply.
The drop shadow is applied to the shape on the poster. Continue adjusting the settings and clicking Apply until the drop shadow appears as desired.
-
Click OK.
NoteTo soften the shadow, select the Fade Shadows checkbox, and then specify the Radius.
- To soften shadows more, increase the value.
- To emphasize shadows, decrease the value.
- The effect can be checked in Preview.
- To remove the shadow, deselect the Drop Shadow checkbox.
Specifying Shape Colors
Fill shapes with colors or change the colors.
-
Click Edit in the task area, and then click Shapes.
The view switches to the Edit screen (Shapes).
-
Click a rectangle, circle, or ellipse on poster.
-
Select the Fill-in Color checkbox.
-
In Fill-in Color, select color.
Note- In Fill-in Color, the current color and basic colors are displayed. To use other colors, click Custom... to display the Color dialog box, and then select a color.
Changing Rectangle Corner Shapes
Change the rectangle corner shape to a round or square shape.
-
Click Edit in the task area, and then click Shapes.
The view switches to the Edit screen (Shapes).
-
Click a rectangle on poster.
-
In Corner Shape, select corner shape.
NoteWhen the round shape is selected, enter a value directly in Radius to adjust the roundness. Alternatively, click
(Up Arrow) or (Down Arrow) on the right to increase or decrease the value.- To increase roundness, increase the value.
- To decrease roundness, decrease the value.
- The range of values that can be specified in Radius varies depending on the rectangle size.
Changing Types of Line Ends
Turn lines into arrows or vice versa by changing the shapes of the starting and ending points of lines. Arrowheads can also be changed to circles or rectangles.
-
Click Edit in the task area, and then click Shapes.
The view switches to the Edit screen (Shapes).
-
Click a line (or arrow) on poster.
-
In Start Point Shape, select the starting point shape.
-
In End Point Shape, select the ending point shape.
Resizing Arrows
Change the size of arrowheads.
-
Click Edit in the task area, and then click Shapes.
The view switches to the Edit screen (Shapes).
-
Click an arrow on poster.
-
In Size for the starting point, select Small, Medium, or Large.
-
In Size for the ending point, select Small, Medium, or Large.
