
Correcting Slant
Correct slant of photos automatically, manually, or by specifying an angle.
-
Click Edit in the task area, and then click Photos.
The view switches to the Edit screen (Photos).
-
On the poster, click the photo for which you want to correct slant.
-
In Edit Image, click
 (Trim).
The Edit Image dialog box and preview panel appear.
-
Click
 (Slant Correction).
 -
Select a correction method.
Correcting automatically:
-
In Slant Correction Method, click Auto.
-
Using
 (Slant Correction pointer), click the line (horizon, pillar, etc.) you want to make horizontal or vertical.
A green line appears, and the slant is corrected so that the line is horizontal or vertical.
 Important
-
To correct slant more than 5 degrees in either direction, select Specify Angle in Slant Correction Method, and then enter the value directly in Offset Angle or click
 (Up Arrow) or (Down Arrow) on the right to increase or decrease the value.
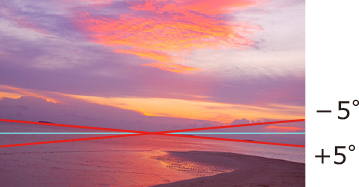
- Slant cannot be corrected unless a line is detected.
-
Correcting manually:
-
In Slant Correction Method, click Manual.
-
Drag the photo in the preview to adjust slant.
Correcting by specifying an angle:
-
In Slant Correction Method, click Specify Angle.
-
In Offset Angle, enter a value between -45.0 and 45.0 or click
(Up Arrow) or (Down Arrow) on the right to increase or decrease the value.Important- When slant is corrected, trimming is performed automatically according to the specified angle.
- Slant correction is canceled if the photo is replaced with another photo.
-
![]() Note
Note
- To cancel slant correction, in the Edit Image dialog box, click Reset Slant Correction.
- For details on the Edit Image dialog box, see Edit Image Dialog Box (Slant Correction).
