Generating a Key and Certificate Signing Request (CSR) and Obtaining and Registering a Certificate
As a certificate generated on the machine does not have a signature from a certificate authority, the machine may not be able to communicate depending on the communicating device. In this case, registering a signed certificate issued by a certificate authority to the key enables communication even with a self-generated key.
For the certificate authority to issue a signed certificate, you must make a request attached with a Certificate Signing Request (CSR). The machine generates a CSR at the same time it generates a key.
-
Step 1 Generating a Key and CSR
-
Step 2 Registering a Certificate Issued by a Certificate Authority to a Key
Generating a Key and CSR
Generate a key and CSR using Remote UI from a computer. You cannot use the operation panel to generate a key and certificate. Administrator privileges are required.
-
Log in to the Remote UI in Administrator Mode.
-
On the Portal page of Remote UI, click Settings/Registration.
-
Click Device Management > Key and Certificate Settings > Generate Key.
The Generate Key screen is displayed.
-
Select Key and Certificate Signing Request (CSR), and click OK.
The Generate Key and Certificate Signing Request (CSR) screen is displayed.
-
In Key Settings, enter the name of the key, and select the signature algorithm and key algorithm.
-
Enter the key name using single-byte alphanumeric characters.
-
For the key algorithm, select RSA or ECDSA, and select the key length from the pulldown menu. The longer the key length, the better the security, but this slows down communication processing.
-
-
In Certificate Signing Request (CSR) Settings, set the CSR information.
- Country/Region
- Select Select Country/Region, and either select the country or region from the pulldown menu, or select Enter Internet Country Code and enter the country code.
- State/City/Organization/Organization Unit
- Enter the items as needed using single-byte alphanumeric characters.
- Common Name
- Enter the name of the certificate subject as needed using single-byte alphanumeric characters. This corresponds to the Common Name (CN).
-
Click OK.
The Key and Certificate Signing Request (CSR) Details screen is displayed.
-
Click Store in File... to save the CSR file to a computer.
-
Logout from Remote UI.
-
Submit the application with CSR file attached to the certificate authority.
 Note
Note
-
When the CSR is generated, the key is registered to the machine, but it cannot be used until the certificate issued by the certificate authority is registered.
Registering a Certificate Issued by a Certificate Authority to a Key
Register the certificate using Remote UI from a computer. You cannot use the operation panel to register it. Administrator privileges are required.
-
Log in to the Remote UI in Administrator Mode.
-
On the Portal page of Remote UI, click Settings/Registration.
-
Click Device Management > Key and Certificate Settings.
The Key and Certificate Settings screen is displayed.
-
Click the key name (or certificate icon) to which to register the certificate.
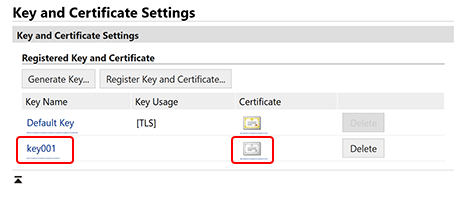
The Key and Certificate Signing Request (CSR) Details screen is displayed.
-
Click Register Certificate....
-
In Specify File, click Browse..., and specify the file of the certificate issued by the certificate authority.
-
Click Register.
The icon of the certificate displayed in Registered Key and Certificate on the Key and Certificate Settings screen changes from
 to
to  .
. -
Logout from Remote UI.
Note
- Viewing and Verifying Detailed Information of a Registered Certificate
-
Click the key name (or certificate icon) in Registered Key and Certificate on the Key and Certificate Settings screen to display the certificate details.
On the certificate details screen, click Verify Certificate to verify that the certificate is valid.
- When the Key and Certificate Cannot Be Deleted
-
You cannot delete a key and certificate being used. Disable the function being used, or delete these after switching to another key and certificate.
