Canon Cloud Printing Center window
This section describes the Canon Cloud Printing Center screens that are displayed on your smartphone, tablet device, or computer.
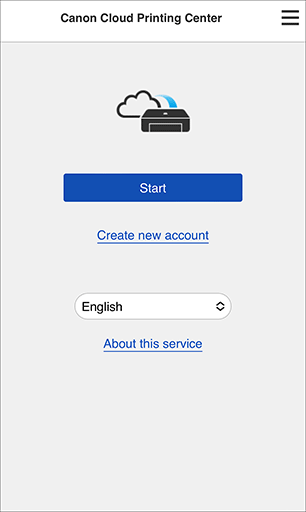
Description of the Start screen
This section provides the description of the Start screen of Canon Cloud Printing Center.
![]() Important
Important
- You remain logged in for 60 minutes after the last access.
- Language
- Select the language you will be using.
- Create new account
- A new registration will be added to the Canon Cloud Printing Center.
For a new registration, you need the Printer registration ID. - About this service
- This displays the descriptions of this service.
- System requirements
- This displays the system requirements for the Canon Cloud Printing Center.
- Software license info
- The licensing information of Canon Cloud Printing Center is displayed.
 Note
Note- System requirements and Software license info can be displayed by selecting
 .
.
Description of the Main screen
When you log in to the Canon Cloud Printing Center, the Main screen appears.
Control each area to register and manage the app.
If you are using a smartphone, tablet, or a macOS computer, you can also start the app.
![]() Important
Important
- With this service, the available functions differ depending on whether the user is the Administrator or Standard user of the printer, and also on the management method that was set.
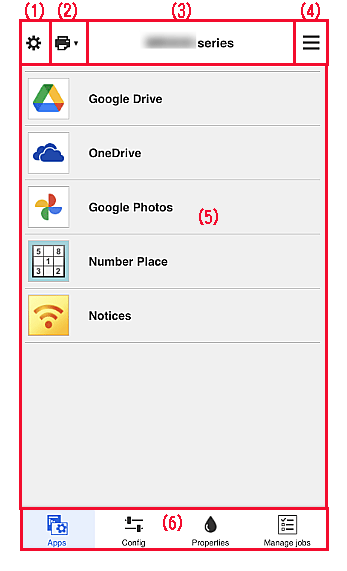
- (1) Left context menu (Administrator only)
- (2) Select printer
- (3) Printer name area
- (4) Right context menu
- (5) Display area
- (6) Menu area
(1) Left context menu (Administrator only)
When you select Mng. printer, Manage users, or Set, the corresponding screen appears.
Mng. printer screen
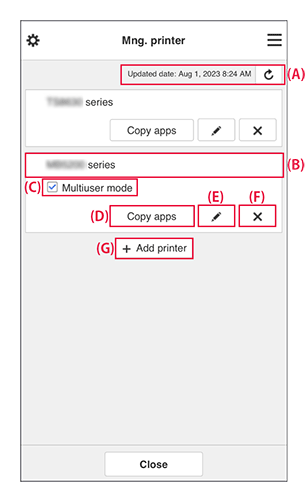
You can use the following features.
(A) Display update date/time of the printer information
-
Display the last updated date and time of printer information.
Select the Update button to update to the latest information. (B) Check the printer information
-
The registered printer name is displayed.
If an error is occurring on your printer, the warning mark will be displayed. (C) Multiuser mode
-
If multiple users will be using the printer, add a check mark to Multiuser mode.
The check mark is linked to the Set security code screen. (D) Copy apps
-
Select this to copy apps added in the selected printer to another printer.
Set the Destination printer and the Source printer. Then select OK.
(E) Change the printer name
-
A screen to change the printer name appears.
Follow the instructions on the screen to change the name. Important
-
The printer name entry has the following character limitation:
- Up to 128 characters (Uppercase and lowercase letters are differentiated.)
-
(F) Delete printers
-
The printer is deleted from the Canon Cloud Printing Center.
When transferring the ownership of the printer, select Clear the information saved on the printer. (G) Add printer
-
Select this to add printers.
You need a Printer registration ID to add a printer.Note- Although the number of printers that can be registered for one domain is not limited, only up to 16 printers are guaranteed to operate.
Manage users screen
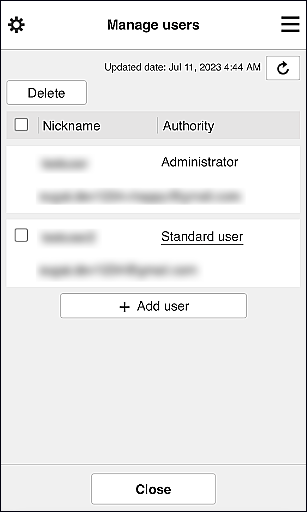
You can use the following features.
-
User deletion
Select the check box of the user to be deleted, and select Delete.
However, you cannot delete yourself. To delete yourself, cancel your membership from the My account screen. -
Adding a user
Select Add user. The user registration screen appears.
-
Changing Administrator and Standard user settings
To change the privileges of the Administrator or a Standard user, select Authority for the user whom you want to change the settings for.
Set screen
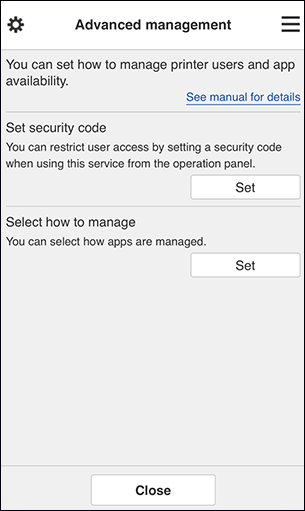
You can set and manage printer users and what apps can be used.
Select Set to go to the settings screen.
-
Set security code

Each user can set a Security code, start the app, and perform printing and other operations.
This setting is linked with Multiuser mode on the Mng. printer screen.Note- The list does not display models without an LCD or models with a monochrome LCD.
- The check box does not appear for models that do not support Multiuser mode.
- To check if your model is compatible with this function, refer to "Models that Support Security Codes".
-
Select how to manage
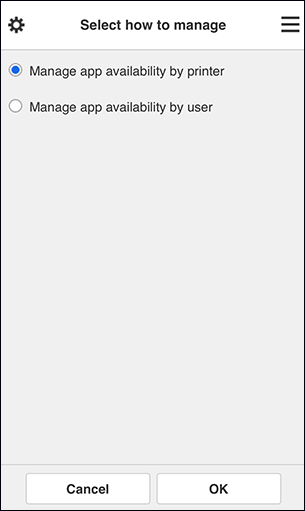
You can change the management method for usable apps and printers.
- Manage app availability by printer
- If you are using multiple printers, you can manage the useable apps for each printer.
- Manage app availability by user
- When one printer is used, you can manage the usable apps by user.
For usage examples, see "Tips on Using Canon Cloud Printing Center (at Home/If you are using PRO-1000 series or PRO-500 series)".
Note- If you manage the usable apps by printer, the default settings will allow all users to add, delete, and rearrange apps.
Also, if you are using a MAXIFY series printer and you select Multiuser mode in the Mng. printer screen, only the administrator will be able to add, delete, and rearrange apps. - If you manage the usable apps by user, all users will be able to add, delete, and rearrange apps, regardless of the Multiuser mode setting.
(2) Select printer
From the Select printer screen, you can select a printer.
If you are using a computer, you can select a printer directly from the pull-down menu.
![]() Note
Note
- Printers with settings that restrict their use do not appear.
(3) Printer name area
The registered name of the printer selected is displayed.
The Administrator can change the printer name from the Mng. printer screen of the left context menu.
(4) Right context menu
The information displayed depends on the menu currently selected in the menu area.
The  symbol indicates that there is a new unread notice.
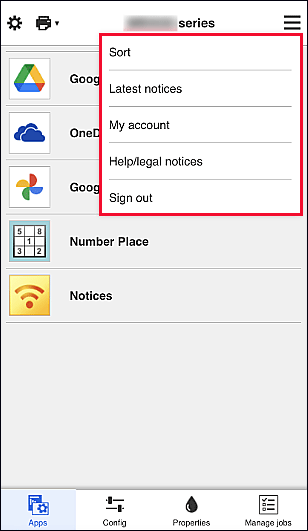
-
Sort
This displays the screen to sort registered apps.
Press the up and down buttons to change the display order of apps. When you finish sorting, select Done.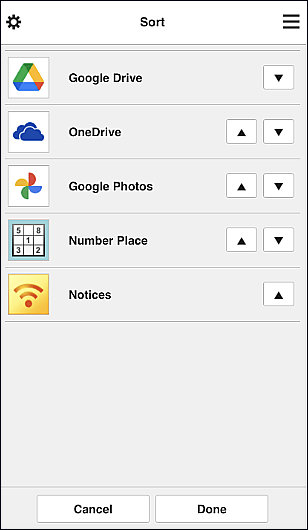 Note
Note- Description of displayed icons
 : Cannot be used because it is not yet released or does not support your region, model, or language.
 : This is the app on which the schedule is set.
- Description of displayed icons
-
Latest notices
This displays the latest notices. The
 symbol indicates that there is a new unread notice.
 -
My account
Displays user information.
From the My account screen, you can change your account settings.
From the My account screen, you can display the Permitted services screen and clear any linked service setting. -
Help/legal notices
The description of the Canon Cloud Printing Center screen and various reminders are displayed.
-
Sign out
This opens the Sign out screen of the Canon Cloud Printing Center.
(5) Display area
The display changes based on the menu you select.
(6) Menu area
The following 4 menu buttons are displayed:
-
Apps
This displays the list of registered apps in the Display area.
-
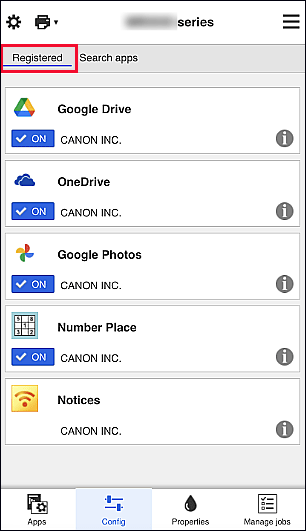
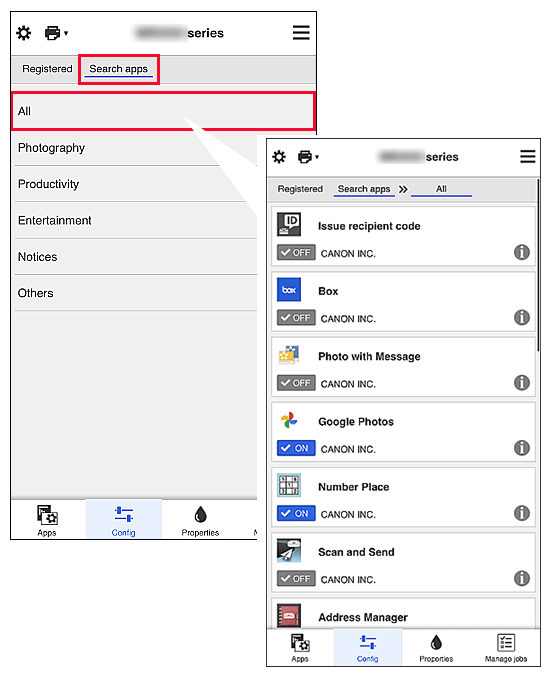
Config
This displays the Register apps screen in the Display area.
The display can be toggled between Registered and Search apps.The Registered screen lists registered apps.
You can check the information of these apps or deregister them.- If Manage app availability by user has been set, even Standard user can register and delete apps.
- When you select
 , the details of the app are displayed.
 - Select ON/OFF to register or deregister an app.
 Note
NoteOn the Search apps screen, the apps that you can register by using the Canon Cloud Printing Center are displayed by category.
- Description of displayed icons
: Cannot be used because it is not yet released or does not support your region, model, or language.
: This is the app on which the schedule is set.
 Note
Note -
Properties
This screen displays the status of the printer that is currently selected.
You can check how much ink is remaining or details about an error that occurred. You can also access the ink purchasing site and the Online Manual.Important- The Properties displayed may differ from the actual status at the display time, depending on the printer status.
-
Manage jobs
This screen displays the print or scan status and history.
You can check the print or scan status by looking at Status list, and the print or scan history by looking at History.
You can also cancel print or scan jobs and delete history information.
To cancel or delete a job, select that job and then select Cancel or Delete.
