Adding the Second and Following Printer
With one account, you can use the Canon Cloud Printing Center services on multiple printers.
The procedure for adding a printer is as follows:
- If your model has a color screen/If your model has a monochrome screen, and can print the URL of the authentication site
- If your model has no screen/If your model has a monochrome screen, and cannot print the URL of the authentication site
![]() Note
Note
- To confirm whether the printer you are using can print the URL of the authentication site needed for registering to Cloud Printing Center, see "Models that Can Print the URL of the Authentication Site".
If your model has a color screen/If your model has a monochrome screen, and can print the URL of the authentication site
-
Print the Printer registration ID from the printer you want to add.
-
Log in to the Canon Cloud Printing Center
-
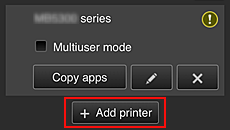
Select Mng. printer from

-
On the screen that appears, select Add printer
-
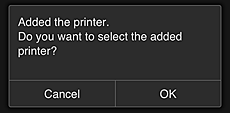
Enter the Printer registration ID, and then select OK
The printer is added.
If your model has no screen/If your model has a monochrome screen, and cannot print the URL of the authentication site
-
Displaying Printer Information
For details, go to the Online Manual home page, and see "Checking Printer Information" or "Change Settings from the Web Browser" for your model.
-
When the printer information menu is displayed, select Cloud Printing Center setup (or Web service connection setup -> Cloud Printing Center setup) -> Register with this service -> Yes
-
On Service registration screen, select OK
Follow the instructions that will be displayed on the screen and perform registration.
 Note
Note- You can skip the printer serial number input screen that is displayed when performing registration.
-
When printer addition complete message appears, select OK
Select Cancel if you don't want to change "default printer" settings.
 Note
Note- If Register My account screen is displayed, follow the instructions on the screen and perform registration.
The printer addition process ends, and the main screen of Canon Cloud Printing Center appears.
