|
Step 1
|
Setting the Display Language and the Country or Region
|
|
|
Set the language to be displayed on the operation panel screen or in reports, as well as the country or region where the machine will be used.
|
1
|
Select a language.
|
|
2
|
Select <Yes>.
|
|
3
|
Select a country or region.
|
|
|
Step 2
|
Setting the Date and Time
|
|
|
Adjust the machine's date/time.
|
1
|
Select a time zone.
What is UTC?
Coordinated Universal Time (UTC) is the primary time standard by which the world regulates clocks and time. The correct UTC time zone setting is required for Internet communications.
|
|
2
|
Enter the date and time, and select <Apply>.
|
|
|
Step 3
|
Removing the Shipping Lock Pin and Attaching the Handhold Cover
|
|
|
Remove the shopping lock pin from inside the main unit, and attach the handhold cover.
|
1
|
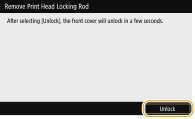
Select <Unlock>.
|
|
2
|
When <Open the front cover.> is displayed, open the front cover.
|
|
3
|
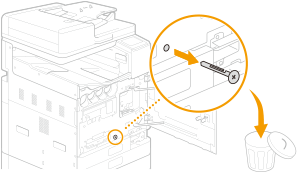
Pull the shipping lock pin (orange) out without bending, and select <Next>.
Discard the removed pin.
|
|
4
|
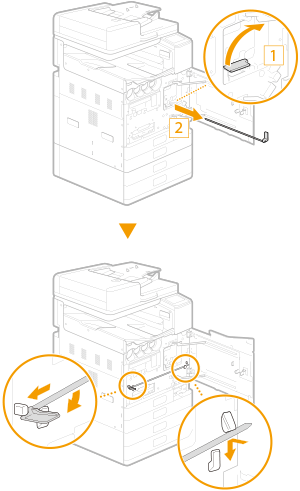
Lift the lever (blue), pull the print head locking rod out without bending, and select <Next>.
Stow the print head locking rod.
The Print Head Locking Rod is required during transport. Do not dispose and store in a safe place.
|
|
5
|
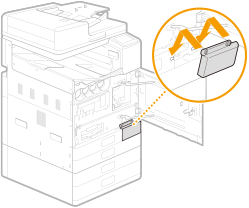
Attach the handhold cover, and select <Next>.
|
|
6
|
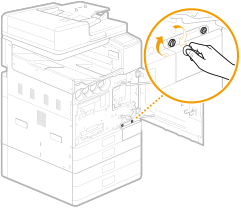
Use a coin to turn the screws to fasten.
|
|
7
|
Close the front cover of the main unit.
|
|
|
Step 4
|
Installing the Ink Tanks
|
|
|
Install the ink tanks.
|
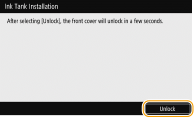
1
|
Select <Unlock>.
|
|
2
|
When <Open the front cover.> is displayed, open the front cover.
|
|
3
|
Install the ink tanks.
Before installing an ink tank, confirm that the color of the ink tank and the color indicated on the slot of the main unit are the same.
Align the  mark on the main unit and the  mark on the ink tank, and push the ink tank in until it stops. Turn clockwise until the ink tank clicks.
Install ink tanks for all four colors.
|
|
4
|
Close the front cover of the main unit.
Ink begins filling in the main unit for the first time, and takes from 40 to 70 minutes.
Do not turn the machine off while ink is filling.
If filling is interrupted by turning off the machine, etc., additional ink tanks may be required.
You can continue up to adjusting margins for paper drawers 3 and 4 while ink is filling.
|
|
|
Step 5
|
Confirming Sending of Machine Information
|
|
|
Please confirm the details of settings for providing information on the machine.
|
1
|
Check the details, and select <Next>.
|
|
2
|
Select <Do Not Accept> or <Accept>.
|
|
|
Step 6
|
Setting the Access Security Measures
|
|
|
Set a PIN to access the Remote UI. If you are using WG7250Z / WG7250F / WG7250 / WG7240, also set a System Manager ID for the system manager account. You must set a PIN to use the Remote UI.
|
1
|
Select <Yes>.
If you select <No>, this setting required for using the Remote UI is not set, and the Setup Guide proceeds to step 7.
|
|
2
|
Specify the Remote UI Access PIN.
Enter the PIN, and then select <Apply>.
The Confirm screen is displayed. Enter the PIN once again to confirm.
Do not forget your PIN.
You cannot register a PIN that consist only of zeros, such as "00" or "0000000."
|
For WG7250Z / WG7250F / WG7250 / WG7240
|
1
|
Select <Yes>.
If you select <No>, this setting required for using the Remote UI is not set, and the Setup Guide proceeds to step 7.
|
|
2
|
Select <Yes>.
If you select <No>, the System Manager ID and PIN are not changed from their default values, and the Setup Guide proceeds to sub-step 4.
|
|
3
|
Specify the System Manager ID and PIN.
Specify the <System Manager ID>  <System Manager PIN>. Enter numbers for each item, and select <Apply>.
The Confirm screen is displayed. Enter the PIN once again to confirm.
Do not forget your PIN.
You cannot register a PIN that consist only of zeros, such as "00" or "0000000."
|
|
4
|
Select <Yes>.
If you select <No>, a Remote UI Access PIN is not set, and the Setup Guide proceeds to step 7.
|
|
5
|
Specify the Remote UI Access PIN.
Enter the PIN, and select <Apply>.
The Confirm screen is displayed. Enter the PIN once again to confirm.
Do not forget your PIN.
You cannot register a PIN that consist only of zeros, such as "00" or "0000000."
|
|
|
Step 7
|
Setting the Wireless LAN
|
|
|
Configure the settings to connect to the network using the wireless LAN.
|
1
|
Select <Yes>.
If you select <No>, wireless LAN is not set, and the Setup Guide proceeds to step 8 or step 9. Select <No> to connect via wired LAN or USB.
If using the Setup Guide, connection is by DHCP and automatically allocates the IP address. To configure an IP address other than by DHCP, such as setting a fixed IP address, select <No> and perform Setting IP Addresses after the Setup Guide exits. |
|
2
|
Select <OK>.
|
|
3
|
Select the setting method.
|
|
|
Step 8
|
Adjusting Margins in Paper Drawers 3 and 4 (Optional)
|
|
|
If an optional cassette feeding unit is installed, enter the margin adjustment values.
|
1
|
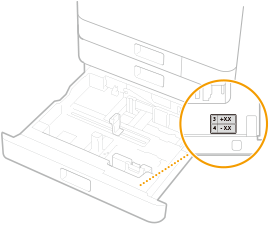
Pull out paper drawer 3 and check the margin adjustment value.
|
|
2
|
Select <Start>.
|
|
3
|
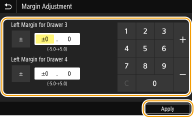
Enter <Left Margin for Drawer 3> and <Left Margin for Drawer 4>, and select <Apply>.
Tap the entry field, and enter the values.
|
|
4
|
Gently insert the paper drawer into the machine.
|
|
|
Step 9
|
Printing Out and Check a Nozzle Check Pattern
|
|
|
Print out and check a nozzle check pattern to check the print head condition. If streaks or unevenness appear in the printed result, perform cleaning.
|
1
|
Load at least 10 sheets of plain paper in any of these paper sizes: A3/11x17/LTR/A4 (A3 or 11x17 recommended).
|
|
2
|
Check that the displayed paper size is loaded, and select <Start>.
The machine prints a nozzle check pattern.
|
|
3
|
Check the printed pattern, and select <A> or <B>.
If the printed result appears okay, press <A> to complete the nozzle check.
If streaks or unevenness appear in the printed result, press <B> to perform cleaning.
|
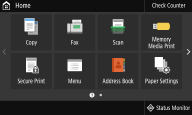
When the Setup Guide is complete, the Home screen appears.
|


 mark on the main unit and the
  mark on the ink tank, and push the ink tank in until it stops.
 <System Manager PIN>.