Scan Basic Features Screen
When you select <Scan> in the Home screen, the Scan Basic Features screen appears.
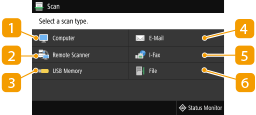
 <Computer>
Saves the scanned data to a computer. Basic Features Screen for Computer Scanning
 <Remote Scanner>
Puts the machine into the online status when originals are scanned from a computer. Using Your Computer to Scan (Remote Scan)
 <USB Memory>
Saves the scanned data to a USB memory device. Basic Features Screen for USB Scanning
 <E-Mail>
Sends the scanned data by e-mail. Basic Features Screen for E-Mail Sending/I-Fax Sending/File Saving
 <I-Fax>
Sends the scanned data by I-Fax. Basic Features Screen for E-Mail Sending/I-Fax Sending/File Saving
 <File>
Saves the scanned data to a shared folder or FTP server. Basic Features Screen for E-Mail Sending/I-Fax Sending/File Saving
Basic Features Screen for Computer Scanning
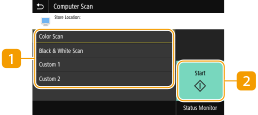
 Scan type
Select the scan setting. Scanning and Saving to a Computer
 <Start>
Use this button to start scanning.
Basic Features Screen for USB Scanning
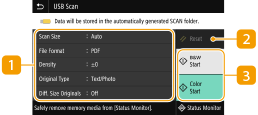
 Send Settings
The original is scanned based on the settings specified here.
 <Reset>
You can collectively restore the default settings.
 <Start>
Use this button to start scanning. Selecting <B&W> starts black and white scanning. Selecting <Color> starts color scanning.
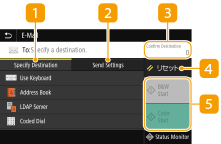
Basic Features Screen for E-Mail Sending/I-Fax Sending/File Saving
|
E-Mail Sending
 |
|
I-Fax Sending
 |
|
File Saving
 |
|
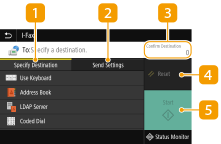
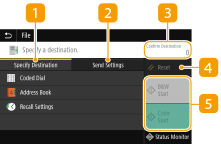
 <Specify Destination> tab
Select this tab to search for a destination in the Address Book or an LDAP server, enter a coded dial, or specify a destination using the recall settings.
Sending Data by E-Mail/Saving Data to a Shared Folder or FTP Server
Sending Data by E-Mail/Saving Data to a Shared Folder or FTP Server
 <Send Settings> tab
Select this tab to specify the scanning settings.
 <Confirm Destination>
You can check or change the name and address of the specified destination as well as the number of destinations.
 <Reset>
You can collectively restore the default settings.
 <Start>
Use this button to start scanning. Selecting <B&W> starts black and white scanning. Selecting <Color> starts color scanning.