Manual (Visual Check)
Visually check an output test page to determine an adjustment values for each color (CMYK).
Prepare the following paper.
Prepare the following paper.
Plain paper (recycled paper can be used)
Size: any of 320x450 mm, 305x457 mm, A3, 11x17, LTR, or A4
320x450 mm, 305x457 mm, A3, or 11x17 is recommended.
320x450 mm, 305x457 mm, A3, or 11x17 is recommended.
Sheets: 2
1
Load paper in a paper drawer or the multi-purpose tray.
Make paper settings also. Loading Paper
2
Select <Menu> in the Home screen. Home Screen
3
Select <Adjustment/Maintenance>  <Adjust Image Quality>
  <Color Correction>
  <Manual (Visual Check)>.
 <Adjust Image Quality>
  <Color Correction>
  <Manual (Visual Check)>.
4
Select <Output Test Page>.
5
Check that the size and type of paper displayed on the screen is loaded in the machine, and select <Start>.
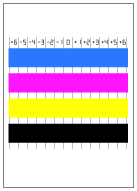
A test page is printed.

6
Visually check the test page to check for unevenness in color.

Range for marks
The marks for each color are printed out in blocks in a range starting from -6 to +6 through -4 to +4, depending on the paper size used for the test page.
7
Select colors to fine-tune.
8
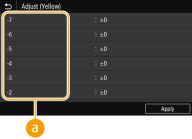
Select the range to adjust ( ), enter a value, and select <Apply>.
 ), enter a value, and select <Apply>.
Enter values from -127 to +127 for all blocks for each color according to the results determined visually in step 5.
Enter plus values for denser colors, and minus values for less dense colors.

9
Select <Apply>.
10
Select <Output Test Page>  <Start>.
 <Start>.
A test page with density corrected is printed.
11
If there is no problem with the test page, press <Apply>.

Returning a corrected value to the initial value
Select <Restore Initial Settings> in the <Visual Correction> screen.
Returning to a previous correction value
Select <Restore Previous Settings> in the <Visual Correction> screen.