Reinstalling the machine
After moving the machine to where it will be installed, install and configure the machine referring to "Getting Started". Next perform the following steps to prepare the machine for use.
 |
|
Consumables are required in the numbers according to their replacement rank you checked before transporting the main unit. See the report you printed out before transport.
|
1
Turn ON the machine.Turning ON the Machine
A reinstall menu is displayed.
2
Select <Reinstalling the Printer>
3
Check content displayed on the screen, and select <Yes>.
The machine begins processing.
 |
|
Once you have begun reinstallion, it cannot be halted. If no consumables replacements are ready, do not start reinstallation.
|
 |
|
If settings were initialized before transporting, configure a few additional settings such as the time.
|
4
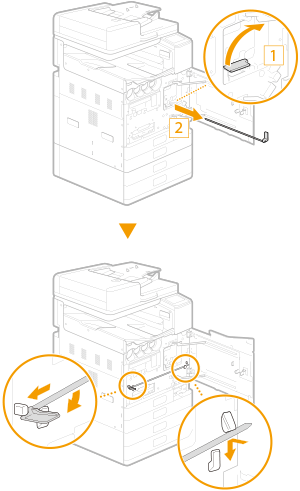
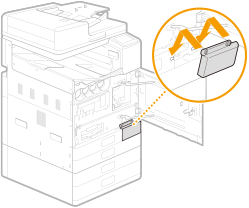
Remove the print head locking rod and attach the handhold cover.
|
1
|
Select <Unlock>.
|
|
2
|
When <Open Front Cover> is displayed, open the front cover.
|
|
3
|
Pull out the print head locking rod.
Stow the print head locking rod.
 |
|
4
|
Attach the handhold cover.
 |
|
5
|
Close the front cover.
|
5
Select <Unlock>.
6
When <Open Front Cover> is displayed, open the front cover.
7
Install the ink tanks.Replacing the Ink Tanks
If ink tanks were removed before transporting the machine, ink tanks need to be installed when reinstalling the machine.
8
Install the maintenance cartridge.Replacing the Maintenance Cartridge
9
Close the front cover.
Once the Home screen returns after the message <Processing... Do not turn OFF the device.>, reinstallation of the machine is complete.
 |
|
Closing the front cover allows ink to fill. Filling takes the same time as when the machine was first installed (40 to 70 minutes).
If consumables become low while ink is filling, consumables must be replaced.
|