
Replacing the Maintenance Cartridge
When the maintenance cartridge is almost full or completely full, a message is displayed prompting you to prepare a new maintenance cartridge or perform maintenance cartridge replacement. Prepare a new maintenance cartridge or perform maintenance cartridge replacement according to the displayed message.
|
|
|
The maintenance cartridge is a container for absorbing ink used during maintenance tasks such as print head cleaning.
For information on the model number of the maintenance cartridge, see Consumables.
You can check the current amount of space used in the maintenance cartridge. Checking the Space Used in the Maintenance Cartridge
Replacement may be necessary even when the maintenance cartridge is not full (error, etc.).
|
When a Message Appear
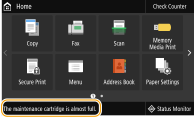
<The maintenance cartridge is almost full.>
The maintenance cartridge is almost full. You can continue printing for a while, but you should have a new one available so that you can make replacement as soon as it is needed. Procedure for Replacing the Maintenance Cartridge
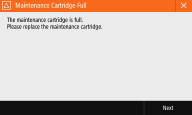
<Maintenance Cartridge Full>
The maintenance cartridge is full, so printing is not possible any longer. Follow the instructions on the screen to replace the maintenance cartridge. Procedure for Replacing the Maintenance Cartridge
Procedure for Replacing the Maintenance Cartridge
When you replace the maintenance cartridge, simple instructions on the replacement procedure are displayed on the screen. See the on-screen instructions as well as the following procedure.
1
Check the message.
 If <The maintenance cartridge is almost full.> is displayed
|
1
|
Select <Menu> in the Home screen. Home Screen
|
|
2
|
Select <Adjustment/Maintenance>
|
If <Maintenance Cartridge Full> is displayed
|
1
|
Select <Next>.
|
2
Select <Unlock>.
3
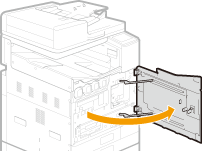
When <Open Front Cover> is displayed, open the front cover.
4
Remove a new maintenance cartridge.
5
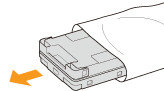
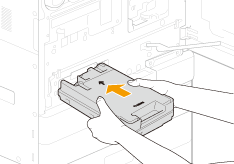
Pull out the maintenance cartridge.
After pulling out the maintenance cartridge half way until it stops, hold it at the left and right with both hands and lift it lightly to pull out.
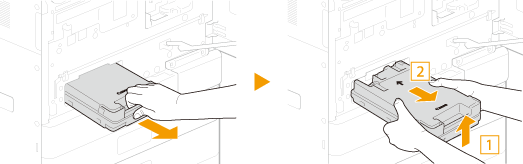

Do not touch the maintenance cartridge slot.
A used maintenance cartridge is heavy. Be sure to hold it firmly and held level when pulling it out. The maintenance cartridge contains ink, and dropping it or leaving it tilted may cause ink to leak and become spilled around.
6
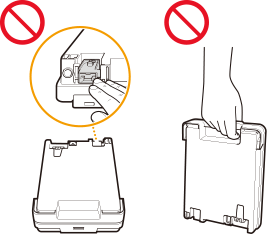
Hold the used maintenance cartridge level as you place it in the supplied storage bag.
Close the opening of the storage bag completely so that the ink does not spill out.
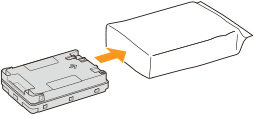
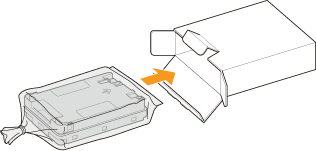
7
Place the used maintenance cartridge in the box that the new maintenance cartridge was in.
8
Install the new maintenance cartridge.
Push the maintenance cartridge firmly all the way in until it clicks, with the Canon logo facing you.
9
Close the front cover.
Replacement of the maintenance cartridge is completed once the message <Processing> no longer appears.