Disposing of the Machine
The machine is heavy. To prevent injury or other accident, be sure to follow the procedure below when disposing of the machine.
 |
Precautions regarding the machine before disposalRegistered personal information and set security information (passwords, etc.) might be remaining in the machine.
Observe the following to prevent leakage of information before the machine is temporarily removed from site (lending, repair, etc.), transferred, or disposed of. <Menu>  <Management Settings> <Management Settings>  <Initialize All Data/Settings> <Initialize All Data/Settings>  <Yes> <Yes>  <Yes> <Yes>Once disposal processing is run on the machine, the machine can no longer be used.
Dispose of the machine according to local laws and regulations. Tilting the machine or laying it on its side without disposing of it properly may cause ink in the machine to leak.
Prepare a plastic bag to put used consumables in beforehand.
If an error occurs indicating the amount of ink is unknown, the <Preparation for Disposal> menu cannot be run.
|
1
Remove any paper.
Remove all paper from the paper drawers and multi-purpose tray.
2
Select <Menu> in the Home screen. Home Screen
3
Select <Adjustment/Maintenance>  <Maintenance>.
 <Maintenance>.
4
Select <Preparation for Disposal>.
5
Enter <System Manager ID> and <PIN>, and select <Log In>.
6
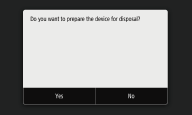
Select <Yes>.
7
Check the message, and select <Yes>.

Do not turn the machine OFF while the message is displayed.
8
Select <Unlock>.
9
When <Open Front Cover> is displayed, open the front cover.
10
Remove the ink tank. Replacing the Ink Tanks
Place the ink tanks in a plastic bag, and close firmly to prevent ink from spilling out.
11
Remove the maintenance cartridge. Replacing the Maintenance Cartridge
Place the maintenance cartridge in a plastic bag, and close firmly to prevent ink from spilling out.
12
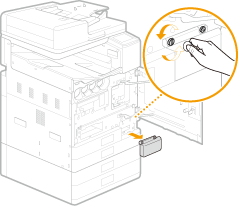
Remove the handhold cover.
13
Close the front cover.
14
Turn OFF the machine. Turning OFF the Machine
15
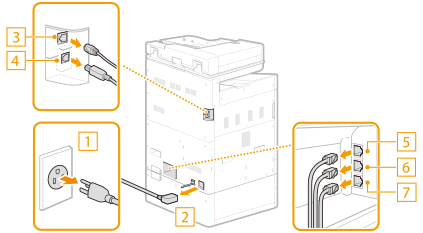
Disconnect the cables and cord from the machine in numerical order as in the illustration below.
The shape of the power plug (*1) depends on your country or region.
Whether the cables with "*2" are connected depends on your environment.
 Power plug*1 Power plug*1 Power cord Power cordUnfasten the power cord clamp and remove the power cord.
 LAN cable*2 LAN cable*2 USB cable*2 USB cable*2 Handset*2 Handset*2 External telephone*2 External telephone*2 Telephone cable*2 Telephone cable*2 |
 |
 If an optional cassette feeding unit is installed.
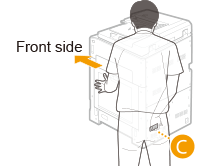
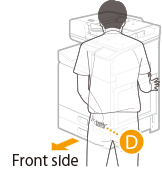
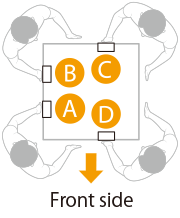
The machine is heavy (Other Specifications). Using the handholds, be sure to lift with 4 people.
|
1
|
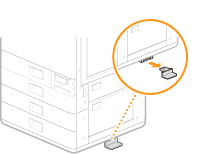
Remove the stabilizer from the right side of the cassette feeding unit.
 |
||||||
|
2
|
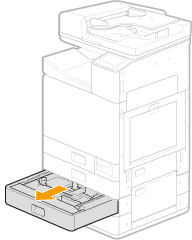
Pull out paper drawer 3 slightly.
 |
||||||
|
3
|
Turn the screws fastening the machine and the cassette feeding unit and remove the pedestal cover.
Front of main unit
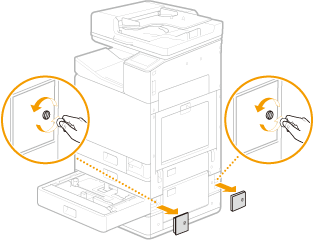 Left of main unit
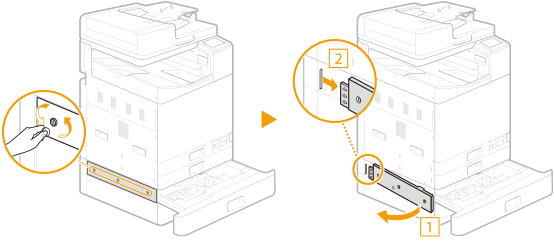 |
||||||
|
4
|
Close paper drawer 3.
|
||||||
|
5
|
Remove the connector cover from the main unit and cassette feeding unit, and remove the cassette feeding unit connector.
 After removing the cassette feeding unit connector, reattach the connector cover on the main unit and cassette feeding unit.
|
||||||
|
6
|
Use the handholds to remove the main unit.

|
 to
to  .
.
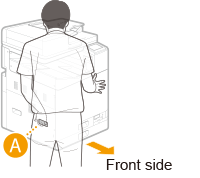
 with right hand, and support with left hand
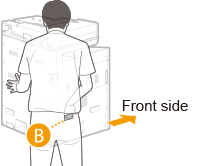
 with right hand, and support with left hand