
Replacing the Print Head
Replace the print head if a message is displayed indicating that it needs to be replaced. You can also check the approximate number of ink tanks and maintenance cartridges required when replacing the print head on the display (Checking Remaining Amounts and Usage of Consumables).
 |
|
It may be necessary to replace the ink tanks and maintenance cartridge when replacing the print head. Follow the instructions on the screen to replace the ink tanks and maintenance cartridge.
Replacing the print head takes from 1.5 to 2 hours.
Do not turn off the machine after having started replacing the print head. If the machine is turned off after starting replacement, additional ink tanks or maintenance cartridges may be required.
|
When a Message Appear
The print head is causing inability to print. Check the message, then exit the screen.Procedure for Replacing the Print Head
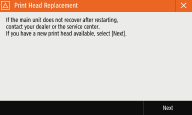
You can also continue replacement from the message. Press <Next> and proceed to step 6. However, since the number of consumables required is unknown, prepare one ink tank for each color and a maintenance cartridge.
Procedure for Replacing the Print Head
When you replace the print head, you can also operate from the screen. See the on-screen instructions as well as the following procedure.
 |
|
If there is not sufficient ink remaining, prepare a new ink tank.
If the maintenance cartridge is almost full, prepare a new maintenance cartridge.
|
1
Check the required number of ink tank and maintenance cartridge replacements.
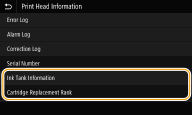
You can check information on the required number of ink tank and maintenance cartridge replacements at <Replacement Rank> in <Print Head Information>.
|
1
|
Select <Status Monitor>.
|
|
2
|
Select <Device Information>.
|
|
3
|
Select <Print Head Information>.
|
|
4
|
Select <Ink Tank Information>.
|
 |
 |
The required number is different for each replacement rank. Refer to  for replacement rank and required number of replacements.
 for replacement rank and required number of replacements.
2
Prepare the required number of replacements for ink tanks and a maintenance cartridge.
If you cannot check <Print Head Information>, prepare one ink tank for each color and a maintenance cartridge.
3
Begin replacement of the print head.
Begin print head replacement from the menu.
|
1
|
Select <Menu>.
|
|
2
|
Select <Adjustment/Maintenance>.
|
|
3
|
Select <Maintenance>.
|
|
4
|
Select <Print Head Replacement>.
|
|
5
|
Select <Start>.
|
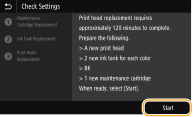

Once you have begun replacement of the print head, it cannot be halted. If no replacements are ready, do not start print head replacement.
The machine begins checking the amounts remaining in the maintenance cartridge and ink tanks, and steps for replacing them according to each of the remaining amounts are displayed.
The required number of consumables may be displayed. This is the maximum number required when replacing the print head. Prepare the number of consumables you checked at step 1.
4
Select the time for replacing the ink tanks.
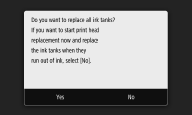
When replacing of the ink tanks is required, a screen for selecting when to replace them appears.
To replace necessary ink tanks together in advance, press <Yes>. Since all the ink tanks will be replaced at the same time, less time is taken for replacement.
To replace necessary ink tanks when they run out of ink, press <No>. Since replacement will be once each ink tank is depleted, no ink is wasted.
5
Select <Unlock>.
Before opening the front cover on the main unit, the machine readies the print head for replacement. If replacement of ink tanks or the maintenance cartridge is required during this time, instructions are displayed for replacing them.

After selecting <Unlock>, the machine begins preparing for print head replacement. While the machine is preparing, the front cover cannot be opened. Wait about 20 minutes for the cover to unlock.
6
When <Open Front Cover> is displayed, open the front cover.
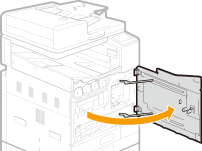
Before opening the front cover on the main unit, the machine readies the print head for replacement. If replacement of ink tanks or the maintenance cartridge is required during this time, instructions are displayed for replacing them.
7
Open the print head compartment cover.
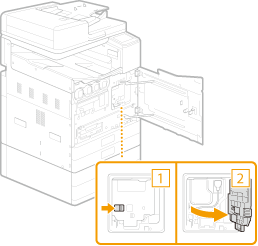
8
Pull the print head out.
|
1
|
Disconnect the print head connector from the print head, and remove the print head connector from the cable guide.
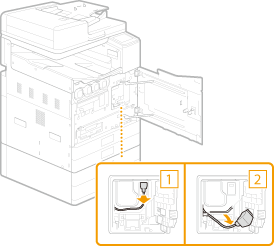 |
|
2
|
Fasten the print head connector to the cable hook.
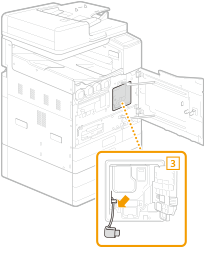 |
|
3
|
Open the storage bag for placing the used print head in.
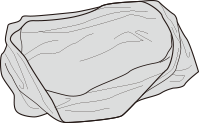 |
|
4
|
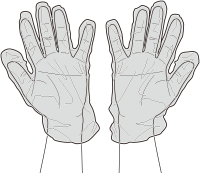
Put on the gloves to keep your hands from getting dirty.
Your hands may become dirty removing the used print head. Wear the gloves supplied with the new print head.
 |
|
5
|
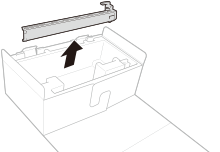
Remove the print head disposal cap.
 |
|
6
|
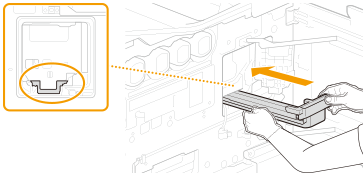
Push on the print head disposal cap bundled with the new print head all the way.
The print head disposal cap is attached to the print head.
 |
|
7
|
After pulling the print head disposal cap half way, hold the print head from beneath with both hands, and pull it out.
The print head will be pulled out together. If only the print head disposal cap is pulled out, insert it all the way again firmly until it stops.
 A used print head is heavy. Be sure to hold it firmly with both hands when removing it from the machine. If dropped, the impact may cause ink to splatter.
 |
|
8
|
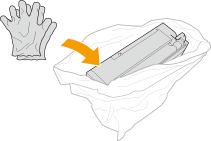
After placing the used print head in the storage bag, remove the gloves and place them in the bag.
The used print head may be soiled with ink. Avoid touching it after removing the gloves.
 |
|
9
|
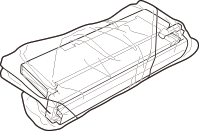
Wrap the unused portion of the bag around the print head.
Close the bag completely to prevent ink from spilling out.
 |
|
10
|
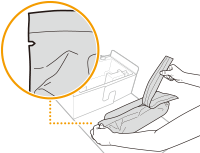
Remove the new print head from its box, and open the aluminum foil bag at the notch.
The print head may be damaged by dropping it. When removing the print head from its box, remove on the floor or other low place.
 |
|
11
|
Hold the print head with both hands and remove it from the aluminum foil bag.
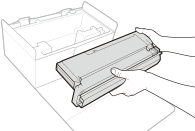 The new print head comes with a print head protector. The protector is required when installing the print head; do not remove.
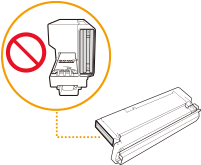
Never touch the print head slot. Doing so may cause the print head to malfunction.
 |
9
Install the print head.
|
1
|
Press the new print head in all the way.
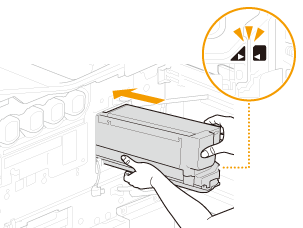 Press in until the
 mark on the print head and the mark on the print head and the  mark on the machine are aligned. mark on the machine are aligned.Press the print head in all the way to install. The print head protector will have moved out toward you.
|
|
2
|
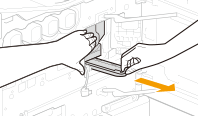
Pull off the print head protector.
Pull out the print head protector while holding the print head in place. Not holding the print head in place may allow it to be pulled out together.
 |
|
3
|
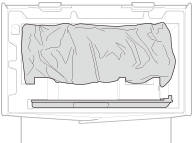
Place the used print head and print head protector in the box and cover them with packing material.
 |
|
4
|
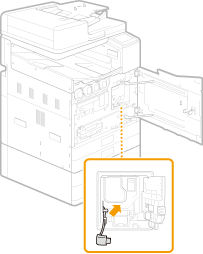
Remove the print head connector from the cable hook.
 |
|
5
|
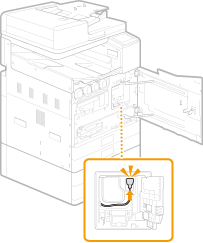
Connect the print head connector to the new print head.
 |
|
6
|
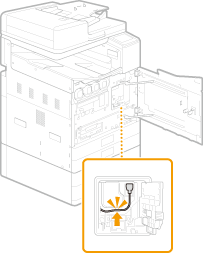
Press the print head connector into the cable guide.
 |
10
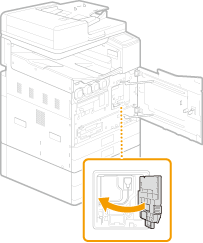
Close the print head compartment cover.
11
Close the front cover. Filling takes from 40 to 70 minutes. Do not turn the machine off while ink is filling.
Ink begins filling.
If replacement of ink tanks or the maintenance cartridge is required while ink is filling, instructions are displayed for replacing them.
Replacement is completed once the message <Finished.> appears.