Setting the Destination
You can set a network folder as the destination for images scanned from the operation panel of the printer and for received fax data.
Adding Destination Folders
-
Open the Main Screen.
-
Select printer you want to use from Printer List.
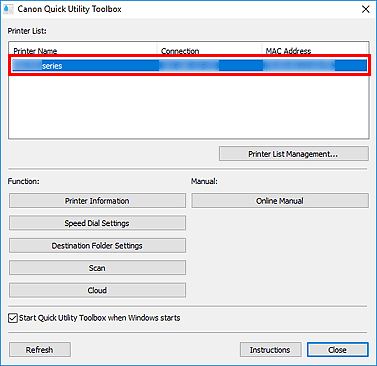
Items corresponding to the selected printer appear in Function.
 Note
Note- If your printer is not displayed in Printer List, click Refresh, or click Printer List Management... and add the printer in the displayed Printer Management dialog box.
-
Click Destination Folder Settings from the items displayed in Function.
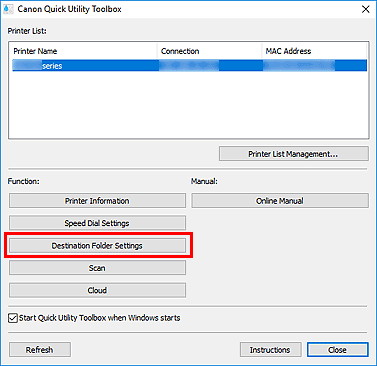
The Folder Setting Utility window appears.
 Note
Note- A password entry screen may appear before the Folder Setting Utility window appears. If it appears, enter the administrator password set to the printer, and then click OK. If you are not sure, contact the administrator. For the password, see Administrator Password.
-
Click Add....
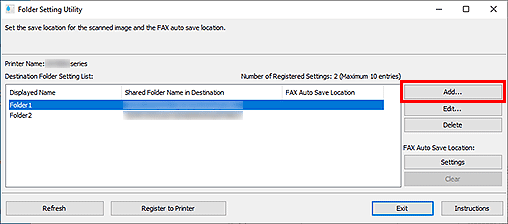
The Add Destination Folder dialog box appears.
-
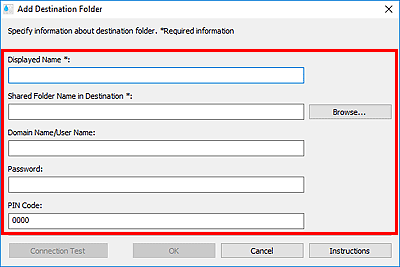
Enter Displayed Name, Shared Folder Name in Destination, and other information.
 Important
- Displayed Name and Shared Folder Name in Destination are required entry fields.
- Folders on Windows 7 or earlier cannot be set as the destination.
- If you are using a GX series printer, folders on Windows Server 2008 R2 or earlier cannot be set as the destination.
 Note
Note- For notes on entering each field, see Add Destination Folder/Edit Destination Folder Dialog Box.
-
Click Connection Test.
Check if you can connect to the specified folder.
 Important
-
Make sure of the following before performing Connection Test.
- The printer is turned on
- The printer and computer are connected to the network
- Another software or user is not using the printer
- An error is not displayed on the operation panel of the printer
-
-
Check the message, then click OK.
-
Click OK in the Add Destination Folder dialog box.
-
Click Register to Printer.
-
Check the message, then click OK.
Setting the Auto Save Location for Fax Data
Set one of the folders displayed in Destination Folder Setting List as the auto save location for fax data.
-
Open the Main Screen.
-
Select printer you want to use from Printer List.

Items corresponding to the selected printer appear in Function.
 Note
Note- If your printer is not displayed in Printer List, click Refresh, or click Printer List Management... and add the printer in the displayed Printer Management dialog box.
-
Click Destination Folder Settings from the items displayed in Function.

The Folder Setting Utility window appears.
-
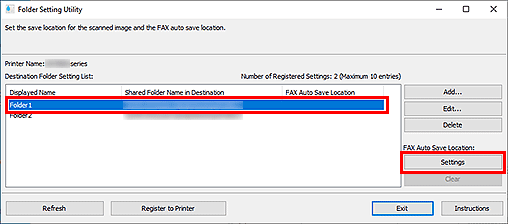
Select one of the folders you want to use as the save location from Destination Folder Setting List, then click Settings.
 Note
Note-
When no folder is displayed in Destination Folder Setting List, add a destination folder.
- If a PIN code entry screen appears, enter the code.
-
-
Check the message, then click OK.
 (Checkmark) appears in FAX Auto Save Location of the set folder.
 -
Click Register to Printer.
-
Check the message, then click OK.
