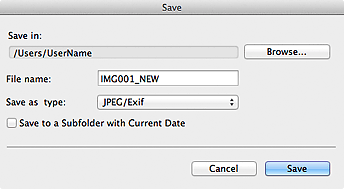
Save Dialog (Correct/Enhance Images or Special Image Filters Window)
You can make advanced settings for saving corrected, enhanced, or adjusted images to a computer.
Display the Save dialog by one of the following operations.
- Click Save Selected Image or Save All Corrected Images in the Correct/Enhance Images window
- Click Save Selected Image or Save All Filtered Images in the Special Image Filters window

- Save in
-
You can set the folder in which to save the images. To change the folder, click Browse..., then specify the destination folder.
 Note
Note- This is disabled when the Save to original folder checkbox is selected.
- File Name
- You can enter the file name of the image to be saved. You cannot enter the file name when saving multiple files at the same time. "_NEW" is automatically appended to the original file names.
- Save as type
- Displays the file type in which to save the corrected, enhanced or adjusted image(s). You can save in JPEG/Exif only.
- Save to a subfolder with current date
- Select this checkbox to create a current date folder in the folder specified in Save in and save corrected, enhanced, or adjusted images in it. The current date folder will be created with a name such as "20XX_01_01" (Year_Month_Date).
- Save to original folder
-
Select this checkbox to save the corrected, enhanced, or adjusted images to the folders in which the original uncorrected, unenhanced, or unadjusted images are saved.
 Note
Note- Save to original folder appears only when Save All Corrected Images or Save All Filtered Images was clicked.

