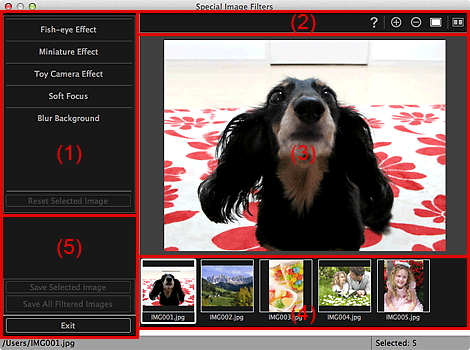
Special Image Filters Window
You can enhance images using special filters.
Display the Special Image Filters window by one of the following operations.
- Select the image(s) in use in the Edit area of the Item edit screen, then click Special Filters at the bottom of the screen
- Select an image or images in Day View of the Calendar view, the expanded display of the Event view, the expanded display of the People view, the Unregistered People view, or folder view, then click Special Filters at the bottom of the screen

- (1) Image Effects Area
- (2) Preview Operation Buttons
- (3) Preview Area
- (4) Selected Images Area
- (5) Operation Buttons
(1) Image Effects Area
 Note
Note
- OK and Cancel appear only when Fish-eye Effect, Miniature Effect, or Blur Background is selected.
- Fish-eye Effect
-
You can enhance an image to resemble a photo taken with a fish-eye lens, focusing on the selected point.
You can adjust the enhancement level using the slider.
- Miniature Effect
-
You can enhance an image to resemble a photo of a miniature model (diorama).
You can adjust the size of the white frame (area that will not be blurred) using the slider.
- Toy Camera Effect
-
You can enhance an image to resemble a retro photo taken with a toy camera.
The enhancement is applied as you move the slider to adjust the effect level.
- Soft Focus
-
You can enhance an entire image to soften the focus.
The enhancement is applied as you move the slider to adjust the effect level.
- Blur Background
-
You can blur the area outside the selection.
You can adjust the enhancement level using the slider.
- OK
- Applies the specified enhancement to the selected image.
- Cancel
- Cancels the last applied enhancement.
- Reset Selected Image
- Restores the enhanced image to the original unenhanced state.
(2) Preview Operation Buttons
 Note
Note
 (Detect the Outline and Select the Area) and
  (Cancel the Selected Area) appear only when Blur Background is selected.
 (Detect the Outline and Select the Area)
- You can specify the area that will not be blurred. The outline is automatically detected.
 (Cancel the Selected Area)
- Deletes the selected area.
 (Help)
- Opens this guide.

 (Enlarge)/(Reduce)
- Enlarges or reduces the preview with each click.
 (Whole Image View)
- Fits the preview to the area size.
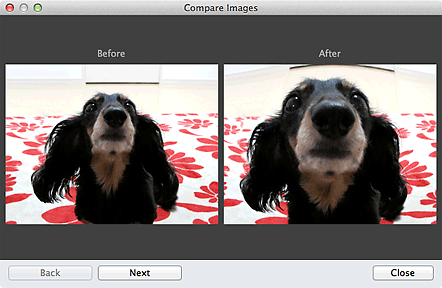
 (Display Comparison Screen)
-
Displays the Compare Images window in which you can compare the images before and after the enhancement.

- Before
- The image before enhancement appears.
- After
- The image after enhancement appears.
- Back/Next
-
Switches to the previous/next image.
Not available when one image is selected.
- Close
- Closes the Compare Images window.
(3) Preview Area
Displays the preview of the image being enhanced.
The  (Enhancement) mark appears on enhanced images.
(4) Selected Images Area
Displays the thumbnails of the images when multiple images were selected upon displaying the Special Image Filters window.
This area does not appear when one image was selected upon displaying the Special Filters window.
The  (Enhancement) mark appears on enhanced images.
 Note
Note
- This area does not appear when multiple images were selected in the Item edit screen upon displaying the Special Image Filters window; only the preview of the last selected image appears.
(5) Operation Buttons
- Save Selected Image
- Displays the Save dialog from which you can save the enhanced image displayed in the Preview area.
- Save All Filtered Images
- Displays the Save dialog from which you can save all enhanced images in the Selected Images area.
- Exit
- Closes the Special Image Filters window.

