Correct/Enhance Images Window
You can correct or enhance images.
Display the Correct/Enhance Images window by one of the following operations.
- Select the image(s) in use in the Edit area of the Item edit screen, then click Correct/Enhance at the bottom of the screen
- Select an image or images in Day View of the Calendar view, the expanded display of the Event view, the expanded display of the People view, the Unregistered People view, or folder view, then click Correct/Enhance at the bottom of the screen
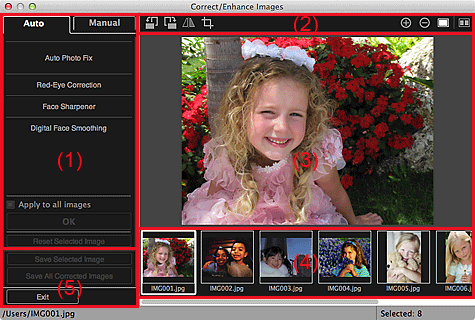
- (1) Image Adjustment/Correction/Enhancement Area
- (2) Preview Operation Buttons
- (3) Preview Area
- (4) Selected Images Area
- (5) Operation Buttons
(1) Image Adjustment/Correction/Enhancement Area
Available settings and procedures vary between the Auto tab and Manual tab.
Click the Auto tab or Manual tab to switch between tabs.
Auto Tab
You can correct or enhance the entire image in the Auto tab.
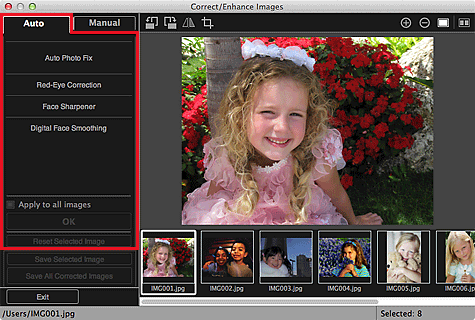
- Auto Photo Fix
-
Applies corrections suitable for photos automatically.
 Note
Note- You can automatically correct photos when printing. Refer to "Print Settings Dialog" for the setting procedure.
- Prioritize Exif info
-
Select this checkbox to apply corrections primarily based on the settings made at the time of shooting.
Deselect this checkbox to apply corrections based on the image analysis results. It is recommended that you normally select this setting.
 Note
Note- Exif is a standard format for embedding various shooting data in digital camera images (JPEG).
- You can automatically apply suitable corrections based on Exif information when printing. Refer to "Print Settings Dialog" for the setting procedure.
- Red-Eye Correction
-
Corrects red eyes.
 Note
Note- You can automatically correct red eyes when printing. Refer to "Print Settings Dialog" for the setting procedure.
- Face Sharpener
-
You can sharpen out-of-focus faces.
You can adjust the correction level using the slider.
- Digital Face Smoothing
-
Enhances skin beautifully by reducing blemishes and wrinkles.
You can adjust the enhancement level using the slider.
- Apply to all images
- Select this checkbox to correct or enhance all images in the Selected Images area automatically.
- OK
- Applies the specified correction/enhancement to the image(s).
- Reset Selected Image
- Restores the corrected, adjusted, or enhanced image to the original uncorrected, unenhanced, or unadjusted state.
Manual Tab
There are two menus on the Manual tab: Adjust and Correct/Enhance.
Use Adjust to adjust brightness and contrast, or to sharpen the entire image.
Use Correct/Enhance to correct/enhance specific areas.
- Adjust
-
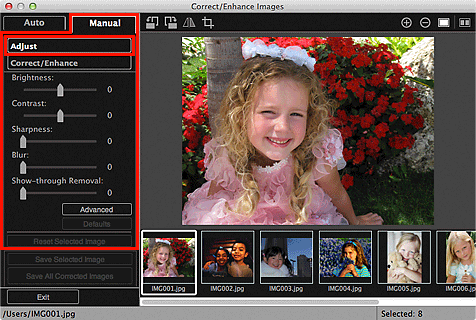
- Brightness
-
Adjusts the overall image brightness.
Move the slider to the left to darken and right to brighten the image.
- Contrast
-
Adjusts the contrast of the image. Adjust the contrast when the image is flat due to lack of contrast.
Move the slider to the left to decrease and right to increase the contrast of the image.
- Sharpness
-
Emphasizes the outline of the subjects to sharpen the image. Adjust the sharpness when the photo is out of focus or text is blurred.
Move the slider to the right to sharpen the image.
- Blur
-
Blurs the outline of the subjects to soften the image.
Move the slider to the right to soften the image.
- Show-through Removal
-
Removes show-through of text from the reverse side or removes the base color. Adjust the show-through level to prevent text on the reverse side of thin document or the base color of the document from appearing on the image.
Move the slider to the right to increase the show-through removal effect.
- Advanced
-
Displays the Advanced Adjustment dialog in which you can make fine adjustments to the image brightness and color tone.
For Brightness/Contrast and Tone, select a color in Channel to adjust either Red, Green, or Blue, or select Master to adjust three colors together.
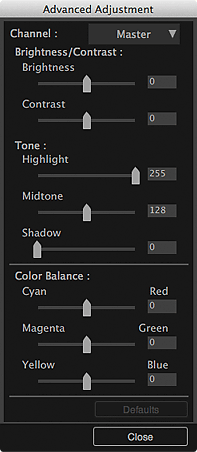
- Brightness/Contrast
-
Adjusts the brightness and contrast of the image.
Move the Brightness slider to the left to darken and right to brighten the image.
Move the Contrast slider to the left to decrease and right to increase the contrast of the image.
- Tone
-
Adjusts the brightness balance by specifying Highlight (the brightest level), Shadow (the darkest level), and Midtone (the color in the middle of Highlight and Shadow).
Move the Highlight slider to the left to brighten the image.
Move the Midtone slider to the left to brighten and right to darken the image.
Move the Shadow slider to the right to darken the image.
- Color Balance
-
Adjusts the vividness and color tone of the image.
Move the Color Balance slider to the left or right to emphasize the corresponding color.
- Defaults
- Resets all adjustments.
- Close
- Closes the Advanced Adjustment dialog.
 Note
Note- The Brightness and Contrast values set in Adjust do not change even if the brightness and color tone are adjusted in the Advanced Adjustment dialog.
- Defaults
- Resets each adjustment (brightness, contrast, sharpness, blur, and show-through removal).
- Reset Selected Image
- Restores the corrected, adjusted, or enhanced image to the original uncorrected, unenhanced, or unadjusted state.
- Correct/Enhance
-
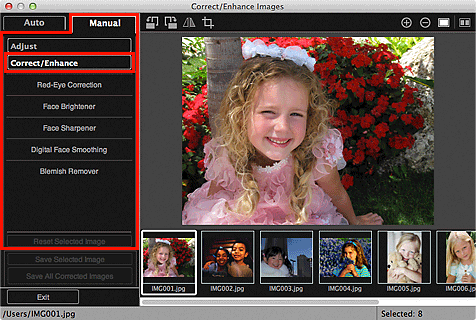
- Red-Eye Correction
-
Corrects red eyes in the selected area.
You can adjust the correction level using the slider.
- Face Brightener
-
Corrects the entire image to brighten the face area in and around the selected area.
You can adjust the correction level using the slider.
- Face Sharpener
-
Corrects the entire image to sharpen the face area in and around the selected area.
You can adjust the correction level using the slider.
- Digital Face Smoothing
-
Enhances skin beautifully by reducing blemishes and wrinkles in the selected area.
You can adjust the enhancement level using the slider.
- Blemish Remover
- Reduces moles in the selected area.
- OK
- Applies the selected correction/enhancement to the specified area.
- Undo
- Cancels the last applied correction/enhancement.
- Reset Selected Image
- Restores the corrected, adjusted, or enhanced image to the original uncorrected, unenhanced, or unadjusted state.
(2) Preview Operation Buttons
 Note
Note
- When the Correct/Enhance Images window is displayed from the Item edit screen,
 (Rotate Left 90°),
  (Rotate Right 90°),
  (Invert Horizontally), and
  (Crop) do not appear.

 (Rotate Left 90°)/(Rotate Right 90°)
- Rotates the image 90 degrees counter-clockwise or clockwise with each click.
 (Invert Horizontally)
- Inverts the image horizontally.
 (Crop)
- Displays the Crop window in which you can crop the image.

 (Enlarge)/(Reduce)
- Enlarges or reduces the preview with each click.
 (Whole Image View)
- Fits the preview to the area size.
 (Display Comparison Screen)
-
Displays the Compare Images window in which you can compare the images before and after the correction, enhancement, or adjustment.
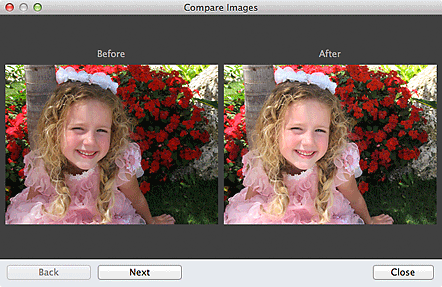
- Before
- The image before correction, enhancement, or adjustment appears.
- After
- The image after correction, enhancement, or adjustment appears.
- Back/Next
-
Switches to the previous/next image.
Not available when one image is selected.
- Close
- Closes the Compare Images window.
(3) Preview Area
Displays the preview of the image being corrected or enhanced.
The  (Correction/Enhancement) mark appears on corrected or enhanced images.
(4) Selected Images Area
Displays the thumbnails of the images when multiple images were selected upon displaying the Correct/Enhance Images window.
This area does not appear when one image was selected upon displaying the Correct/Enhance Images window.
The  (Correction/Enhancement) mark appears on corrected or enhanced images.
 Note
Note
- This area does not appear when multiple images were selected in the Item edit screen upon displaying the Correct/Enhance Images window; only the preview of the last selected image appears.
(5) Operation Buttons
- Save Selected Image
- Displays the Save dialog from which you can save the corrected, enhanced, or adjusted image displayed in the Preview area.
- Save All Corrected Images
- Displays the Save dialog from which you can save all corrected, enhanced, or adjusted images in the Selected Images area.
- Exit
- Closes the Correct/Enhance Images window.

