
Changing Media Names
Change the name of the paper displayed in the printer control panel and printer driver.
![]() Important
Important
-
You cannot add or edit media information if a printer is not connected.
Browse "Changing the Base Printer" and reselect the base printer to add and edit media information.
-
Do not attempt to print or turn the printer off while the program is communicating with the printer.
Do not add or edit media information on a printer from another computer while it is being added or edited.
-
We recommend backing up the media information in advance before editing media information.
For how to back up media information, see "Back Up Base Printer Media Information" in "Copying Media Information from the Base Printer to Another Printer".
![]() Note
Note
-
If you want to apply the same media information to another printer, make the other printer the base printer and edit or copy the media information.
-
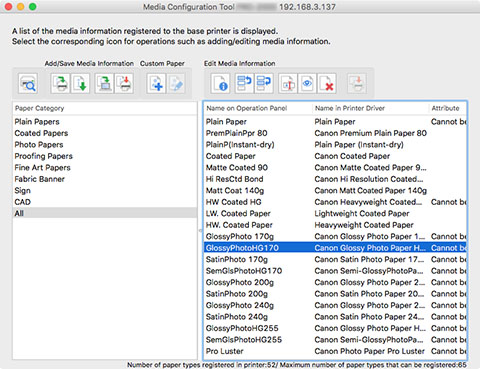
Select the paper whose name you want to change.
-
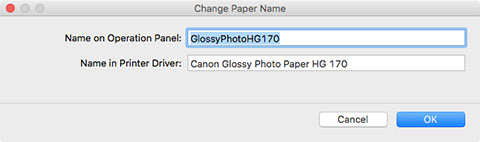
Click
 (Change Paper Name) in the Edit Media Information button group (or select Change Paper Name from the Edit Media Information menu).
The Change Paper Name dialog box appears.
-
Edit Name on Operation Panel and Name in Printer Driver, and the click the OK button.
 Note
Note-
The characters that can be entered for Name in Printer Driver and Name on Operation Panel are stated below.
alphanumeric, space, "-", ".", "_", "(", ")", "+", "%", ",", "/", ”[“, “]”
-
For Name on Operation Panel, up to 10 double-byte characters and up to 20 single-byte characters can be entered.
-
For Name in Printer Driver, up to 32 characters or 80 bytes may be entered.
-
If the selected media is custom paper, you can edit Paper Name (English).
For Paper Name (English) up to 20 single-byte characters can be entered.
-
If the text you have entered exceeds the character limit, "The entered text is too long." appears. Clicking OK displays the text with the excessive part cut.
-
You cannot rename the paper with the same name as the paper registered to the standard printer.
-
-
Click
 (Apply Edits) in the Edit Media Information button group (or select Apply Edits from the Edit Media Information menu).
 -
Click the Yes button.
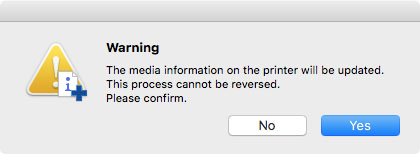
The media information is applied to the printer.
Next, apply the media information to the printer driver.
-
Click the Yes button.
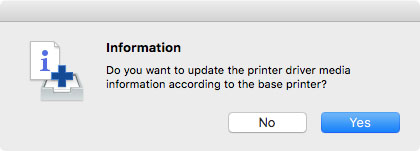
-
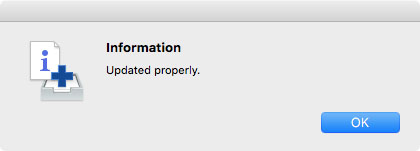
Click the OK button.
 Note
Note-
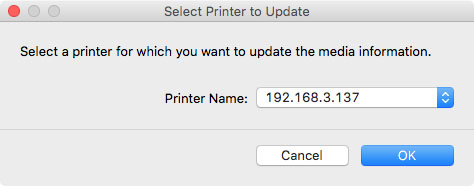
If the following dialog box appears, select the printer that you are updating the media information of, and then click the OK button.
The printer driver's Utility screen will appear.
-
-
Update the media information on the printer driver's Utility screen.
For details, search for and refer to the "Updating Media Information in Printer Driver" page from the home page of the Online Manual for your model.
