Printing a Disc Label Merging Handwritten Text with a Photo
You can use a disc label handwriting sheet printed from the printer to print a disc label (for a BD, DVD, CD, or other disc) that merges a photo with handwritten text or hand-drawn pictures.
Some functions may not be available in certain countries or regions.
- Description of Disc Label Handwriting Sheet
- Printing a Disc Label Merging Handwritten Text with a Photo
![]() Important
Important
-
You cannot print on 3.15 in. (8 cm) printable discs.
Description of Disc Label Handwriting Sheet
This section describes how to fill out a disc label handwriting sheet and fill in marks.
-
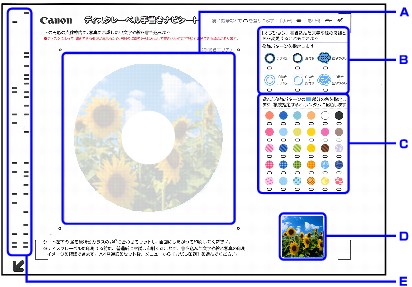
Filling Out a Disc Label Handwriting Sheet
-
A: In the circular area, write the text and draw the pictures you want to merge with a photo.
-
B: Select how to decorate the handwritten text and hand-drawn pictures.
-
C: Select a color or pattern for the handwritten text and hand-drawn pictures.
-
D: The photo before merging is printed here.
-
E: A barcode including information on the photo to print is printed here.
Keep this part clean. If it is dirty or wrinkled, the disc label handwriting sheet may not be able to be scanned correctly.
-
-
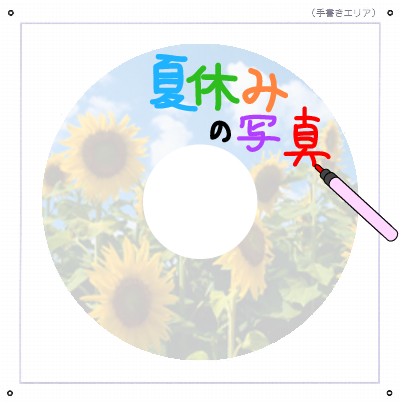
Writing Text and Drawing Pictures
In the circular area, write the text and draw the pictures you want to print.
 Note
Note-
If the
 marks in the four corners of the handwritten area are dirty or wrinkled, the disc label handwriting sheet may not be able to be scanned correctly. Keep the area around the marks clean.
 -
Use a dark writing implement to clearly write the text and draw the pictures. Light colors such as fluorescent colors may not be able to be scanned correctly.
-
If the handwritten text is in a similar color to the background photo, it may be difficult to read.
-
Text written and pictures drawn to match the photo of a disc label handwriting sheet that has been printed too lightly may be slightly shifted when merged.
-
The image printed on the disc label handwriting sheet may differ from the actual print results, depending on the print area settings.
-
If you write text or draw pictures near the circular border, it may be cut off when printed. It is recommended that you write text or draw pictures away from the circular border.
-
-
Filling Marks
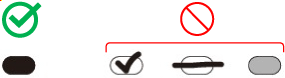
Fill in the marks using a writing implement such as a dark pencil.
 Note
Note-
If the marks are too light or not filled in enough, the disc label handwriting sheet may not be able to be scanned correctly.
-
-
Decorating the Handwritten Text and Hand-drawn Pictures
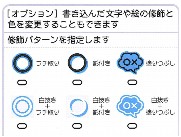
Fill in the mark for the decoration type to use.
For examples of decorating handwritten text and hand-drawn pictures, see Description of Handwriting Sheet.
Note-
If no decoration mark is filled in, printing will be performed without decoration. However, if a color or pattern mark is filled in, printing will be performed with Fill automatically set for the decoration type.
-
-
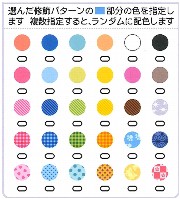
Setting a Color or Pattern
Fill in the mark for the color or pattern to use.
 Note
Note-
If a color or pattern mark is filled in without filling in a decoration mark, printing will be performed with Fill automatically set for the decoration type.
-
If the color or pattern is similar to the background photo, the handwritten text may be difficult to see.
-
If you select a pattern such as a check pattern, it is recommended that you specify Fill or Outline + Fill for the decoration type. Other decoration types may make it difficult to see the pattern.
-
If a decoration mark is filled in without filling in a color or pattern mark, printing will be performed with one color automatically set.
-
If you specify multiple colors or patterns, they will be randomly assigned to the handwritten text and hand-drawn pictures.
-
If the edges of handwritten text and hand-drawn pictures are connected and you specify multiple colors or patterns, the same color or pattern will be assigned to the entire range that is connected.
-
Printing a Disc Label Merging Handwritten Text with a Photo
This section describes the procedure for printing a disc label handwriting sheet, merging handwritten text with a photo, and printing a disc label.
![]() Important
Important
-
Do not mount the multi-purpose tray until the message prompting you to load the printable disc appears. Doing so can damage the printer.
-
Select
 Print on the HOME screen.
 -
Select
 Print from memory card.
The memory card print menus are displayed.
-
Select
 Disc label handwriting print.
 -
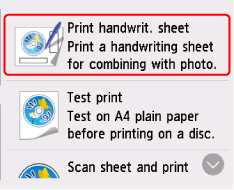
Select Print handwrit. sheet.
-
Insert memory card into card slot.
Note-
If no printable photo data is saved on the memory card, Saved data is not of a supported type. is displayed on the touch screen.
-
If more than 2,000 photos are saved on the memory card, only the 2,000 most recent photos can be printed.
If you want to print older photos (photos that were updated before the 2,000 most recent photos), reduce the number of photos on the memory card or transfer the photos that you want to print to another memory card.
-
-
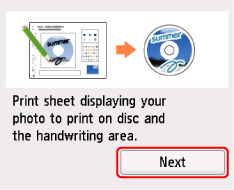
Confirm the displayed information, then select Next.
-
Select a photo you want to print.
Note-
Other Options
-
-
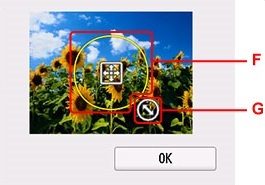
Trim the photo, specify the range to print, and select OK.
-
F: Drag to position the trimming frame.
-
G: Drag to set the trimming frame size.
-
-
Follow on-screen instructions to load A4 size plain paper in the paper drawer.
-
Tap Color.
The disc label handwriting sheet is printed.
 Important
-
If you add or delete photos on the memory card after printing the disc label handwriting sheet, the photo may not be printed correctly when the disc label handwriting sheet is scanned. After printing the disc label handwriting sheet, do not change the files on the memory card until the disc label handwriting sheet is scanned.
-
-
Fill in the marks on the disc label handwriting sheet and write the text and draw the pictures to merge with the photo.
-
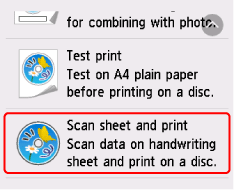
Select Scan sheet and print.
 Note
Note-
Making a Test Print
-
You can select Test print to make a test print on A4 size plain paper before printing on a printable disc. Follow the displayed instructions.
-
When making a test print, specify the dimensions of the inner circle and outer circle according to the actual printed surface of the printable disc.
-
The color and appearance of the test print may differ from the results of printing on a real printable disc.
-
When making a test print, return the output tray to the position for regular printing.
-
-
-
Check message and select OK.
-
Follow on-screen instructions to place the disc label handwriting sheet with the handwritten text on the platen glass, then select OK.
Place the side with the handwritten text face-down, align the
 mark on the top left corner of the disc label handwriting sheet with the alignment mark (
 ) on the platen, then close the document cover.
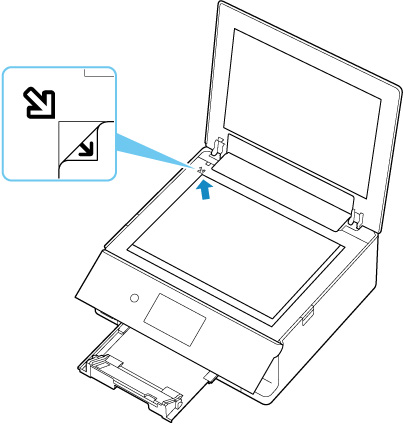
-
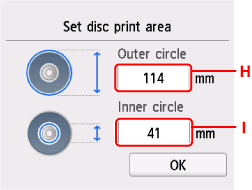
Specify print area and select OK.
-
H: Specify the outer circle.
-
I: Specify the inner circle.
Note-
Measure the outer and inner diameters of the printing surface of the printable disc and make sure you set a value smaller than the measured value for the outer diameter, and a value larger than the measured value for the inner diameter.
-
For information on printable discs, contact their manufacturers.
-
-
Specify the amount of ink.
If the print result is blurry, select Bleed-proof. Blurring may be reduced by printing with less ink.
-
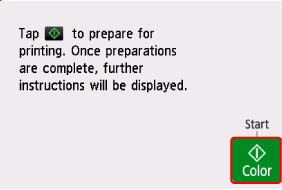
After checking message, tap Color.
-
Open operation panel until horizontal.
-
Follow on-screen instructions to set printable disc.
Note-
You can see the procedure to set the printable disc by selecting How to set.
-
-
Select OK.
The disc label handwriting sheet is scanned, and the photo is printed with the content of the handwritten area merged with the photo.
Do not move the disc label handwriting sheet until printing is complete.
When printing is complete, remove the disc label handwriting sheet from the platen glass.
![]() Important
Important
-
If Failed to scan disc label hand-writing sheet. is displayed on the touch screen, select OK and check the following.
-
Is the surface of the platen glass or the disc label handwriting sheet dirty?
-
Is the disc label handwriting sheet loaded in the correct position with the correct side facing down?
-
Is the area near the barcode on the disc label handwriting sheet dirty?
-
Are you using colored paper?
After performing the above check, print or scan the disc label handwriting sheet again. When printing the disc label handwriting sheet again, correctly load A4 size plain white paper.
-
-
Do not remove the memory card until printing of the photo is complete.
![]() Note
Note
-
Printing may take some time, depending on the size and shape of the handwritten text and hand-drawn pictures.
-
After printing, allow the printing surface of the disc to dry naturally. Do not use hairdryers or expose the disc to direct sunlight to dry the ink. Do not touch the printing surface until the ink has dried.
-
If printing is misaligned, adjust the printing position using Adjust disc print area in Print settings under Printer settings.
