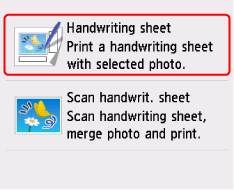
Printing a Photo Merged with Handwritten Text
You can use a handwriting sheet printed from the printer to print a photo merged with handwritten text or hand-drawn pictures.
Some functions may not be available in certain countries or regions.
Description of Handwriting Sheet
This section describes how to fill out a handwriting sheet and fill in marks.
-
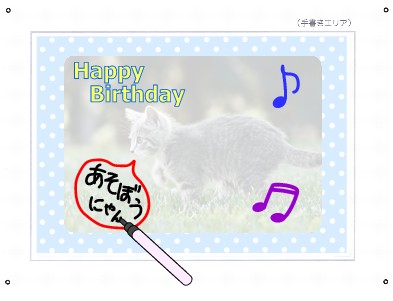
Filling Out a Handwriting Sheet
The handwritten area depends on the paper size.
In the example here, the L size paper is used.

-
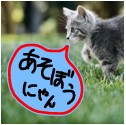
A: In the circular area, write the text and draw the pictures you want to merge with a photo.
-
B: Select how to decorate the handwritten text and hand-drawn pictures.
-
C: Select a color or pattern for the handwritten text and hand-drawn pictures.
-
D: Fill in this mark to print without automatic photo correction.
 Note
Note-
The mark for automatic photo correction is not included on a handwriting sheet for sticker paper.
-
-
E: Print the handwriting sheet again. Even if you filled in other marks, a handwriting sheet without any marks will be printed.
-
F: The photo before merging is printed here.
-
G: A barcode including information on the photo to print is printed here.
Keep this part clean. If it is dirty or wrinkled, the handwriting sheet may not be able to be scanned correctly.
Note-
An area for selecting the type of sticker paper is printed on a handwriting sheet for stickers.

Fill in one of the marks. If you do not, Failed to scan handwriting sheet. will be displayed.
-
-
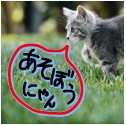
Writing Text and Drawing Pictures
In the handwritten area, write the text and draw the pictures you want to print.
 Note
Note-
If the
 marks in the four corners of the handwritten area are dirty or wrinkled, the handwriting sheet may not be able to be scanned correctly. Keep the area around the marks clean.
 -
When printing on sticker paper, handwritten text and hand-drawn pictures around the photo and near the border of the handwritten area may be cut off when the sticker is removed with the perforation.
-
Use a dark writing implement to clearly write the text and draw the pictures. Light colors such as fluorescent colors may not be able to be scanned correctly.
-
If you write text or draw pictures overlapping the template illustration printed on the handwritten area, the text decoration effects or borders may be printed incorrectly. Avoid writing text or drawing pictures overlapping the illustration.
-
If the handwritten text is in a similar color to the background photo, it may be difficult to read.
-
Text written and pictures drawn to match the photo of a handwriting sheet that has been printed too lightly may be slightly shifted when merged.
-
The photo may not be printed with the selected layout, depending on factors such as the camera used to take the photo and the orientation when the photo was taken. If that happens, select another layout and print a handwriting sheet.
-
If the edges of handwritten text and hand-drawn pictures are connected and you specify multiple colors or patterns, the same color or pattern will be assigned to the entire range that is connected.
-
-
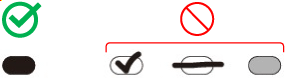
Filling Marks
Fill in the marks using a writing implement such as a dark pencil.
 Note
Note-
If the marks are too light or not filled in enough, the handwriting sheet may not be able to be scanned correctly.
-
-
Decorating the Handwritten Text and Hand-drawn Pictures
Fill in the mark for the decoration type to use.
Some examples of decorating the handwritten text and hand-drawn pictures are indicated below.
Border
Shadow
Fill

Outline + Border
Outline + Shadow
Outline + Fill


 Note
Note-
If no decoration mark is filled in, printing will be performed without decoration. However, if a color or pattern mark is filled in, printing will be performed with Fill automatically set for the decoration type.
-
-
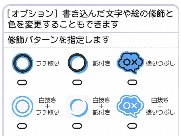
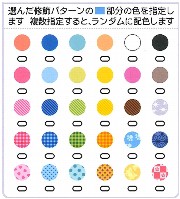
Setting a Color or Pattern
Fill in the mark for the color or pattern to use.
 Note
Note-
If a color or pattern mark is filled in without filling in a decoration mark, printing will be performed with Fill automatically set for the decoration type.
-
If the color or pattern is similar to the background photo, the handwritten text may be difficult to see.
-
If you select a pattern such as a check pattern, it is recommended that you specify Fill or Outline + Fill for the decoration type. Other decoration types may make it difficult to see the pattern.
-
If a decoration mark is filled in without filling in a color or pattern mark, printing will be performed with one color automatically set.
-
If you specify multiple colors or patterns, they will be randomly assigned to the handwritten text and hand-drawn pictures.
-
If the edges of handwritten text and hand-drawn pictures are connected and you specify multiple colors or patterns, the same color or pattern will be assigned to the entire range that is connected.
-
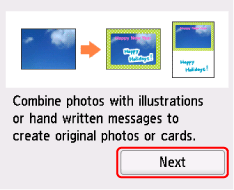
Printing a Photo Merged with Handwritten Text
This section describes the procedure for printing a handwriting sheet, merging handwritten text with a photo, and printing.
-
Select
 Print on the HOME screen.
 -
Select
 Print from memory card.
The memory card print menus are displayed.
-
Select
 Add handwriting.
 -
Select Handwriting sheet.
-
Insert memory card into card slot.
Note-
If no printable photo data is saved on the memory card, Saved data is not of a supported type. is displayed on the touch screen.
-
If more than 2,000 photos are saved on the memory card, only the 2,000 most recent photos can be printed.
If you want to print older photos (photos that were updated before the 2,000 most recent photos), reduce the number of photos on the memory card or transfer the photos that you want to print to another memory card.
-
-
Confirm the displayed information, then select Next.
-
Confirm the displayed information again, then select Next.

-
Select the layout to print.
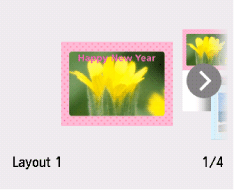
The layout depends on the size of the paper to print on.
- For postcard, KG, and L size paper:
-
Layout 1, Layout 2, Layout 3
- Stickers
-
Stickers
If you selected Stickers, proceed to step 12.
-
Select the paper size according to the paper to print on.
-
Select the paper type according to the paper to print on.
-
Select a photo you want to print.
Note-
Other Options
-
-
Select the frame.
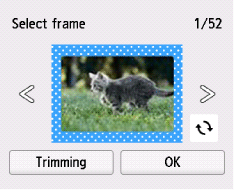
Flick left or right to select the frame.
You can also tap
 or
or  to select the frame.
If you select
 , you can select the orientation of the frame.
If the photo is upside-down, you can rotate the frame 180 degrees to align it with the orientation of the photo.
-
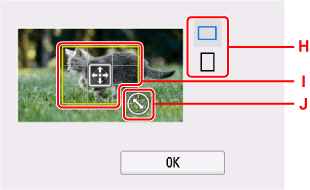
Select Trimming, trim the photo, then select OK.
The screen for specifying trimming range will appear.
-
H: Select to switch the aspect ratio of the trimming frame.
-
I: Drag to position the trimming frame.
-
J: Drag to set the trimming frame size.
Note-
You can cancel trimming even after determining the trimming range. To cancel trimming, select Cancel after the screen for specifying the trimming range reappears.
-
-
Select OK.
If you selected Stickers for the layout, proceed to step 17.
-
Select the template illustration and text to merge, then select OK.
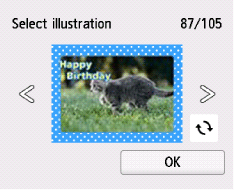
Flick left or right to select the template illustration and text.
You can also tap
or to select the template illustration and text.If you select
, you can select the orientation of the template illustration and text.If the photo is upside-down, you can rotate the template illustration and text 180 degrees to align them with the orientation of the photo.
-
Follow on-screen instructions to load A4 size plain paper in the paper drawer.
-
Tap Color.
The handwriting sheet is printed.
 Important
-
If you add or delete photos on the memory card after printing the handwriting sheet, the photo may not be printed correctly when the handwriting sheet is scanned. After printing the handwriting sheet, do not change the files on the memory card until the handwriting sheet is scanned.
-
-
Fill in the marks on the handwriting sheet and write the text and draw the pictures to merge with the photo.
-
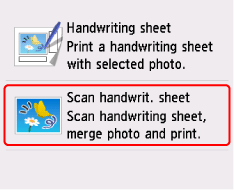
Select Scan handwrit. sheet.
-
Follow on-screen instructions to place the handwriting sheet with the handwritten text on the platen glass, then select OK.
Place the side with the handwritten text face-down, align the
 mark on the top left corner of the handwriting sheet with the alignment mark (
 ) on the platen, then close the document cover.
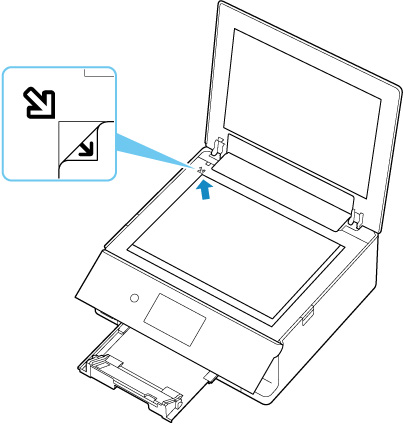
-
Follow on-screen instructions to load the paper to print on in the rear tray, then select OK.
Load the paper selected in steps 10 and 11 or sticker paper.
-
Specify the number of copies to print.
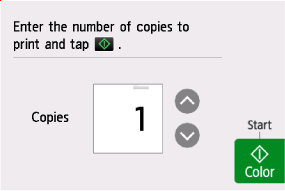
Tap
 or
or  to specify the number of copies.
Touch and hold to specify the number of copies by 10 copies.
You can also flick the number to specify.
-
Tap Color.
The handwriting sheet is scanned, and the photo is printed with the content of the handwritten area merged with the photo.
Do not move the handwriting sheet until printing is complete.
When printing is complete, remove the handwriting sheet from the platen glass.
![]() Important
Important
-
If Failed to scan handwriting sheet. is displayed on the touch screen, select OK and check the following.
-
Is the surface of the platen glass or the handwriting sheet dirty?
-
Is the handwriting sheet loaded in the correct position with the correct side facing down?
-
Is the area near the barcode on the handwriting sheet dirty?
-
Are you using colored paper?
After performing the above check, print or scan the handwriting sheet again. When printing the handwriting sheet again, correctly load A4 size plain white paper.
-
-
Do not remove the memory card until printing of the photo is complete.
![]() Note
Note
-
The image may be printed upside-down, depending on factors such as how the photo was taken and how the image was edited. If that happens, load the paper upside-down.
