
Example Basket Configurations
Various positions are possible for the basket that collects the printed materials.
In this section, we present the following five positions as examples of using the basket. Switch the position of the basket to suit to the media type and the print job.
-
Printing on Large-Format or Easily Damaged Paper (Position 3)
-
Moving Printed Materials to Next Work Area Immediately (Position 5)
For instructions on switching the basket position, see "Using the Basket."
![]() Important
Important
-
If replacing the roll paper or using the roll unit as a take-up device, you must store the basket. For instructions on storing the basket, see "Storing the Basket."
-
If the printed materials collected are damaged or folded, select Eject cut in Cutting mode or use the basket in a different position. (See "Specifying the Cutting Method for Rolls.")
![]() Note
Note
-
For details on the printer dimensions when using the basket, see "Specifications."
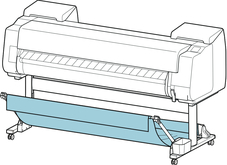
Using Without roll unit (Position 1)
You can use the basket in the following positions when not using the roll unit.
![]() Important
Important
-
The number of sheets that can be collected in the basket is one. If printing multiple pages, print after removing each sheet.
-
If using the roll unit as a feed device, we recommend using it as described in "Using With roll unit (Position 2)".
-
If using the roll unit and using the Position 1 basket, the printed materials may come in contact with the roll unit depending on the paper, resulting in damage.
-
If using the roll unit as a feed device and using the Position 1 basket, the ejected roll paper's cut end enters the roll unit and may cause a paper jam or affect the print quality when set to Borderless Printing or Trim edge first when loading the paper.
-
Roll paper up to 62 inches (1,575 mm) in length can be collected in the basket. If printing on longer roll paper, use as described in "Printing on Large-Format or Easily Damaged Paper (Position 3)" or use with the roll unit as the take-up device.
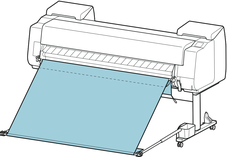
Using With roll unit (Position 2)
You can use the basket in the following positions when using the roll unit as a feed device.
This position is useful also when rewinding printed roll paper by hand.
Move the basket rod (cord side) to the upper of the two pairs of attachment locations on the front of the printer, and extend the basket arm as far as possible at the angle shown to achieve this position.
You can adjust the basket length so that it is easy to use.

![]() Important
Important
-
You can place up to approximately 4.41 lbs (2 kg) of printed materials in the basket. If the weight of the printed materials is greater than that, the basket may fall over.
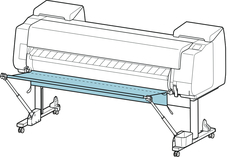
Printing on Large-Format or Easily Damaged Paper (Position 3)
If printing on large-format or easily damaged paper, you can use the basket in the following position.
Move the basket rod (cord side) to the upper of the two pairs of attachment locations on the front of the printer, extend the basket arm as far as possible, and lower it to the angle shown. Next, adjust the length so that the basket is pulled into this position.
![]() Important
Important
-
Always select Eject cut in Cutting mode when used in this position. If you select Automatic cut, the printed materials may be damaged. (See "Specifying the Cutting Method for Rolls.")
-
Be extra careful when using paper that tends to curl or is damaged easily in this position.
-
With some types of paper, the leading edge may curl or bend during ejection. In this case, straighten out the paper. Printed documents may be damaged if the paper is curled or bent.
-
Depending on the paper, the paper may be caught between the output guide and the basket when being ejected. In this case, fix the paper that is caught. If the paper is caught, printed documents may be damaged.
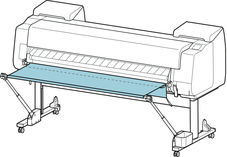
Stacking Printed Materials (Position 4)
You can use the basket in following positions when you want to stack printed materials.
Move the basket rod (cord side) to the lower of the two pairs of attachment locations on the front of the printer, extend the basket arm as far as possible in the angle shown. Next, adjust the length so that the basket is pulled into this position.
![]() Important
Important
-
In the following cases, use as described in "Using Without roll unit (Position 1)" or "Using With roll unit (Position 2)". If printing multiple pages in these positions, print after removing each sheet.
-
Printed materials other than A2 portrait
-
Paper curls an extreme amount due to paper characteristics and printing environment
-
If there is not much paper remaining on the roll, and the paper curls an extreme amount
-
Moving Printed Materials to Next Work Area Immediately (Position 5)
You can use the basket in the following position when moving the printed materials to the next work area immediately.
Move the basket rod (cord side) to the upper of the two pairs of attachment locations on the front of the printer, extend the basket arm as far as possible in the angle shown. Next, adjust the length so that the basket is pulled into this position.
![]() Important
Important
-
Be extra careful when using paper that tends to curl or is damaged easily in this position.
-
With some types of paper, the leading edge may curl or bend during ejection. In this case, straighten out the paper. Printed documents may be damaged if the paper is curled or bent.
-
Depending on the paper, the paper may be caught between the output guide and the basket when being ejected. In this case, fix the paper that is caught. If the paper is caught, printed documents may be damaged.
