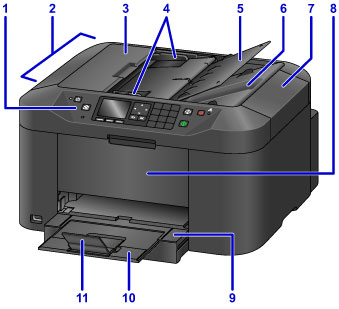
Front View

- (1) operation panel
-
Used to adjust settings or operate the machine.
- (2) ADF (Auto Document Feeder)
-
Load documents here. Documents loaded in the document tray are scanned automatically, one page at a time.
- (3) document feeder cover
- Open to clear jammed documents.
- (4) document guides
- Adjust to match the width of documents in the ADF.
- (5) document tray
- Open to load documents in the ADF. You can load multiple pages of the same size and thickness. Load documents face-up.
- (6) document output slot
- Ejects documents scanned in the ADF.
- (7) document cover
- Open to load originals on the platen glass.
- (8) front cover
- Open to replace ink tanks or clear internal paper jams.
- (9) paper output tray
- Pull out to support printed documents. The tray covers the cassette when extended. Normally, leave the tray out.
- (10) output tray extension
- Pull out to support ejected paper.
- (11) paper output support
- Open to support ejected paper.

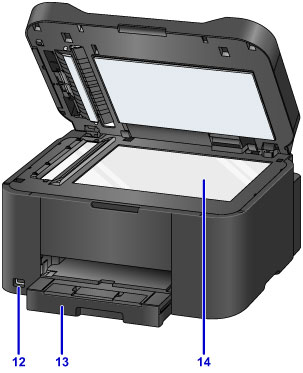
- (12) USB flash drive port
- Insert USB flash drives here.
-
 Warning
- Do not connect any equipment other than USB flash drives to the machine's USB flash drive port. This may cause fire, electric shock, or damage to the machine.
 Important
- Do not touch any exposed metal parts.
- Do not connect USB cables longer than 10 feet (3 meters), which may affect operation of other peripherals.
- (13) cassette
-
Load paper here. Load a stack of the same size and type of paper, which will be fed automatically one sheet at a time.
- (14) platen glass
- Load originals here.

