 Cannot Proceed beyond Scanner Connection Screen

If you cannot proceed beyond the Scanner Connection screen, check the following.
-
Check 1 Check that the supplied USB cable is securely connected to the scanner and computer.
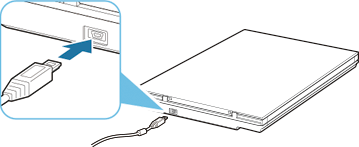
Connect the scanner and the computer with the USB cable as shown in the illustration below. The USB connector is on the rear side of the scanner.

 Important
- Use the supplied USB cable.
- Connect the Mini-B side to the scanner. For details, see Scanner Connection Method.
-
Check 2 Disconnect the USB cable from the scanner and the computer, and then connect it again.
 Important
-
In macOS, check that a lock icon is displayed at the bottom left of the Printers & Scanners screen.
If the lock icon is
 (locked), click it to unlock. (The administrator name and password are required to unlock.)
-
-
Check 3 If you cannot resolve the problem, follow the procedure below to start the installation over.
Windows:
- Click Cancel.
- In Setup Canceled screen, click Back to Top button.
- In Start Setup screen, click Exit button to exit setup.
- Disconnect USB cable.
- Make sure that you have no application running.
-
Perform setup from this web page.
 Note
Note- You can also perform the setup using the Setup CD-ROM.
macOS:
-
Click Next.
A screen informing that the setup is not complete appears.
-
Click No.
The Creation of Shortcut to Online Manual screen appears.
-
Select Create shortcut or Do not create shortcut checkbox, and then click Next.
The Installation completed successfully. screen appears.
- Click Exit to exit setup.
- Disconnect USB cable.
- Restart your computer.
- Make sure that you have no application running.
- Perform setup from this web page.

